In this guide, you’ll learn how to bulk sync WooCommerce stock with Google Sheets in real time, so your inventory stays accurate without manual work. We’ll show you how to sync stock from WordPress to Google Sheets and bidirectionally.
Keeping your WooCommerce stock updated can be a challenge, especially if you manage lots of products, work with a team, or sell across different platforms.
Whether you’re running a small store or a large warehouse, you may need to update stock faster and avoid overselling. You can make changes in Google Sheets, and your WooCommerce store updates automatically. It’s perfect for store owners, dropshippers, suppliers, and anyone who prefers managing stock in a spreadsheet.
You’ll save time, reduce mistakes, and keep your inventory under control, all without logging in to WordPress every time you need to change a product’s stock. Let’s see how it works.
Table of Contents
Tools to sync WooCommerce stock with Google Sheets
Besides WooCommerce, you need these two tools to sync WooCommerce stock with Google Sheets:
1- WP Sheet Editor – WooCommerce Products allows you to manage your WooCommerce products using a spreadsheet inside your WordPress dashboard. You can view and edit all product details like stock, prices, SKUs, descriptions, images, and variations. This tool makes it easy to update many products at once, saving you time and reducing errors.
You can download the plugin here: Download WooCommerce Products Spreadsheet Plugin - or - Check the features
2- Google Sheets Sync is a service that allows you to connect your WooCommerce store with Google Sheets. You can export and import product data between WordPress and Google Sheets. You can set up real-time or scheduled syncs, so any changes made in Google Sheets are automatically reflected in your store, and vice versa.
You can sign up to the service here:
Sign up to the Google Sheets Sync Service - or - Check the features
You need to follow the steps below in order to sync WooCommerce stock with Google Sheets.
Connect WordPress to Google Sheets
When you sign up to the Google Sheets Sync service, you’ll get a helper plugin that allows you to connect your WordPress site to your Google Sheets account, to the Google API, and to the WP Sheet Editor API.
Follow this guide to do it.
Option 1: Sync stock from Google Sheets to WooCommerce
Let’s see how to sync stock from Google Sheets to WooCommerce.
This means that you or your team will be able to edit WooCommerce product stock in Google Sheets, and the stock updates will be automatically imported to WooCommerce.
Go to WP Sheet Editor > Edit products to open the spreadsheet.

Open the Import tool.

Select these values to import stock from Google Sheets in real time:
- Tick the checkbox called Run this in the future.
- Select the date and time: You need to select when you want to import the data from Google Sheets and start monitoring changes made in Google Sheets to import them automatically into WooCommerce.
- Notify this email address when the process finishes: You need to add the email address where you want to get a notification when the import is complete and every time changes are imported into WooCommerce.
- Select the Run once option.
- Name: Add a descriptive name for this import.
- Source: Google Sheets
- Google Sheet file: Select the existing Google Sheet here.
- Note: Our service can only import fields that were created using our API. To proceed, you’ll need to first export your data into Google Sheets. You can either use an existing sheet or go to Google Sheets > Create new file to generate a new one that you can populate with your data.
- Tick the checkbox called Monitor and import changes made on Google Sheets.
- Synchronization delay: Select the time you want our service to wait before importing changes made on Google Sheets. The reason for this delay is to give you the time to finish making changes and avoid importing incorrect or incomplete changes.
- Optional: You can check the checkbox called Mark items in WordPress as out-of-stock when they are deleted in the external source.
- Click on Next.

You can import all the columns or select individual columns to import.

Now you need to decide how you want to import the data:
- Do you want to update or create items: Since we’re dealing with existing products only, we will update existing items and ignore new items.
- How do we find existing items to update: We will use the ID column as an identifier to find existing items to update.
- Click on Next.

Once you’re ready to import, click on The preview is fine, start import.

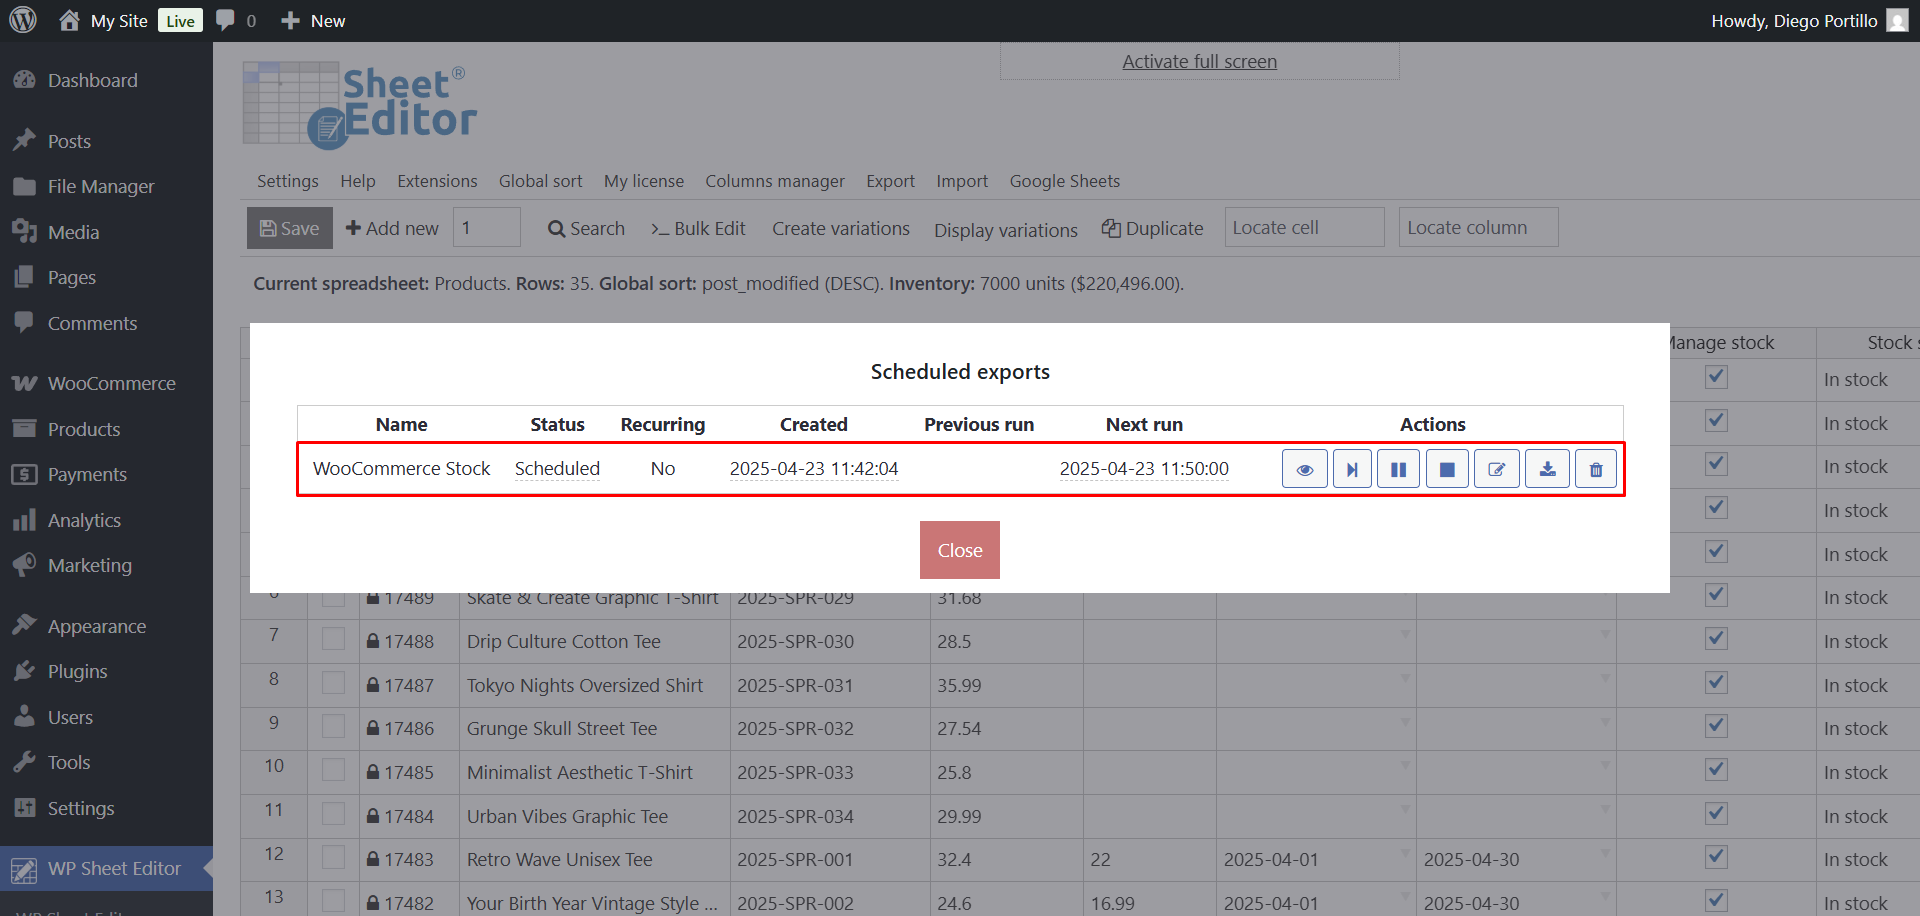
Once the import to monitor stock updates in Google Sheets has been scheduled, you can click on the View scheduled imports link.

As long as the import has not been executed, the import will appear with the status Scheduled.

But when the import has already been executed and starts monitoring changes for automatic import, the status will change to Waiting for Google Sheet changes to sync. This means that all changes you make to stock and products’ data will be automatically imported into WooCommerce.

Option 2: Sync stock from WooCommerce to Google Sheets
If what you want is that stock changes in WooCommerce are exported in real time to Google Sheets, you can schedule a real-time export. This is very useful if you have team members monitoring stock for various reasons. They won’t have to log into the WordPress dashboard to pull the stock data, since changes made on WordPress will be automatically exported to Google Sheets.
Here are some benefits of syncing WooCommerce stock to Google Sheets in real time:
- Inventory always updated: Ensure your Google Sheets reflect the latest stock levels from WooCommerce, helping prevent overselling or stockouts.
- Enhanced team collaboration: Allow team members, suppliers, or partners to access up-to-date stock information without needing direct access to your WooCommerce dashboard.
- Accurate data analysis: Utilize real-time stock data in Google Sheets to create custom reports, track inventory trends, and make informed decisions.
- Automated workflow: Eliminate manual exports or imports by automatically syncing WooCommerce stock data with Google Sheets, saving time and reducing errors.
Once you’re in the WooCommerce products spreadsheet and have connected your WordPress site to your Google Sheets account, you need to open the Export tool to schedule a real-time export.

Now select these values to export stock in real time:
- What columns do you want to export: In this example, we will only export these columns:
- Name
- In stock (which is Stock Status)
- Stock
- Which rows do you want to export: We will export all the rows.
- What app will you use to edit this file: Google Sheets
- Name of this export: Add a name for this export, which will also be the name of the Google Sheet.
- Tick the Run this in the future checkbox.
- Select the date and time: You need to select the date and time when this export should be executed.
- Notify this email address when the process finishes: Add an email address here.
- Select the Real time sync option.
- Type of sync: WordPress to Google Sheets
- What column should be used as an identifier: We will select the record_id (product ID) column.
- Click on Start new export to schedule the export.

If you go to Export > View scheduled exports, you’ll see the details of the export we have just created.

Once the export has been completed, you can open the Google Sheet by clicking on the export’s name.

Here you can see the stock details in Google Sheets.
Now, every time you edit stock details on WordPress, your Google Sheet will be automatically updated.

For example, if we change stock numbers in the products spreadsheet, it’s just a matter of some seconds to update stock in Google Sheets automatically.

As you can see below, the stock has automatically been updated in Google Sheets.

This is a great way to keep your stock always up to date in Google Sheets.
Option 3: Bidirectional stock sync between Google Sheets and WooCommerce
Now let’s see how to sync stock from Google Sheets to WooCommerce in real time. This means that all the stock changes you make in Google Sheets will be automatically imported into WooCommerce. At the same time, the changes you make in WooCommerce will be automatically exported to WooCommerce.
You need to start by opening the Export tool.

Now select these values to set up the bidirectional export:
- What columns do you want to export: In this example, we will only export these columns:
- Name
- In stock (which is Stock Status)
- Stock
- Which rows do you want to export: We will export all the rows.
- What app will you use to edit this file: Google Sheets
- Name of this export: Add a name for this export, which will also be the name of the Google Sheet.
- Tick the Run this in the future checkbox.
- Select the date and time: You need to select the date and time when this export should be executed.
- Notify this email address when the process finishes: Add an email address here.
- Select the Real time sync option.
- Type of sync: Bidirectional
- What column should be used as an identifier: We will select the record_id (product ID) column.
- Optional: You can tick this checkbox if you want: Mark items in WordPress as out-of-stock when they are deleted in the external source.
- Click on Start new export to schedule the export.

Now, when you go view the Scheduled exports panel, you’ll see the bidirectional export scheduled.
When the export is complete, the plugin will automatically create an import to monitor changes made in Google Sheets to import them into WooCommerce. You can check that in the Scheduled imports panel by going to Import > View scheduled imports.

This is the best way to synchronize WooCommerce stock between your WordPress site and your Google Sheets account. With WP Sheet Editor’s bulk editor plugin and Google Sheets sync service, you can manage your WooCommerce products seamlessly.