Getting started
How to Save Personal and Global Searches in WP Sheet Editor
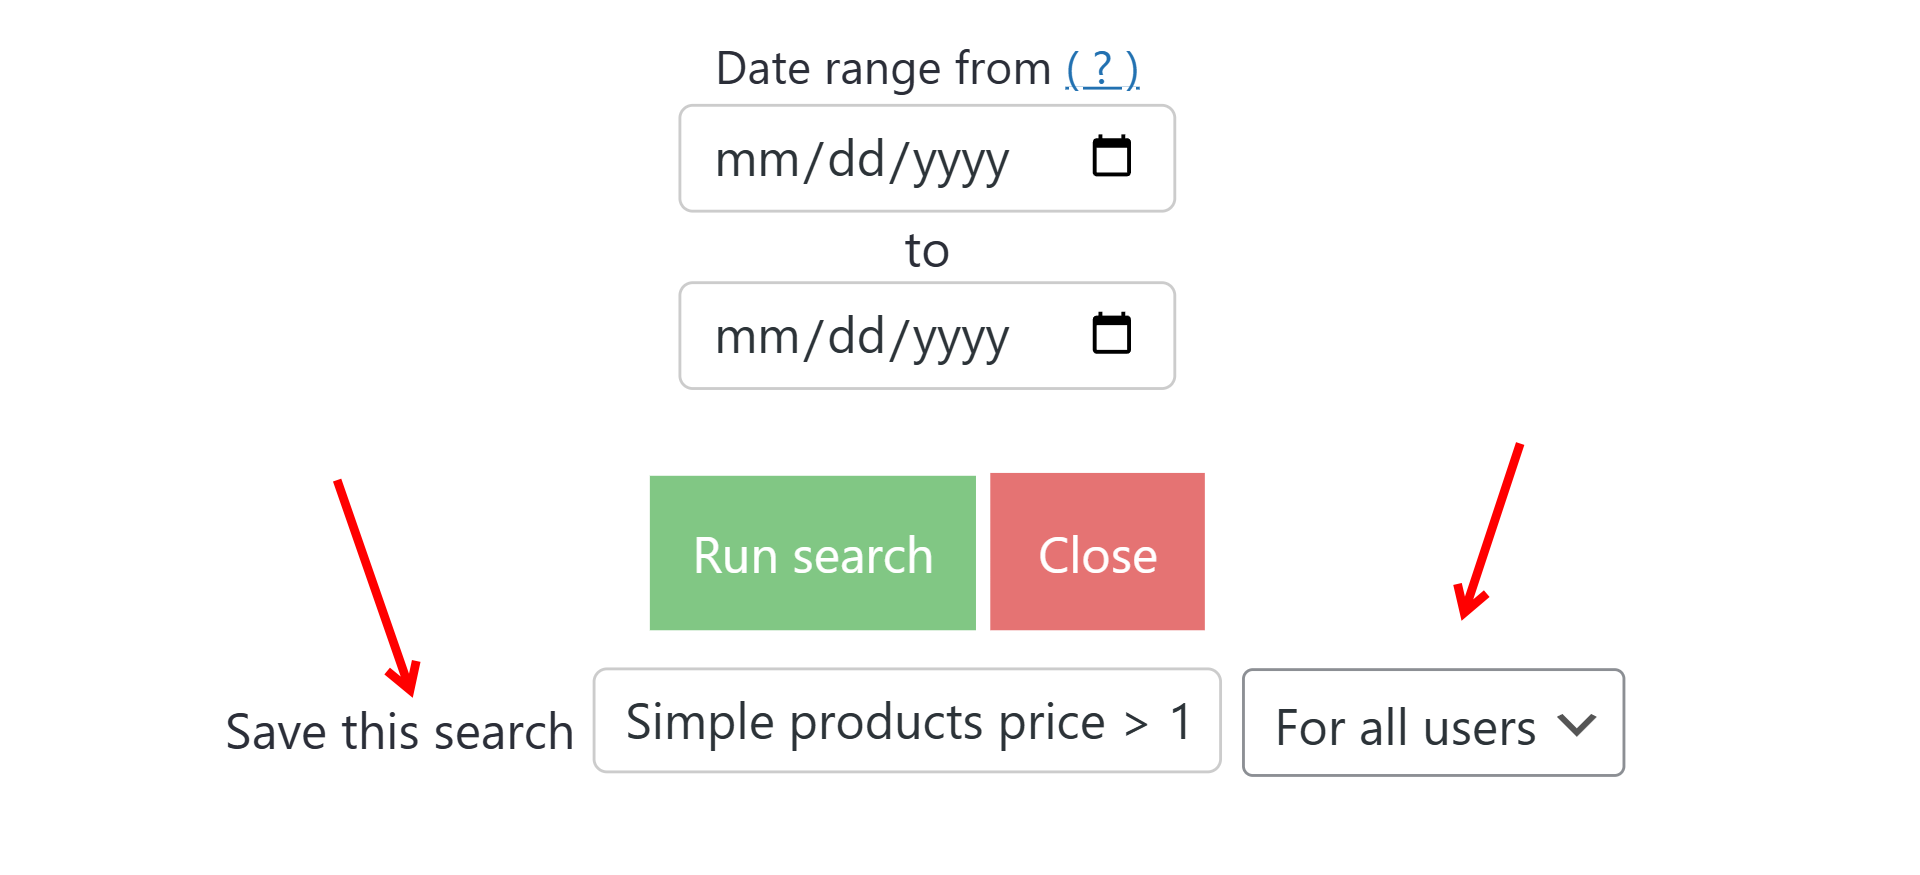
WP Sheet Editor now has a new feature that allows you to quickly reuse your favorite search filters in the spreadsheet.
- All users can save searches for themselves, making it easy to access their most-used filters.
- Administrators can save searches either for themselves or for all users on the site.
How to save a search
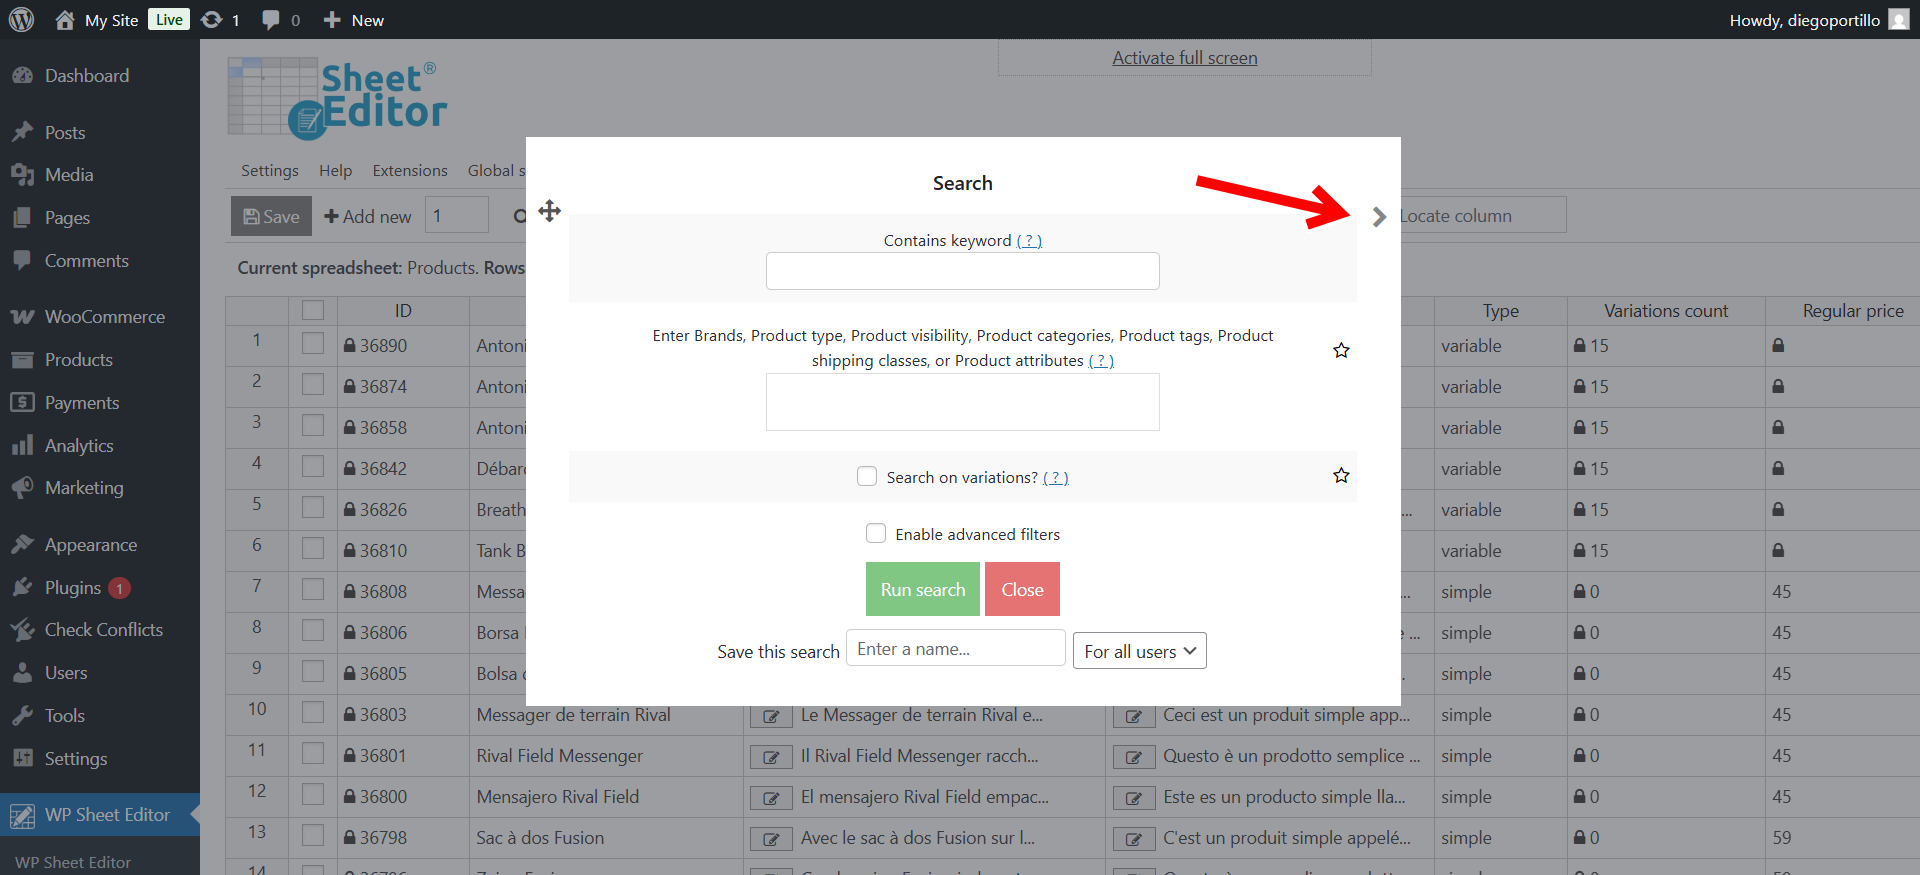
To save a search, simply enter a name in the “Save this search” field before clicking Run search.
If you’re an administrator, you can select if this search is For all users or Only for me.
The system will automatically store your search filters under that name and availability settings.
How to use saved searches
To quickly load a saved search, hover over the “Search” tool on the toolbar, and you’ll see a list of your saved searches. Just click on any saved search, and it will instantly run with the same filters you used before.
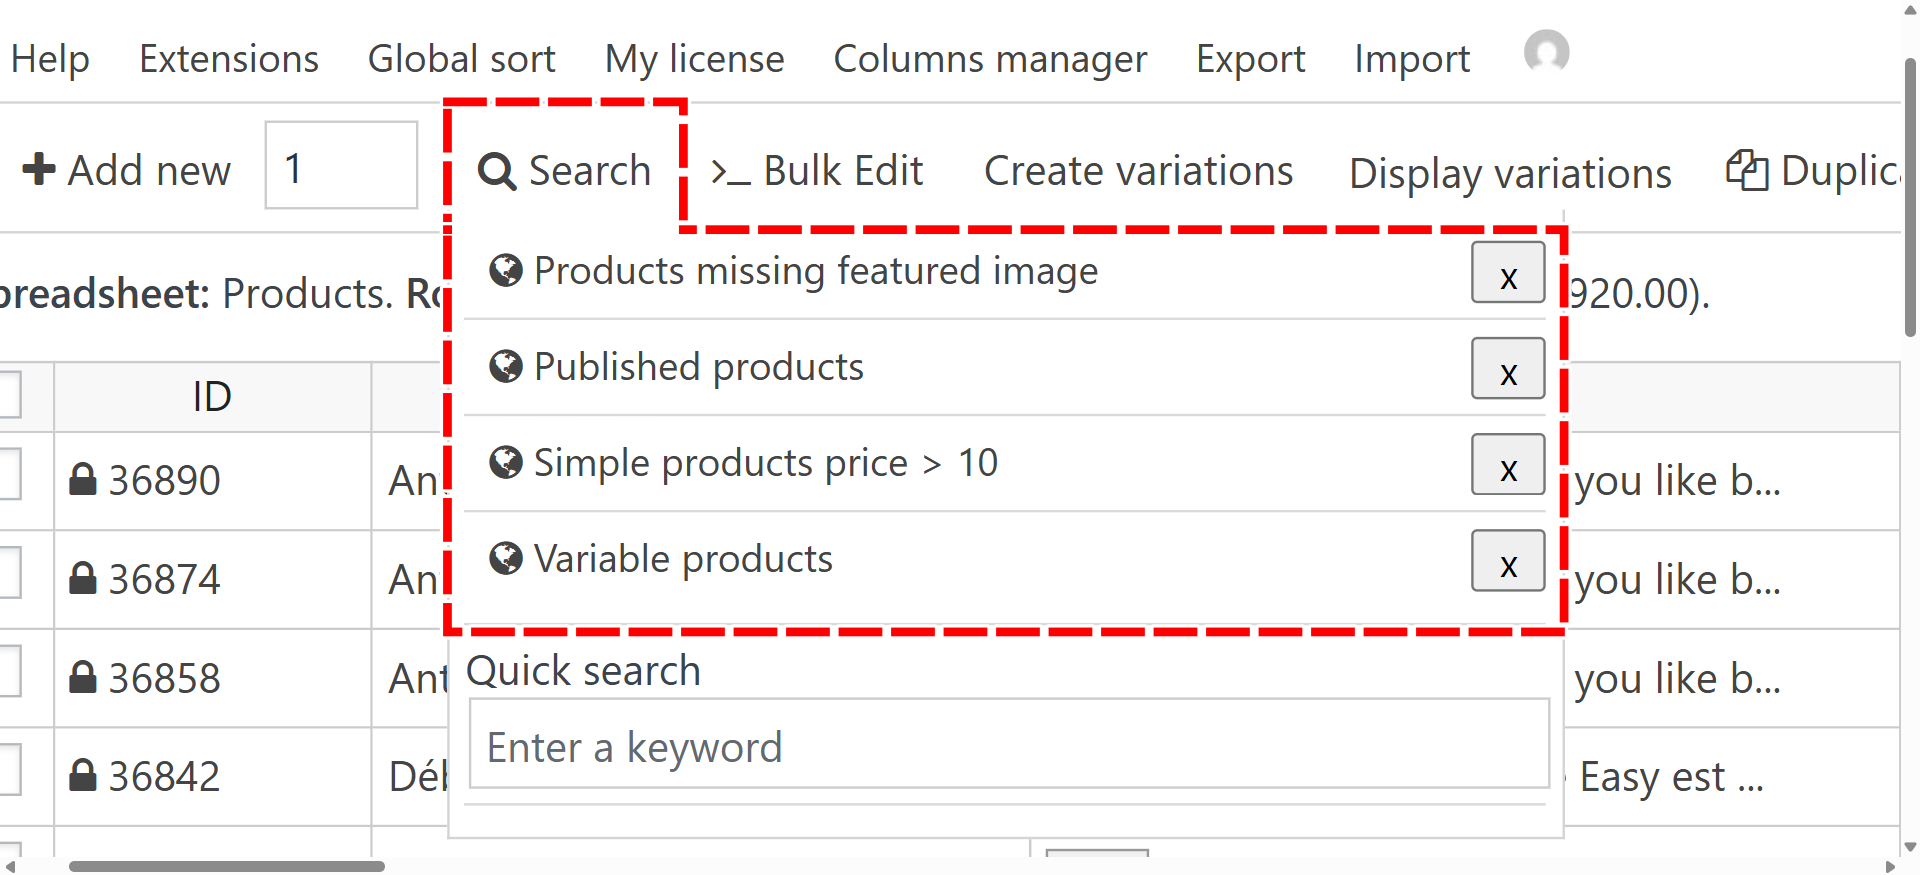
This feature is perfect for saving time and keeping your workflow organized, especially if you regularly use the same filters for managing products, cleaning data, or reviewing content.
How to Pin WP Sheet Editor Tools to the Right Side
We’ve added a small but fun new feature in WP Sheet Editor. You can now pin certain tools to the right side of the screen to use them while continuing to work on your spreadsheet.
This feature currently applies only to tools that don’t modify data, such as Search and Export. You’ll notice a new “Pin to side” option inside these tools.
How it works
- Open the Search or Export tool.
- Click the “Pin to side” button to move it to the right panel.
Now you can use the tools and still scroll or edit cells in the spreadsheet at the same time.

This feature adds a new layer of flexibility to your workflow, giving you the freedom to explore, search, and refine your data without breaking your focus. Whether you’re reviewing product info, exporting reports, or fine-tuning details, you’re always in control of your workspace.
Try pinning your favorite tools and experience a smoother, more dynamic way to work inside WP Sheet Editor.
Google Sheets Sync: Installation and Setup
In this guide, we will show you how to install and configure the helper plugin for WP Sheet Editor – Google Sheets service.

WP Sheet Editor – Google Sheets Sync is a service provided by wpsheeteditor.com, that allows you to export, import, and synchronize content between WordPress and Google Sheets.
You can schedule automatic exports to Google Sheets. These automatic exports can run once or in recurring intervals (every X minutes, hours, days, weeks or months). You can also add real-time sync between WordPress and Google Sheets.
Besides, you can automatically import WordPress content from Google Sheets. These automatic imports can run once or in recurring intervals. You can also import data and then monitor changes on the Google Sheet to automatically import the changes into WordPress.
When you sign up for the Google Sheets Sync service, you’ll get a helper plugin that will allow you to securely connect your WordPress sites with the WP Sheet Editor API and Google API.
You need to follow these steps to install and set up both the Automations add-on and the WP Sheet Editor – Google Sheets helper plugin:
1- Install and set up the WP Sheet Editor – Automations add-on
The WP Sheet Editor – Google Sheets helper plugin needs the WP Sheet Editor – Automations add-on, you received this plugin when you signed up to the Google Sheets Sync service.
You can read the installation and setup guide for the Automations add-on by clicking here.
2- Install the “WP Sheet Editor – Google Sheets” helper plugin
Follow these steps to install the WP Sheet Editor – Google Sheets helper plugin on your WordPress website:
- On your wp-admin dashboard, go to Plugins > Add New > Upload plugin.
- Upload the wp-sheet-editor-google-sheets-premium.zip file that you received after your purchase.
- Once installed, click on Activate.
3- Activate your WP Sheet Editor – Google Sheets service license
You need to enter your license and click on Activate License.

You’ll see a welcome page, which means you’re ready to connect your WordPress site to the WP Sheet Editor API and the Google API.
4- Connect to your Google Sheets account and the WP Sheet Editor API
For this you need to open any WP Sheet Editor spreadsheet.
You’ll see the Google Sheets button on the top toolbar.

Once you click the Google Sheets button, click on Connect with Google and WP Sheet Editor API.

Here are some important things on how we care about your privacy:
- WP Sheet Editor needs access to your Google Sheets account. This is in order to export data from your WordPress site to Google Sheets and/or import data from Google Sheets to WordPress.
- Your privacy is very important for us. Therefore, our app only requests permission to read/edit files created by our app. We won’t have permission to access other files in your Google account.
- We do not store any spreadsheet content on our server. Your spreadsheet contents are saved only in your WordPress site and Google Sheets.
Select the account you want to connect to WP Sheet Editor.

Now tick the following checkbox: See, edit, create, and delete only the specific Google Drive files you use with this app and click on Continue.

After that, you’ll have successfully connected this WordPress website to your Google account and the WP Sheet Editor API.
Since you can connect multiple WordPress websites to WP Sheet Editor and Google Sheets, the popup will show you options to manage the status of all your websites and the current website:
- Disconnect all sites. This will remove the access of WP Sheet Editor to your Google Sheets account, and it will disconnect all your websites from WP Sheet Editor.
- Disconnect current site. This will disconnect this website from WP Sheet Editor. If this is the only website connected to WP Sheet Editor, the access to Google Sheets will be revoked too. If you have more websites connected to WP Sheet Editor, the other websites will still be connected to WP Sheet Editor and to Google Sheets.

Now that you have set up the Google Sheets service on your WordPress website, you’re ready to start exporting and importing content between WordPress and Google Sheets. Just click on the “export” or “import” options in the WP Sheet Editor toolbar.
Automations: Installation and Setup
Automations is an add-on for the WP Sheet Editor plugins. This add-on allows you to automate bulk actions, bulk edits, individual edits, exports, and imports across the spreadsheet editors on WordPress. You can save a lot of time and increase your productivity by reducing your workload to a few scheduled tasks.

You need to follow the steps below to install and set up the WP Sheet Editor – Automations add-on:
1- Get what you need to use Automations in WordPress
Make sure you have this in order to use the Automations plugin:
- The WordPress content you will edit: The first thing you need to know is what content you want to manage with WP Sheet Editor. This includes any third-party plugins you use to create or manage content (e.g., WooCommerce, GiveWP, LearnDash, etc.).
- The WP Sheet Editor plugin: Once you have decided what kind of content you want to edit with our spreadsheets, you need the right WP Sheet Editor plugin to edit the content. WP Sheet Editor is a suite of plugins that allow you to edit any post type, taxonomy term or database in an intuitive spreadsheet within WordPress. These are our spreadsheets:
- Posts, Pages and Custom Post Types Spreadsheet: This plugin allows you to edit any WordPress post type such as courses, donations, recipes, real state, etc.).
- WooCommerce Products Spreadsheet
- WooCommerce Orders Spreadsheet
- WooCommerce Coupons Spreadsheet
- WooCommerce Customers Spreadsheet
- WordPress Users Spreadsheet
- Media Library Spreadsheet
- Comments and Reviews Spreadsheet
- Taxonomy Terms Spreadsheet
- Custom Database Tables Spreadsheet
- Easy Digital Downloads Spreadsheet
- The Events Calendar Spreadsheet
- GiveWP Spreadsheet
- The WP Sheet Editor – Automations add-on: This add-on works with any WP Sheet Editor spreadsheet, so you’ll be able to schedule automatic exports, imports and bulk edits for any post type and taxonomy, including custom fields added by other plugins like Advanced Custom Fields, PODS, Metabox, SEO plugins, etc.
2- Set up WordPress cron jobs
The Automations add-on uses the WordPress cron jobs system to run scheduled automatic exports, imports, bulk edits and cell changes saving.
Therefore, for Automations to work properly, you need to do two things:
a) Disable the default WP cron
WordPress has a system to schedule general tasks, called “WP Cron”. This is used by WordPress to schedule posts, etc.
By default, WordPress runs the WP cron when someone visits your website, which means that if your website doesn’t get any visitors in a few hours, the scheduled tasks will not run in those hours.
This is why you need to disable the default cron and configure a cron in your own server, which will run the scheduled tasks always at the scheduled time.
- Go to the folder of your WordPress website.
- Open the wp-config.php file to edit it.
- Paste the following line of code above the line that says, “That’s all, stop editing! Happy publishing.”. Important: Please check if your file already contains this line, you will get errors if you add the line twice.
define('DISABLE_WP_CRON', true);
- Once done, save the changes on the wp-config.php file.
b) Add a cron job on your web hosting control panel software
Note: If your hosting provider doesn’t allow or accept cron jobs or if you want to simplify this process, you can use this free service to create cron jobs. We recommend running the cron job every 1 minute.
IMPORTANT: The performance of your scheduled tasks will depend on the cron job interval that you configure. For example, let’s suppose you’re making an export that WP Sheet Editor will process in 12 batches. If your cron runs every minute, your export could finish in 12 minutes or less. But if your cron runs every hour, your export could take 12 hours instead of minutes, since every batch will run until the cron runs. If you want the best performance, your cron should run every 1-5 minutes. If you have a cheap server, you could use a cron interval of 10+ minutes.
There are a few commands that you can use for the cron job in your server. You can see some examples below, but keep in mind that those are examples and you need to edit them based on your server and website. It’s better if you ask your hosting provider to set up the cron job for you. Please only use one of the commands, don’t use multiple commands:
Command to run WP Sheet Editor tasks only
This command will run the WP Sheet Editor tasks only. We recommend a one or two minutes interval for the best speed. Replace /path/to/your/website with the real path of your site.
cd /path/to/your/website; wp action-scheduler run --hooks=vg_sheet_editor/scheduled/export-rows,vg_sheet_editor/scheduled/import-rows,vg_sheet_editor/scheduled/bulk-edit,vg_sheet_editor/scheduled/gs-sync,vg_sheet_editor/scheduled/rows
Important. If you have a multisite network, don’t forget to add the parameter –url=http://subsite.url so WP CLI runs the command on the specific subsite where our plugins are installed. Replace http://subsite.url with your real subsite URL.
Command with log file to know if the cron is running correctly
This is the same command as above, but this will create a log file to easily know if the cron is running correctly. You can use this for troubleshooting purposes, always use the command above when you finish troubleshooting because the log file can become very big:
cd /path/to/your/website; wp action-scheduler run --hooks=vg_sheet_editor/scheduled/export-rows,vg_sheet_editor/scheduled/import-rows,vg_sheet_editor/scheduled/bulk-edit,vg_sheet_editor/scheduled/gs-sync,vg_sheet_editor/scheduled/rows >> cronwpsheet.txt
Command to run all the scheduled tasks
This command will run all the scheduled tasks, including tasks scheduled by other plugins, without the log file:
cd /path/to/your/website; wp cron event run --due-now
Command to run all the scheduled tasks with log file to know if the cron is running correctly
This command will run all the scheduled tasks, including tasks scheduled by other plugins, with the log file:
cd /path/to/your/website; wp cron event run --due-now >> cronwpsheet.txt
Command to run all the scheduled tasks, replacing with your site’s URL
This command will run all the scheduled tasks, including tasks scheduled by other plugins. Replace https://example.com with your site’s URL:
wget -q -O - https://example.com/wp-cron.php?doing_wp_cron
IMPORTANT: You need to contact your hosting provider to know how to properly create cron jobs, because every server panel is different.
We have compiled a list of tutorials from the documentation of several popular hosting services. However, we recommend that you contact your hosting provider if 1) you do not find your service on this list or 2) if you need further assistance to do what your hosting provider’s documentation indicates.
If you use cPanel, follow these steps to create a new cron job:
- In cPanel, go to Cron Jobs.
- Add the necessary values to create a new cron job.
- Click on Add New Cron Job.
- Note. You still need to contact your hosting provider or check their documentation to know the values for the Command field.

IMPORTANT: If you experience issues when running the scheduled tasks, you can install this free plugin created by the WooCommerce team, which will increase the number of tasks processed per cron call and it will help to clear the queues faster.
3- Install and activate the Automations extension
Now you’re ready to install and activate the WP Sheet Editor – Automations extension.
Note. This section assumes you have already installed and activated any of the WP Sheet Editor spreadsheets.
First, you need to install the Automations extension:
- On your wp-admin dashboard, go to Plugins > Add New > Upload plugin.
- Upload the wp-sheet-editor-automations-premium.zip file that you received after your purchase.
- Once installed, click on Activate.
Second, you need to enter your license and click on Activate License.

After activating your license, you’ll see a welcome page showing you some of the cool things you’ll be able to do with the Automations plugin:
- Save the modified cells in the spreadsheet at a later date or in a recurring schedule
- Run bulk edits/actions on any data set later or recurringly
- Automatically run any export at a later date or recurringly
- Automatically import data at a later date or recurringly
- And more

Now that you have installed and configured the Automations add-on for WP Sheet Editor, you can start scheduling exports, imports, bulk edits, and changes made to cells.
How to set up the plugin
You can read this tutorial to learn how to set up the plugin: How to Set Up the Spreadsheet
How can I install the plugin?
- When you purchased the plugin, you received an email with the download link and license key
- If you were using the free version of the plugin before, you need to uninstall the free version now
- Now go to your WordPress site (wp-admin) and open the plugins > add new page, and click on Upload
- Upload the premium zip
- Activate
- You will see a screen asking for a license, enter your license key
- Done. Now you should see the welcome page where you can set up the plugin and start using it
Billing
How do the annual renewals work?
When you purchase an annual license, we show these terms in our checkout popup before the purchase is processed:
- The annual license is a subscription that renews automatically by default
- You can cancel the subscription any time before the renewal date. You can cancel it immediately after the purchase, a month later, or just before the renewal date. You have full control to cancel anytime.
- We send you an email reminder 30 days before the renewal date, so you have plenty of time to decide if you want to cancel the renewal or let it renew.
What options do you have to manage your subscription?
- When you complete the purchase, you receive an email with your license key, download link, invoice, etc. This email also mentions the details of your subscription, like the renewal date, etc.
- You can use the user account panel to manage your subscription, license, etc. You can cancel the subscription anytime through that panel.
- We provide live chat support and email support, so you can contact us anytime and request the cancellation of your subscription or verify the status of your subscription.
- When you deactivate our plugin in your WordPress site, we automatically show a popup asking if you want to cancel the subscription too. This helps you cancel the subscription right when you stop using our plugin to make it easier for you.
- We send you the email reminder 30 days before the renewal date. If you want to cancel, you can reply to that email as well and we can cancel the renewal for you.
- We send you an email when the renewal takes place, so if you forgot to cancel, you can reply to that email and request a refund in the first 14 days after the renewal.
We want you to be in control, that’s why we provide all those ways for you to manage your license, and be aware of your subscription; so you are in control in every step of the process, and you are completely protected by our refund policy in case you forget to cancel the renewal.
Also, feel free to use our support channels if you need any help.
I purchased the plugin with PayPal but my license expired 24 hours later
Sometimes PayPal makes a mistake and the payment doesn’t go through.
So our system will cancel the license in 24 hours if the payment is not received.
In this case, you have to buy the plugin again with a credit card.
Why does this happen? it can happen if your PayPal account is associated to a card without funds, or if the bank of the card associated to PayPal rejects the transaction.
I purchased multiple individual plugins. Can I upgrade to the All Plugins plan / full package?
Yes. You can upgrade.
a) If the previous plugins were purchased in the last 30 days, you can buy the full package and we will refund the previous purchases
b) If the previous plugins are old purchases, we can’t refund old purchases but you can contact us and we will arrange a discount.
I purchased the All Plugins plan / full package. Can I get a refund of my individual purchase?
Yes. We can refund your individual purchase if they were made in the last 30 days. You can request the refund here.
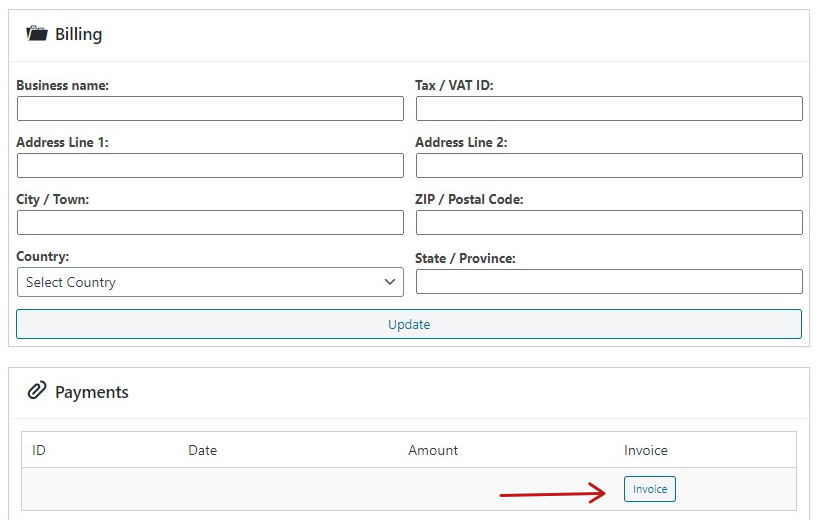
How do I download or edit my invoice?
How to get an invoice for WP Sheet Editor
Step 1
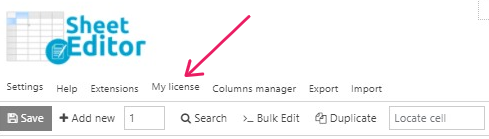
Go to the spreadsheet, and click on “my license” in the top toolbar. This option appears for administrators only.
 Step 2
Scroll down to the bottom and you will see a form where you can enter and edit your details, once updated, click on the “invoice” button to download the updated invoice.
License
Why is my user account panel not showing my license or subscription?
We use a third-party platform named Freemius as our payment processor and licensing provider. Freemius provides a user account panel where you can manage your license, payments, subscriptions, and more.
You can access the user account panel for our store by clicking on the link “Account” in our top menu.
However, there are hundreds or thousands of companies using Freemius and they have their own user panels for their stores. So if you log in to a user account panel and you don’t see information related to our plugins, it’s very likely that:
a) You are in the wrong user account panel. Maybe you are seeing your account for a different store unrelated to our plugins.
b) Maybe you logged in with the wrong Freemius account. You might have multiple accounts if you have purchased our plugins with different email addresses or if you have purchased plugins from other businesses with different email addresses.
In any case, feel free to contact us using our live chat or contact form, and we’ll be happy to verify your account and help you perform any action, like cancelling renewals, help you manage your license, and more.
I’m trying to install updates for my premium plugin but it fails
The update fails when your paid license is not activated in the site.
Go to wp-admin > plugins, find our premium plugin in the list, and use the “activate license” option
What is the difference between the spreadsheet plugin vs the All Plugins Pass?
The spreadsheet plugin is one standalone plugin. For example, the products spreadsheet let’s you edit WooCommerce products only.
The All Plugins plan includes all our plugins (+12) to edit Posts, Pages, Products, Coupons, User profiles, Taxonomies, Media library files, etc.
How can i enter the license key after activating the plugin?
There are 2 ways to activate the license key.
1- When you activate the plugin, it automatically shows the license activation screen. Just enter the license and you can start using the plugin.
2- If you don’t see the license activation screen automatically or you want to activate the license later, you can go to wp-admin > plugins, locate the plugin in the list, and you will see the option “Activate license” or “change license”.
IMPORTANT. If you were using the free version of the plugin before, you should uninstall the free plugin.
Can I activate your plugin on a staging site and then move it to a production site?
Yes, you can activate the plugin on the staging site first, then deactivate it, and activate again on the production site. You can do this process as many times as you need.
Here’s a quick tutorial on how to deactivate your license:
1- Go to the plugin and find the “my license” button at the top and click on it.
2- You will see a page where you can see your license details, at the top there’s a button to deactivate your license.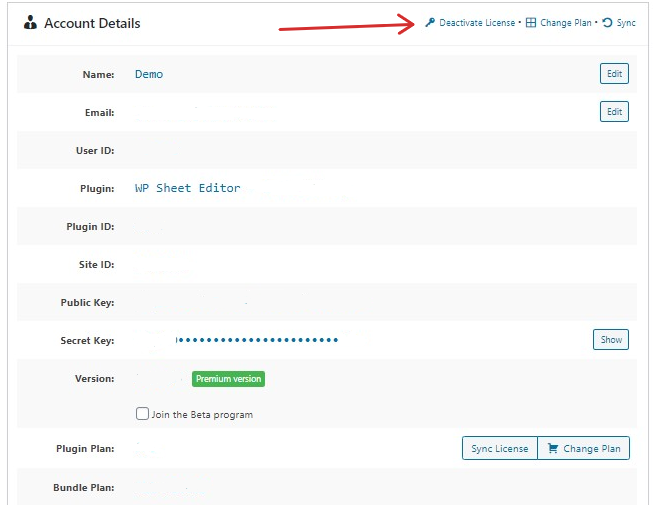
After doing this, you can activate on the new site.
Will your plugin work on a local host / environment?
Yes, WP Sheet Editor works perfectly on a local host/environment and it will behave like in a live site.
Note: Our premium plugin will require license activation.
If I have the bundle, can I use some spreadsheets in one site and other spreadsheets on another site with the same license?
Yes, when you purchased the All Plugins plan, you received one license key that you can use with all our plugins. Each plugin shares the same license, but the license is handled separately for each plugin.
For example, if you purchase the All Plugins plan for 1 site, and you have Site A and Site B, you could activate WP Sheet Editor for Post and Pages on Site A and WP Sheet Editor for Users on Site B.
Common errors
How to install the latest fixes and improvements? Common way to fix MOST errors
We are working on the spreadsheet editor every day. We add new features, fix bugs, and general improvements.
There is a good chance that ANY error is already fixed in our dev version. You can follow these steps to install the dev version:
- Go to the spreadsheet
- Open “my license” in the top toolbar
- Join the beta program and accept the warning (it’s safe)
- Reload the page, and you will see the option to install an update
- Install the new version
The spreadsheet is showing a column/field that I’m not using
The spreadsheet creates columns for all the fields found in the database.
So it’s normal that it found the old fields and displayed columns.
If you don’t want to use the field, you can delete it completely from the spreadsheet AND the database. Just right-click on the column and select “delete field” in the contextual menu.
Or you can disable the column (but not delete the database field), by going to the columns manager and deactivate the column.
I have multiple columns with same title and I don’t know which one to edit
We detect all the fields in the database and generate the column names from the key. If you have 2 fields from 2 plugins: _price and __price. We might show both fields as “Price” and “Price 2”.
In that case, the solution is:
1- Edit the row in the normal editor outside the spreadsheet. For example, edit the product in the normal editor and set a value in the price field that you want to edit.
2- In the spreadsheet, you will see which column has the right price that you just edited, and you can use that column and hide the other column
3- Optionally, if you want to use both columns, you can right-click on the column and rename it to any name you want.
Note. The export and import tools use the column name as identifier. So if you have duplicate names, it might use the wrong column during the export/import. So you should make sure they have unique names.
I imported a file and the accents and some characters are missing or look weird
It’s an encoding issue on Excel’s end.
We export the file in UTF-8 which works with all the characters across all languages.
You need to edit the file in Excel or Google Sheets and save it as UTF-8. If you save in Excel using a different encoding, the special characters might be lost in the file.
So this issue is not in our plugin, it’s an issue on the software you used to edit the file outside WordPress. It’s outside our control.
Make sure you change Excel’s settings to edit files as utf-8 or edit using Google Sheets.
I’m trying to import a CSV file but it reads everything as one column
CSV files are like spreadsheets, they are made of columns and rows.
Our plugin detects the columns separator automatically when the file uses any of these separators: , ; | (tab).
But sometimes our plugin is not able to detect the separator for several reasons (maybe your file uses a different character as separator or the columns contain , as part of the name, which breaks our detection).
In that case, the solution is the following:
- Open the file in the notepad
- Read the first line and see which character is used for separating the column names
- Open our importer tool, activate the “advanced options”, and enter the separator character in the “separator” option
I’m experiencing a bug or error and I can’t find the solution
There are multiple ways we can help:
a) You can try installing the dev version of the plugin, which contains the latest fixes.
- Go to the spreadsheet page
- In the top toolbar, open “My license”
- Activate the option “join beta program” and accept the warning
- Reload the page
- Install the new version
If you are using multiple plugins from us, you have to follow this process for every spreadsheet because one spreadsheet core can override the other.
b) You can contact us in the live chat or open a ticket and we’ll help you fix it
WooCommerce is duplicating my variations after every import
Variations must have unique SKU, otherwise WooCommerce can’t find the existing variation to update, and it duplicates them on future imports.
I imported product variations but the variation attribute is empty or appears as “any”
If the attributes of a variation are not imported (i.e. one attribute appears as “any”), maybe they were global attributes and the names from your CSV don’t match with the existing global attribute options.
For example, your CSV might contain a color “dark blue” and the existing attributes on WordPress might be “Dark blue”.
You have 2 options:
- Make sure you import using the exact same attribute name
- Or import using the attribute slug in the variation row instead of attribute name
I get “server not available” errors while saving
If you are getting network errors (messages like “server not available”) when you are saving changes or executing bulk edits, it means your server is overloaded.
Possible solutions:
1- You need to increase the PHP memory
Sometimes, your server has very limited memory (less than 256 MB).
So when you try to load hundreds of rows or save a lot of changes at once, the memory can be exhausted and you will get errors.
The solution is simple. Increase the PHP memory by editing the wp-config.php of your website. You can follow this tutorial.
We recommend 256mb or higher. If you have a big website with a lot of rows, you can set 1026mb. Any number works.
2- You need to save fewer posts per batch and increase the time between batches.
The spreadsheet saves the posts in batches, for example, 4 posts every 8 seconds. But if you are using a cheap server, this can overload the server.
So you can reduce the number to 2 posts every 10 seconds. You need to adjust the number of posts per batch and the time until it works.
Go to the spreadsheet > settings > advanced settings. And reduce the number in the option “Save changes faster”.
3- Maybe your login session expired
Maybe you were saving and logged out and logged in again in another tab. This would invalidate the security tokens, and you won’t be able to continue saving. This rarely happens, though.
In that case. The solution is to open the spreadsheet in another tab and copy paste the changes between the old sheet and the new sheet, and save in the new sheet where you have the new login session. You can copy paste a lot of cells at once.
4- Try to save smaller batches manually
For example, edit 5 posts and save, then edit other posts and save. Don’t wait until you make too many changes to save because it will take longer.
5- Disable the post actions while saving
WP triggers the save_post hook every time a post is updated in any context. Sometimes, other plugins make mistakes and execute their code everywhere the save_post hook is triggered.
Their mistake may break our saving because they think we are in the normal editor, and we don’t pass their security checks as we’re not in the normal editor.
You can go to the spreadsheet > settings > advanced settings > solution to weird error > activate the option “disable post actions while saving”.
6- WordPress has a heartbeat API, which pings the server every few seconds to check log in status. This overloads the server.
For example, you open the spreadsheet editor and use it for one hour, heartbeat has made about 100 requests to the server in that hour so when you start saving the server is already busy.
You can disable the heartbeat in our advanced settings (in the spreadsheet page > settings (top toolbar) > advanced settings > advanced).
Note. This might cause issues because WP will not notify you when your login session expires. So use this option only under extreme cases when you have a cheap server and you think this might help.
I purchased the plugin but I’m still on the free version and the features are locked
You might have upgraded recently but for some reason the plugin is still asking you to upgrade or some columns and features are locked. Do not worry, there are two reasons why this may be happening:
You have the free version still installed
To uninstall the free version, go to your WP Dashboard > Plugins > All Plugins > Look for our plugin > If the plugin doesn’t have the word “PRO” or “PREMIUM” in it’s name, it means that is the free version and you need to uninstall it. If you haven’t installed the PRO version, you received the download link via email after the purchase and you must install it.
The license is not active
Go to your WP Dashboard > Plugins > All Plugins > Look for our premium plugin > it should show an “activate license” button, you need to enter the license you received via email.
A column is missing – How do I add a missing column?
Here are some possible solutions to make a missing column appear:
1- Automatic detection: make sure at least one post is using the field
Go to the normal editor and edit one item, and fill all the fields.
After that, go to our spreadsheet > settings > scan db.
Our spreadsheet will find it automatically and create the columns. You might want to run this scan 3-5 times as our spreadsheet searches for the missing fields in batches.
2- Maybe the column was deleted
Go to the spreadsheet > columns manager (top toolbar), and at the bottom of the popup, you’ll see the option to restore deleted columns.
3- Maybe the column is deactivated
Go to the spreadsheet > columns manager (top toolbar), and check the list of deactivated columns. If you find the column there, you can move to the left side to activate it.
4- Maybe the column is available but you can’t find it because it has a different name.
- The solution is to enable all the columns in the columns manager
- Edit one item in the normal editor and set a very unique value like “99999999”
- Open our spreadsheet
- Use the cell locator in the toolbar to find any cell containing the value “99999999” (do not confuse the cell locator with the columns locator)
- After this, you will find the column with the value and you can right-click on the column > rename, to set a friendly name
5- Maybe you reached the columns limit
By default, we limit the spreadsheet to 300 columns for performance reasons. Some websites have thousands of fields and the spreadsheet would be slow if we display thousands of columns.
In this case, you can go to the spreadsheet > settings > scan DB. You can use the option multiple times.
Every time you scan the database to find more columns, it will scan 300 additional fields. So 5 uses mean 1500 new fields.
Another way to increase the limit is: go to the spreadsheet > settings > advanced settings > solution to weird errors > columns limit.
6- Maybe this is a serialized field and the support for serialized fields is disabled
The spreadsheet supports serialized fields automatically, but we have the advanced option to deactivate it.
You can go to the spreadsheet > settings > advanced settings > customize feature > deactivate support for serialized fields.
Make sure the option is unchecked, so the serialized fields are supported.
7- You can reset the settings
Go to the spreadsheet > settings > advanced settings > reset settings.
This will reset all the settings and generate the columns again. This is safe because it will reset the spreadsheet settings only and your data will not be changed.
8- Maybe the field is saved outside the context of the post/user/term
If you are editing posts in our spreadsheet. Our spreadsheet will read the post information from the standard database tables: wp_posts, wp_postmeta, and taxonomies.
If you are using the “users spreadsheet”, the spreadsheet will read the information from the standard wp_users and wp_usermeta tables.
If you are using the “taxonomy terms spreadsheet”, it will read the fields from the standard wp_terms, wp_term_relationships, wp_term_taxonomy, wp_termmeta
If you followed all the previous solutions and the field is missing, maybe the field was added by another plugin and the third-party plugin saves the field in a custom database table.
In that case, the field is outside the reach of our spreadsheet editor and the only way to edit the field is through a custom extension.
We can create the custom extension for you and you can contact us to get a quote.
Note: There might be a possibility that the spreadsheet is not recognizing the column automatically. You could try creating a custom column following this guide
General use
How to delete a column permanently
To delete a column permanently, go to settings > Hide / Display / Sort columns.
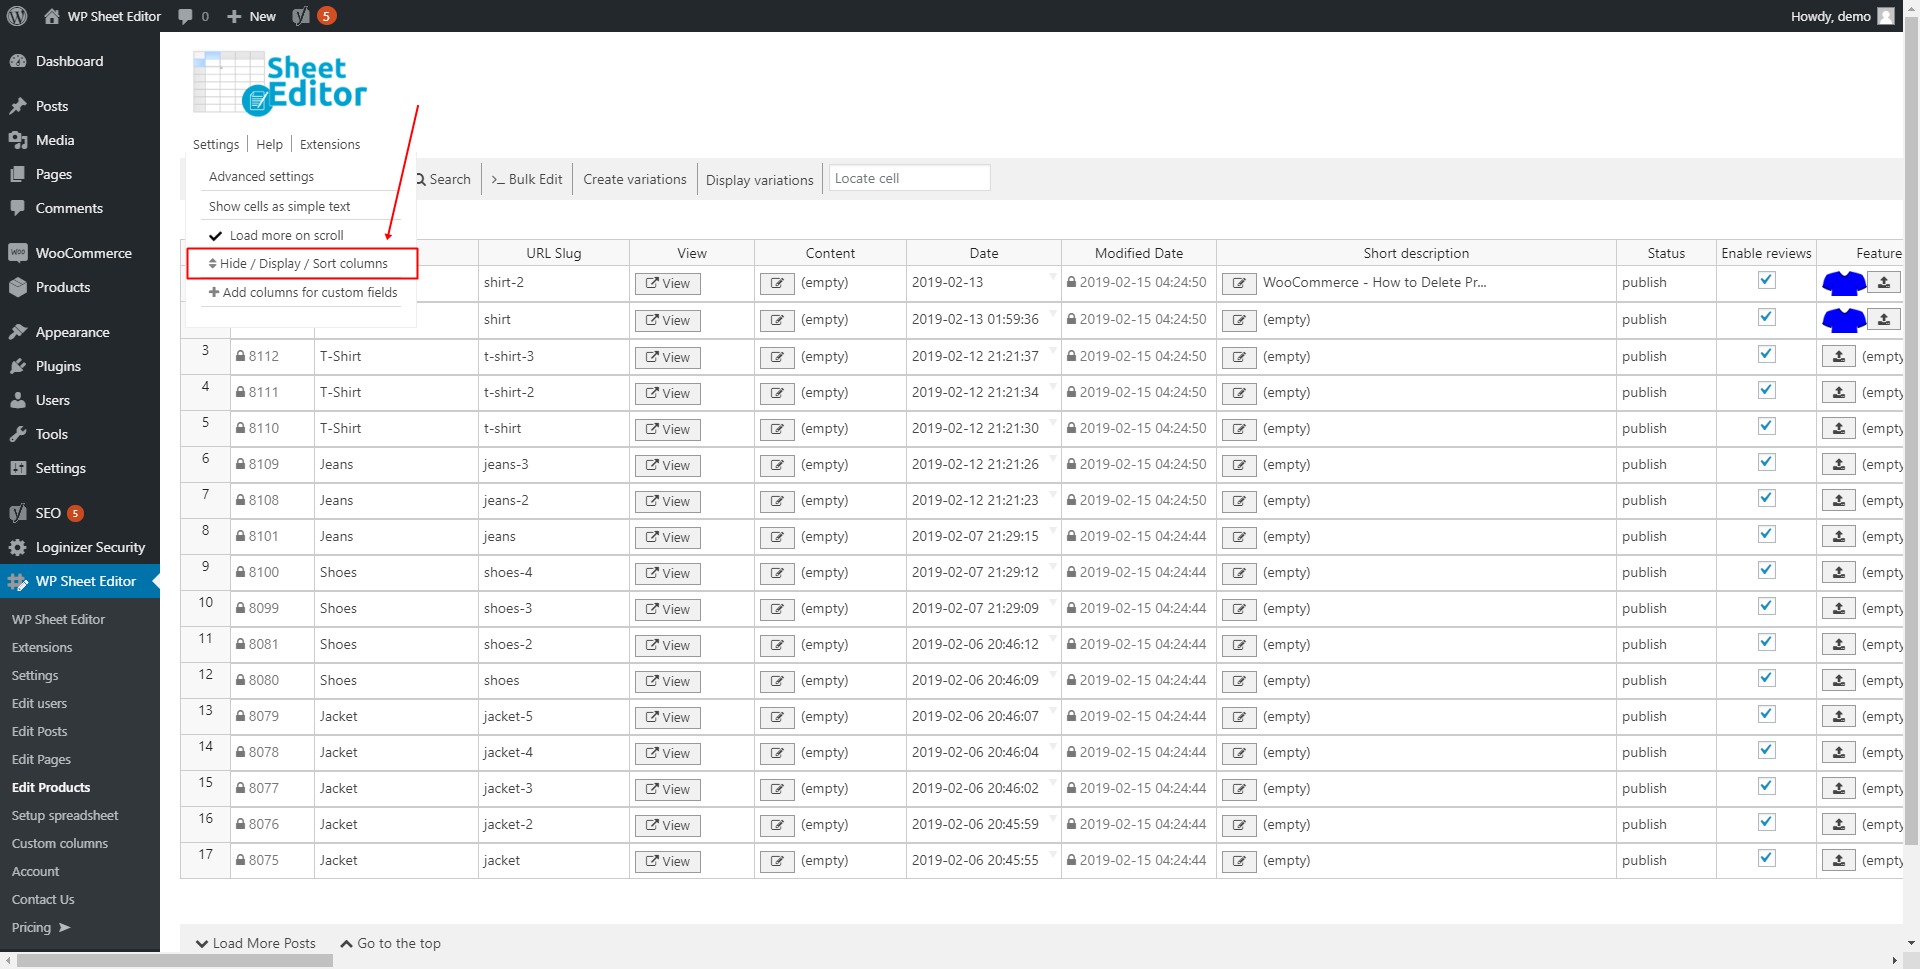
Once there, hit the “X” in the column you want to delete permanently.
If you delete a column by error, you can restore it by clicking “Restore deleted columns”.

How to import/export the spreadsheet settings
To import or export something on the spreadsheet, go to settings > advanced settings > Import / Export.
Once there, select the import options: “Import from file” or “Import from URL”.
Or select the export options: “Copy Data”, “Download Data File” or “Copy Export URL”.
Once you’ve finished, hit “Save changes”.

How to load 500 rows at once in the spreadsheet
If you want to load 500 rows at once in the spreadsheet, then you need to go to advanced settings, and then go to speed and performance.
Note, this depends on your server capacity. Some servers will not be able to handle 500 rows at once and our plugin will automatically revert to 10 rows per batch if we detect that your server is overloaded.

Enter 500 in the “Load rows faster: Number of rows to load per batch”

How to copy values between columns
To copy values between columns, you have two options:
1. Do it on the spreadsheet: Simply select the content from column 1 and then paste it on column 2 using CTRL + V. Finally, click on Save to update the column content.
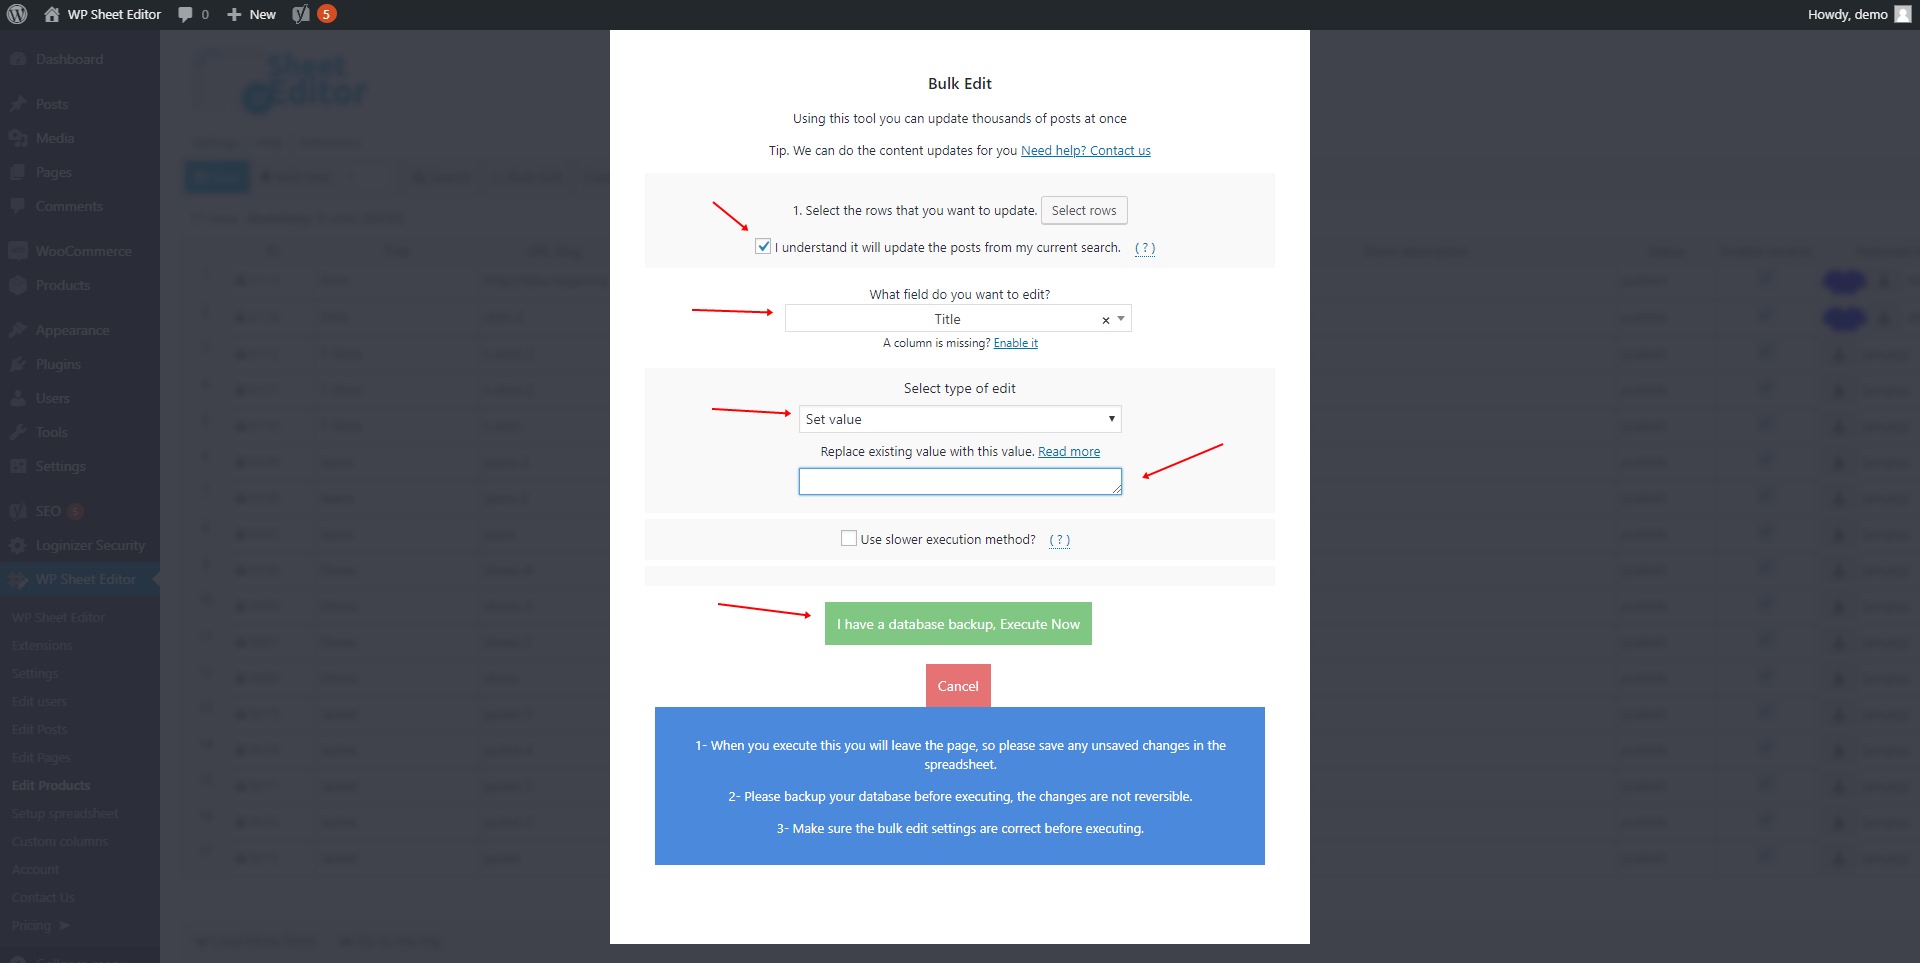
2. Do it with the Bulk Edit tool: If, for example, you want to add your product titles to the URL Slug, you just need to open the Bulk Edit tool and select these values:
- What field do you want to edit: URL Slug
- Select type of edit: Copy from other columns
- Copy from this column: $post_title$ (Title)
- Click on Execute now
Of course, this is an example, you decide from which columns and to which columns you’ll copy the content.

How to disable the loading of rows on scroll
To disable the loading of rows on scroll, Go to settings > Load more rows on scroll and leave it unchecked.

How to remove the help messages on the spreadsheet columns?
Go to the spreadsheet > Settings > Advanced settings > Customize features > Remove help messages from the cells.

Why do the columns appear in different order?
By default, the columns are ordered based on the code execution of the related Sheet Editor module. We have the serialized columns module, ACF module, etc.
That’s why the columns don’t follow the same order as the WP Editor.
For example. You can create 3 fields with Advanced Custom Field. One text field, one group of checkboxes, and one image. They won’t appear in the same order on the spreadsheet, the text and image columns will appear together and the group of checkboxes will appear after all the text columns.
You can sort the columns by going to settings > hide/display columns.
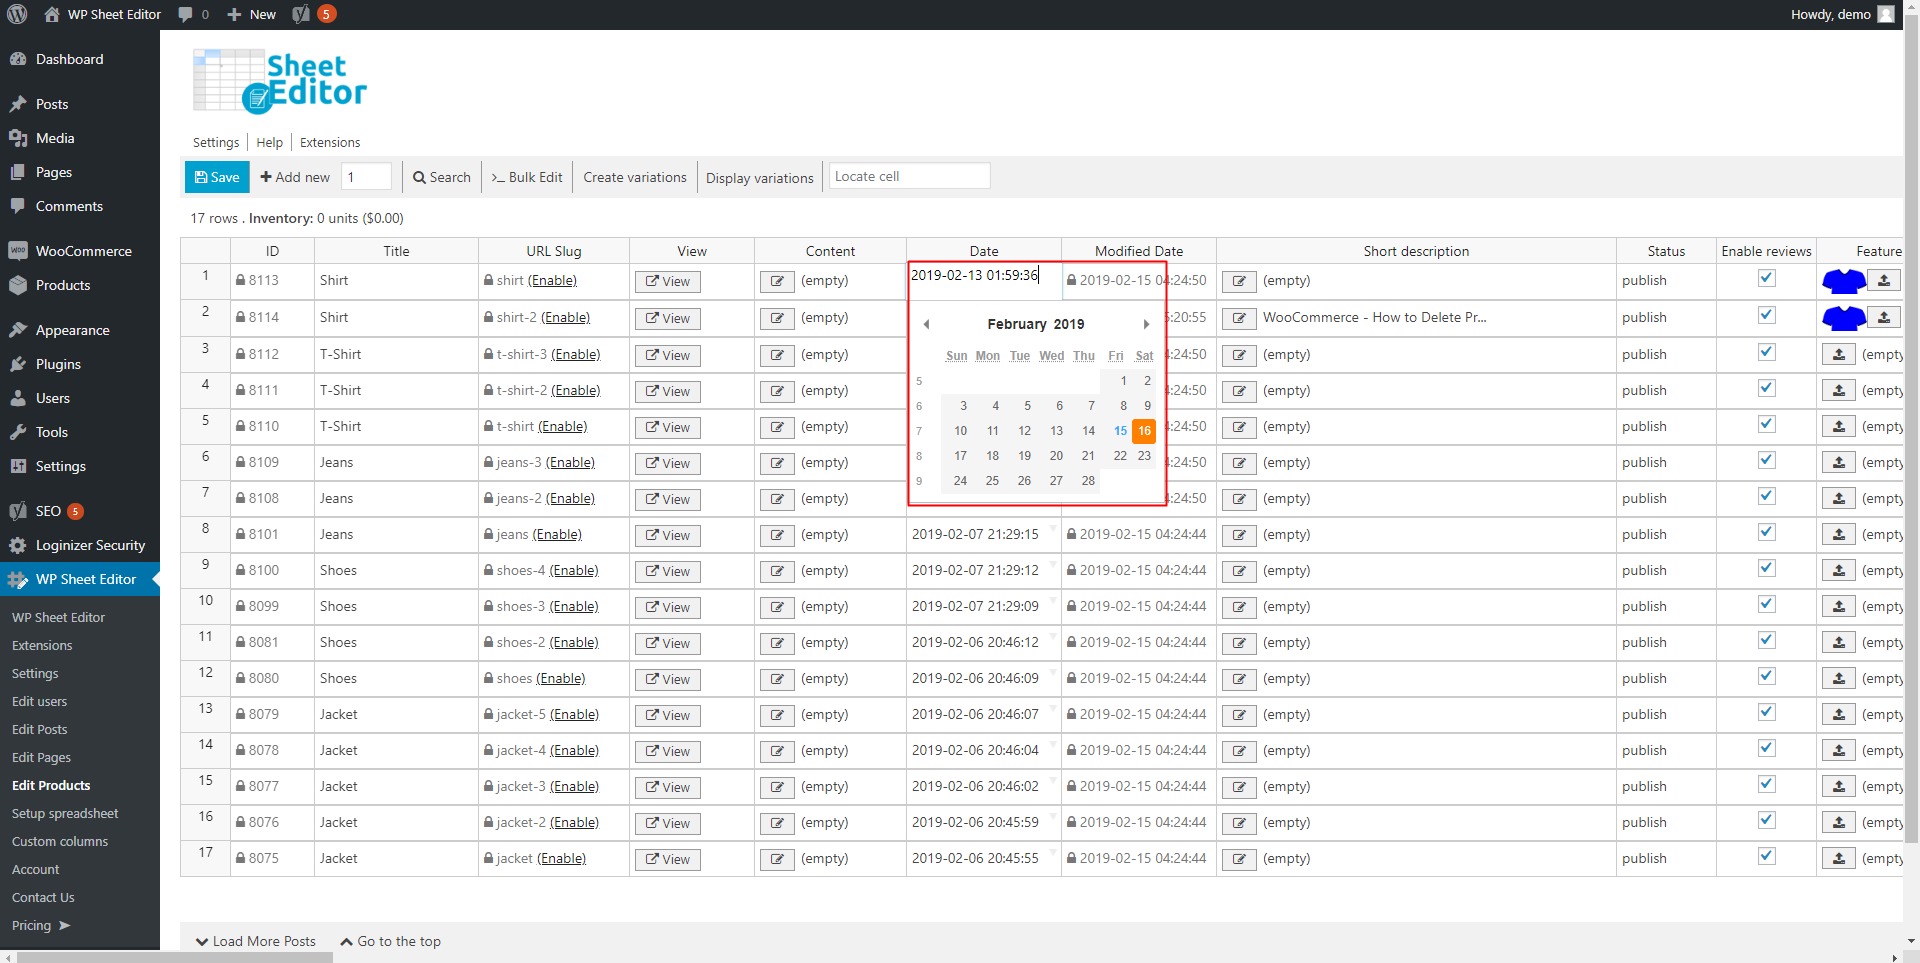
How to change dates in the spreadsheet
To change dates in the spreadsheet you need to locate in the “Date” column and change the date using the calendar popup in the cells. This applies to all cells with the date format
How to add extensions
To add extensions to the plugin, open the “Extensions” tool by clicking “Extensions” on the toolbar.

Use slower execution method
The default way uses a faster execution method, but it might not work in all cases.
In such cases, go to “Bulk Edit” and check the “Use slower execution method” before executing the changes.

Disable post actions while saving
To disable post actions while saving, go to Settings > Advanced settings > Solution to weird errors > Disable post actions while saving?, and tick/untick the checkbox

Disable cells lazy loading
To disable cells lazy loading, go to Settings > Advanced settings > Customize Features> Disable cells lazy loading?, and tick/untick the checkbox

Disable usage stats widget
To disable usage stats widget, go to settings > advanced settings > Customize Features> Disable usage stats widget?, and tick/untick the checkbox

Suspend object cache invalidation
To suspend object cache invalidation, go to Settings > Advanced settings > Solution to weird errors > Suspend Object Cache invalidation?, and tick/untick the checkbox

Disable or enable extension offerings
To disable extension offerings, go to Settings > Advanced Settings > Misc > Disable extension offerings? and tick/untick the checkbox

How to set a different taxonomy separator
If you want to select a different taxonomy separator, go to Settings > Advanced settings > Solution to Weird Errors > Separator for taxonomy terms cells, and enter the separator in the field.

How to load rows from a specific row number
When you have 1000 posts, you might want to open the spreadsheet and start editing from post 200.
For that, go to settings > advanced settings > Misc > Initial rows offset, and enter the number.

How to enable/disable the fixing of the first 2 columns at the left side
To disable or enable the fixing of the first 2 columns at the left side of the spreadsheet, go to Settings > Advanced settings > Increase productivity > Enter the number of columns you want fixed

Once there, you decide whether to activate it or not by selecting the checkbox or not
How to add values at the beginning or end of columns or rows
To prepend or append something to columns or rows, open the “Bulk Edit” tool.

Select the fields you’ll edit and select the type of edit you’ll apply: prepend or append.
Finally, write the value you’ll add and hit “Run Search.”

How to set new values on columns
To set new values on columns, go to the “Bulk Edit” tool.
Select the column you’ll edit >Choose “Set value” as the type of edit you’ll apply > Enter the new value.
How to replace words or phrases in an entire column
To replace words or phrases in an entire column, go to “Bulk Edit” on the toolbar.
Select the column you’ll edit in the “Field you want to edit” field.
Then, select “Replace” as the type of edit you’ll apply.
Finally, write the new value and hit the Run search button.

How to delete everything in one column
To delete everything in one column, you have two options: manual and bulk.
Manually, select the column by clicking the above part of it and then hit “Delete” in your keyboard.

To delete a whole column content, open the “Bulk Edit” tool.
Select the column you’ll edit in the “Field you want to edit” field and select the type of edit you’ll apply: “Clear value”.

How to edit post or product URL
To edit a product/post URL, go to the “Slug” column, and hit “Enable”.

Then, paste the URL in the “Slug” cell.
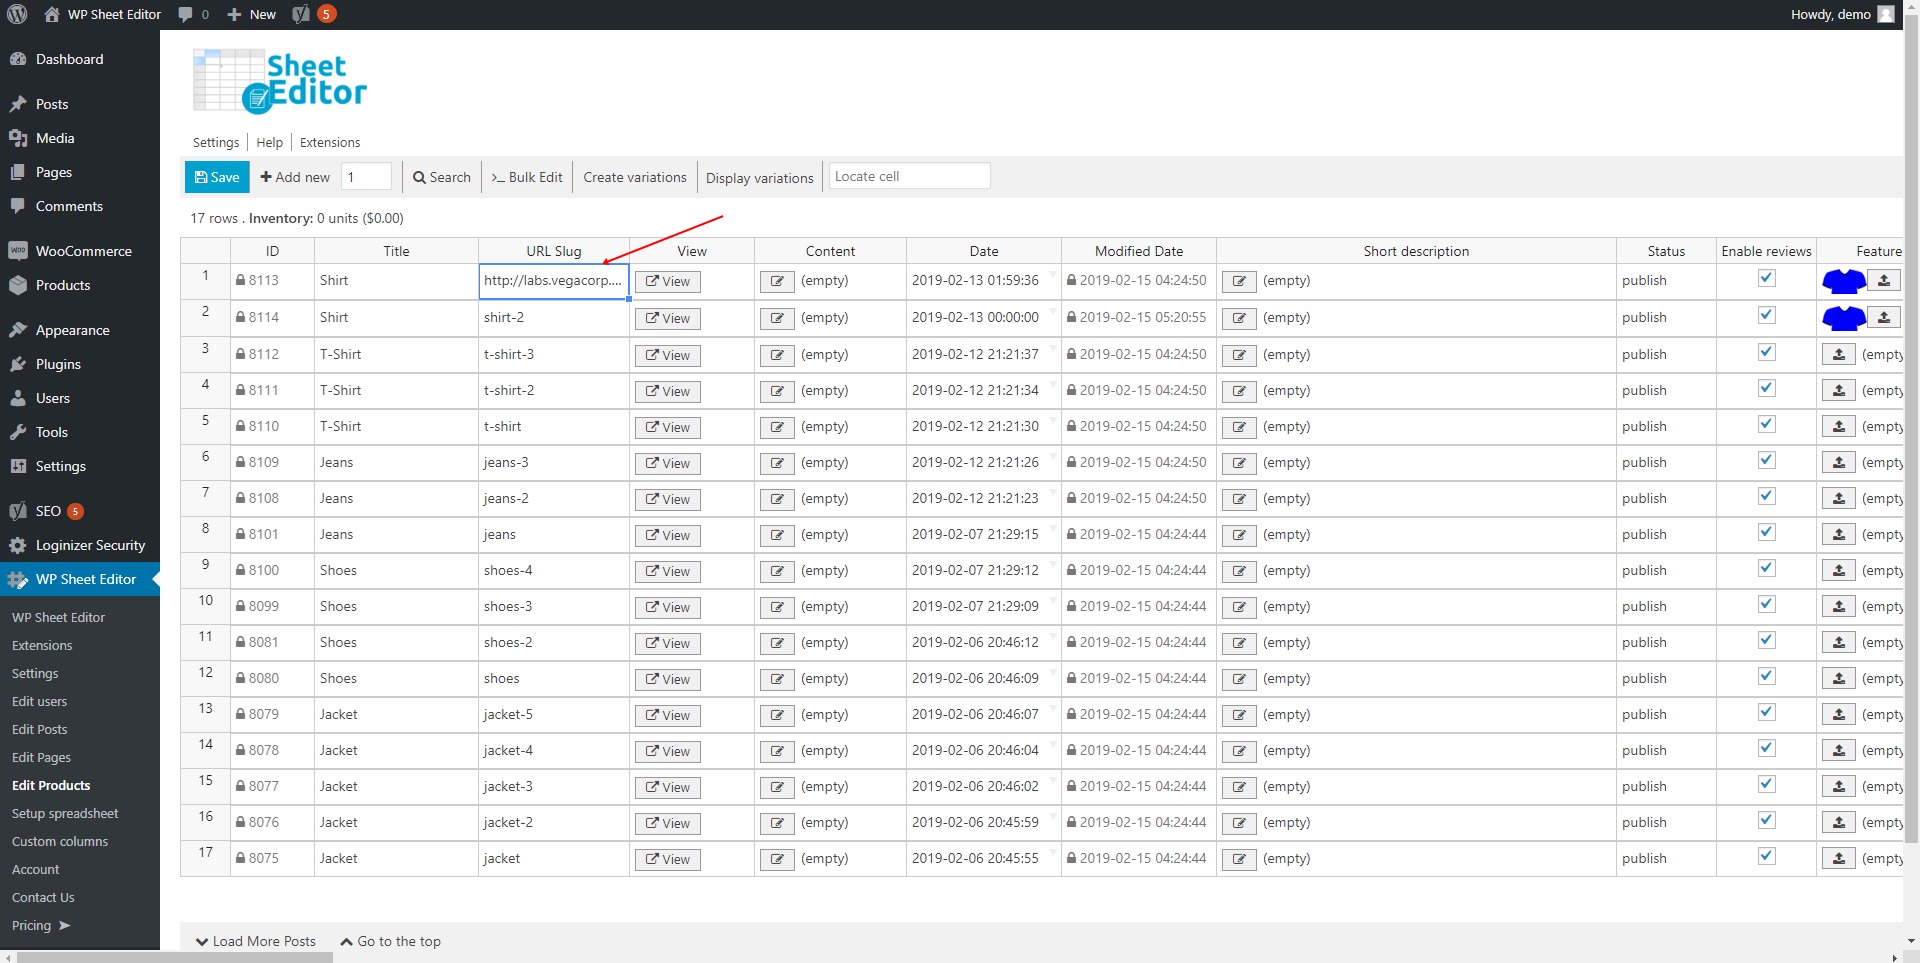
Note: If the products are not published you will not be able to edit the slug, as only Published products/posts have Slug.
How to copy paste from Excel
To copy from excel, go to the spreadsheet in Excell and copy what you need from a specific cell, row, column, and then go to Sheet Editor and paste the info you’ve copied using CTRL + V.

How to copy paste images
To copy/paste images from one cell to another, just copy from one cell and then paste into another cell using CTRL + C and CTRL + V

How to edit images as plain text/URLs
To edit images as plain text/URLs, you need to go to the cell you want to edit and double click it; it converts into a plain text field when you double click on it.
Then just paste the image URL.
Note: If you want to see all columns as simple text check this FAQ

How to create a new column
For most cases, our spreadsheet will recognize all the columns in the spreadsheet immediately if you go to Settings > Scan DB. This action will show all the metafields represented as columns. In the case that for some reason the field that you want to show is not picked up by the spreadsheet, you can create the column manually.
To create a new column, go to advanced settings > add columns for custom fields.
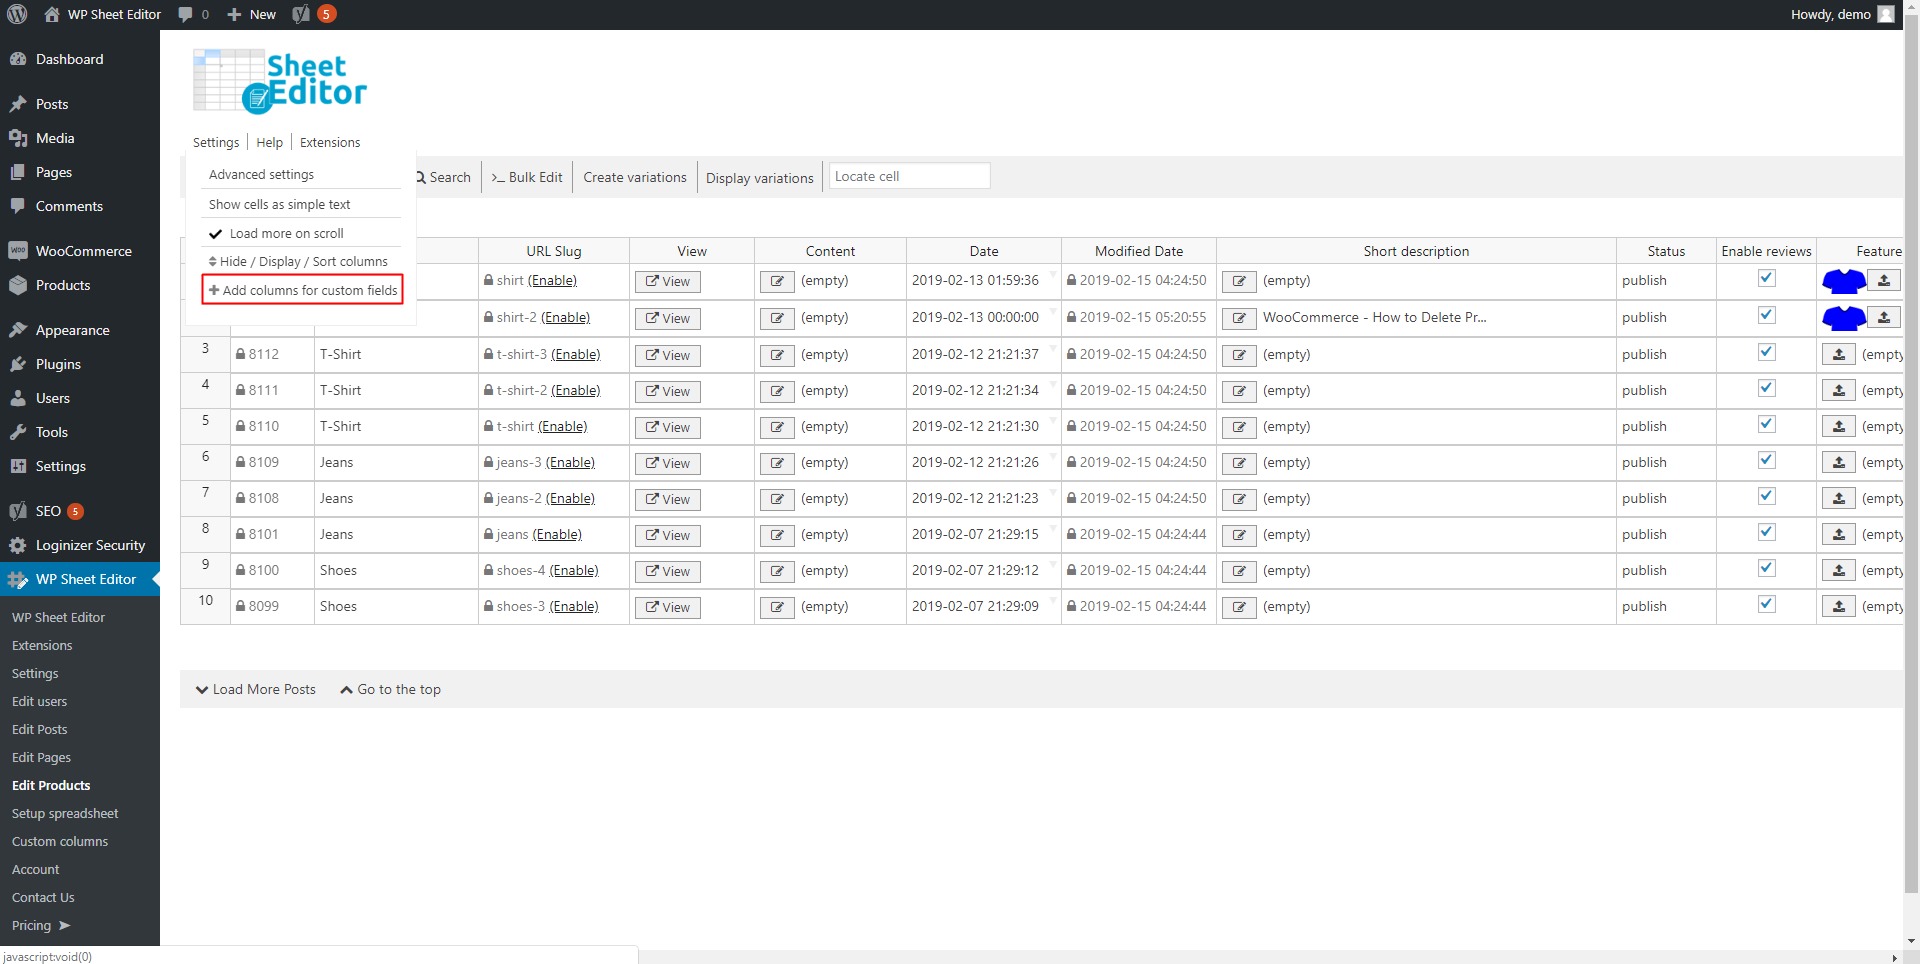
Once there, you’ll have to specify the values for the new column: name, key, type.

How to save changes faster
Sheet Editor saves products in batches, so if you want to increase the number of products to save in each batch go to the spreadsheet and click on the settings button at the top left, then click on “Advanced Settings > Speed and performance > Save changes faster, and enter the number of products to save in each batch.

How to show cells as simple texts
To show date columns as simple texts, you need to go to settings > Show cells as simple text.

How to hide a column
To hide columns from the spreadsheet, you need to right-click on the column you want to hide and click “Hide column”.

You can also use the Columns Manager at the top of the plugin to hide those columns you don’t want to see, simply drag and drop the columns you don’t want to the “disabled” side of the columns manager and hit save.


What if I have too many columns with similar names that I want to hide? I don’t want to have to drag and drop one by one
You have 2 options
A) Use the bulk search tool at the top of the columns manager > search for the columns and choose > Disable all

B) Use the blacklist option on our advanced settings. To do that, go to Settings > Advanced Settings > Solution to weird errors > Blacklist these columns > Enter the beginning of the key of the columns you don’t want to see. For example, the plugin Yith for WooCommerce creates a lot of columns with the key yith_field1 and creates hundreds of them, in order to blacklist all those columns at once, you’d enter the word yith on the previously mentioned field and that will remove all unnecessary columns.

How to display a new column in the spreadsheet
To display hidden columns in the spreadsheet, go to settings > Hide / Display / Sort columns.

Drag the disabled columns to the enabled columns.

Can multiple users edit using the Sheet Editor without causing issues?
Yes, multiple users can make use of the spreadsheet at the same time, but they have to coordinate with each other to not edit the same items and overwrite each other.
For example, user A can search/edit products with category A and user B can search/edit products with category B, and that will work fine. But if they edit the same rows, they will overwrite each other.
Another option is to export the products to Google Sheets and all the users can edit their own part at the same time, and you can import the changes back when they finish.
How can I translate the plugin?
The plugin can be translated to your language. You need to translate 2 .pot files with poedit (or any translation software).
/lang/**.pot
/modules/wp-sheet-editor/lang/**.pot = this file is shared with all our spreadsheet plugins, so if you use multiple plugins from us, you only need to translate it once.
When you finish your translations, you can send us the .po and .mo files and we will add them to the official plugins in the next update.
In the meantime, you can save your translation files in the directory /wp-content/languages/plugins/ so they will not be overwritten in the next update.
How to create new products
There are 2 main ways to create products or posts
1 – Create them through the live editor
To create new rows, write the number of rows you want to create and then hit the “Add new” button.

2- Create them through a CSV file by importing them.
Check out these links to know how to import on your spreadsheet.
How to open and use the “Search” tool
To open the “Search” tool, click “Search” on the toolbar.
It contains fields to look for products by keyword, status, category, attribute, tag, date, product variations, and filters to do advanced searches.

Tip: If you want to know more details about how to search for specific data, head over to our blog tutorials here
Once there, just enter the feature “search” and the Spreadsheet you are using to find existing tutorials

How to open and use the “Bulk edit” tool
To open this tool, click “Bulk Edit” on the toolbar.
It contains fields for you to search for the products to edit. It also contains the fields you’ll edit and the type of edit you’ll apply.

How to locate cells in the spreadsheet
To locate specific cells in the spreadsheet, just write the word of the cell you want to locate in the “Locate cell” field and hit enter.
WooCommerce Products
How can I remove duplicate product variations?
Learn how to remove duplicate product variations following the steps in this tutorial:
How can I delete all product variations at once?
To delete hundreds all product variations, follow the steps in this tutorial:
How can I copy variations between products?
You can copy variations from one product to 100 products. Learn how following the steps in this tutorial:
WooCommerce – Copy Variations from One Product to 100 Products with a few Clicks
How can I convert simple products to variable products?
Learn how to convert simple products to variable. Follow the steps in this tutorial:
WooCommerce – How to Convert Simple Products to Variable Products
How can I bulk upload images to product variations?
Here’s how you can bulk upload images to hundreds of product variations:
WooCommerce – How to Upload Images to lots of Product Variations
How can I find product variations missing images?
Follow the steps in the following article to find product variations without images.
How can I bulk delete duplicate products?
Learn how to remove duplicate products following this tutorial:
WooCommerce – Remove Thousands of Duplicate Products in Seconds
How can I add a purchase note to hundreds of products?
Purchase notes are important. Lean how to add one to hundreds of products by following the steps in this tutorial:
WooCommerce – How to Add a Purchase Note to Products Quickly
How can I find products missing prices?
Prices are indispensable. You can find all your products missing prices.
Please follow the steps in this tutorial: WooCommerce – How to Find Products Without Prices
How can I bulk edit download files?
To edit downloadable files, follow the steps in this tutorial:
How can I edit hundreds of short descriptions at once?
You can edit product short descriptions in bulk. Just follow the steps in this tutorial:
How can I calculate stock and inventory?
To calculate your products stock, follow the steps in this tutorial: WooCommerce – Calculate aggregated Stock by Product Category or Attribute
To calculate global inventory units and retail price, follow this tutorial: WooCommerce – Calculate global inventory units and retail price
How can I edit download limits in bulk?
To edit download limits, just follow the steps in this tutorial:
WooCommerce – Increase or Decrease Download Limit to Product Files
How can I calculate total sales?
To calculate total sales, follow the steps in this tutorial:
WooCommerce Taxes – Calculate total sales by country, state, city
How can I add a message to my product descriptions?
To add a message to your product descriptions, just follow the steps in this tutorial:
How can I create several products at once?
You need to use the Add new row tool. When you add new rows to the spreadsheet, you’re in fact adding new products. Therefore, enter the number of new rows you want to add and then click on Add new.
Once created, select the product names, prices, images, etc., in the columns of the spreadsheet.

How can I create product variations quickly?
You can create hundreds of product variations quickly.
Just follow the step in this tutorial: WooCommerce – How to Create Product Variations Faster
How can I convert variations into main products?
This tutorial shows you how to convert hundreds of product variations into main WooCommerce products:
How can I display product variations on the spreadsheet?
You can display product variations on the spreadsheet.
Just click on Display variations and the spreadsheet will reload to show you the variations.

How can I change stock status massively?
To change stock status on hundreds of products, follow this tutorial:
WooCommerce – How to Change Stock Status on Hundreds of Products at Once
How can I delete my product photo galleries?
If you want to delete your product photo galleries, follow this tutorial:
How can I find downloadable products missing files?
You can quickly find products missing download files.
Just follow this tutorial: WooCommerce – Find Downloadable Products Missing Files Quickly
How can I find products with empty attributes?
To find products with empty attributes, follow this tutorial: WooCommerce – Find and Bulk Edit Products with Empty Attributes
How can I convert simple products to variable?
You can convert simple products to variable products.
Follow the steps in this tutorial: WooCommerce – How to Convert Simple Products to Variable Products
How can I find products without SEO Title and description?
You can find and edit products missing SEO title or description.
Just follow this tutorial: WooCommerce – How to Find Products Missing SEO Title or Description
How can I find and delete out of stock products?
If you want to delete out of stock products, follow this tutorial:
How can I bulk apply discounts on hundreds of products?
To bulk apply discounts, follow this tutorial:
WooCommerce – Apply Discounts on Thousands of Products Quickly
How can I find my products by modification date?
You can find products by modification date. Just follow the steps explained in this tutorial:
How can I set a default description for my products?
This tutorial explains how you can set a default descriptions on your products:
WooCommerce – Show Default Description on Products Missing Descriptions
Posts, Pages, and Custom Post Types Spreadsheet
How can I delete all empty posts and pages?
Follow this tutorial to learn how to do it: How to Delete all Empty Posts and Pages
How can I find all posts containing email addresses in content?
Follow this tutorial to learn how to do it: WordPress – Search Posts that Contain an Email Address
How can I find and edit posts with long URLs?
Follow this tutorial to learn how you can do it: WordPress – Search Posts with Long URLs and Edit Them Quickly on a Spreadsheet
How can I find posts containing YouTube videos in content?
You can learn how to find posts with YouTube videos in content: WordPress – Search Posts that contain YouTube videos in the Content
How can I find all posts missing YouTube videos in content?
Here’s a tutorial to show you how to find all posts missing YouTube videos in content: WordPress – Search Posts without YouTube Videos in the Content
How can I find my posts missing H2 or H3 headings in content?
Learn how to find posts missing H2 or H3 tags in content by following this tutorial: WordPress – Search Posts WITHOUT H2 or H3 Tags in the Content
How can I search posts by title’s initial letter?
Here’s how you can search posts by title’s initial letter: WordPress – Search Posts where Title Begins with a Letter
How can I find posts by content initial letter or character?
Learn how to find all posts by content initial letter or character by following this tutorial: WordPress – Find Post Content by Initial Letter or Character
How can I find and edit posts with too short/long title?
This tutorial shows you how to find and edit posts with short or long titles: WordPress – Find and Edit Posts with Short or Very Long Titles
How can I find all posts without images in content?
Here’s how you can find all your posts missing images in their content: WordPress – Search Posts without Images in the Content
How can I know which posts don’t have any links in their content?
This tutorial shows you how to quickly find all posts without links in their content: WordPress – Search Posts WITHOUT any Links in the Content
How can I change post dates?
You can change hundreds of post dates. Just follow this tutorial:
How can I change post authors?
You can learn how to edit post authors by following this tutorial:
WordPress – How to Assign All Posts from One Author to Another
How can I convert my pages into full width?
The following tutorial explains to you how to change hundreds of page templates:
How can I delete thousands of posts or pages?
Please follow this tutorial to learn how to do it:
How can I delete duplicate posts or pages?
Please follow this tutorial to find out how:
WordPress – How to Delete Duplicate Posts or Pages in Seconds
Can I edit taxonomies (categories, tags, custom) in the posts, pages, or post types spreadsheet?
Yes. The spreadsheet shows one column for every taxonomy, and you can enter any value in the column. Existing terms are assigned, new terms are created automatically, if you remove a term from the cell the category assignment is removed.
For example, the posts’ spreadsheet lists all the posts with columns: titles, content, dates, categories, tags, etc. and you just edit the taxonomies (categories, tags, etc.) in the columns.
You enter the terms separated by comma, and you can define the hierarchy like this: category > child category > child category.
Can I convert pages into WooCommerce products?
Yes. You can do it. Just follow this tutorial: How to Convert Pages into WooCommerce Products
How can I find all posts or pages with empty content?
Here’s a tutorial for you to learn how to do it: How to Search Posts and Pages with Empty Content
How can I convert post into posts and vice-versa?
Here’s a tutorial to show you how you can do it: How to Convert Posts into Pages and Vice-versa
How can I edit Advanced Custom Fields?
Learn how to do it by following this tutorial: Bulk Edit Advanced Custom Fields in a Spreadsheet
How can I edit last modified date in bulk?
You can learn how to do it by following this tutorial: WordPress Posts – How to Bulk Edit Last Modified Date
How can I disable post comments in bulk?
Here’s a tutorial for you to learn how to do it: WordPress – Disable Post Comments by Keyword, Author, Category, or Tag
How can I remove all featured images from posts?
Follow this tutorial to learn how to do it: WordPress – Remove All the Featured Images from Posts
How can I edit Visual Composer element styles?
Learn how to edit element styles from Visual Composer by following this tutorial:
Visual Composer – How to Edit Element Styles in Hundreds of Posts or Pages at Once
Categories, Tags, Product Attributes, Taxonomies Spreadsheet
How can I bulk delete product categories?
Here’s a tutorial to show you how to do that: WooCommerce – How to Delete Categories in Bulk Quickly
How can I filter all post categories by initial or final number?
Just follow this tutorial: WordPress – Search Categories or Tags that Start or End with a Number
How can I filter all product attributes by initial or final number?
You can do it by following this tutorial: WooCommerce – Search Product Attributes that Start or End With a Number
Can I filter product attributes by initial letter?
Yes. You can filter all product attributes such as colors, sizes, etc., by initial letter.
Just follow the steps in this tutorial: WooCommerce – Search Product Attributes that Start With a Letter (Color, Sizes, etc.)
Can I search categories by initial letter in title?
Yes. You need to follow this tutorial to find out how to do it: WordPress – Search Categories or Tags that Start with a Letter
How can I create hundreds of sequential attributes?
You can do it by following this tutorial: WooCommerce – Create Hundreds of Sequential Attributes
How can I delete WooCommerce categories, attributes or tags in bulk?
This tutorial shows you how to do it: WooCommerce – Bulk Delete all Categories, Tags, or Attributes
How can I rename blog categories or tags in bulk?
You just need to follow this tutorial in order to do it: WordPress – Bulk Rename Blog Categories and Blog Tags
Can I regenerate category URLs from their titles?
This tutorial shows you the steps you need to follow to do it: WordPress – Regenerate Category URLs from Titles
How can I export/import categories from Excel or Google Sheets
The following tutorial shows you how to do it: WooCommerce – How to Export/Import Hundreds of Categories – Excel or Google Sheets
How can I convert categories into tags?
You need to follow this tutorial in order to do it: WooCommerce – How to Convert Tags into Categories and Vice-versa
Can I convert categories into global attributes?
Yes, you can do it. Just follow this tutorial: WooCommerce – How to Convert Categories into Global Attributes and Vice-versa
How can I bulk delete hundreds of categories?
Here’s how you can do it: WooCommerce – How to Delete Hundreds of Categories in Seconds – WordPress
How can I edit my category descriptions in bulk?
Just follow this tutorial: WooCommerce – How to Edit Category Descriptions in Bulk
How can I upload images to my product categories?
You can do it by following this tutorial: WooCommerce – Upload Images to Hundreds of Product Categories
How can I open the spreadsheet?
You can open any taxonomy spreadsheet in 2 ways:
1- Regular WP screen
Go to the regular screen of the taxonomy. For example, in the case of blog categories, you can go to wp-admin > posts > categories.
And you’ll see a “open spreadsheet” button in the top left of the page content.
This is a shortcut that we add to the regular screens.
2- Through the WP Sheet Editor menu
Go to Sheet Editor > Edit categories, tags, categories, taxonomies > select thet taxonomy from the list.
Users and Customers Spreadsheets
How can I filter and delete thousands of users at once?
You can do it by following this tutorial:
WordPress – How to Delete Thousands of Users by Email, Keyword, Role
Can I find users missing role?
Yes. You can do it by following the steps in this tutorial:
WordPress – How to Find Users without Role and Assign Role in Seconds
How can I capitalize the first letter of my user names?
You can do it by following the steps in this tutorial:
How can I copy the billing company to shipping company?
Here’s a tutorial that shows you how to do it:
How can I find users by their initial or final names?
In these two tutorials we show you how to do it:
Does WP Sheet Editor allow me to edit ACF?
Yes. Here are some tutorials on how you can do it:
WordPress – Bulk Edit Advanced Custom Fields in a Spreadsheet
WordPress Users – Bulk Edit Advanced Custom Fields in a Spreadsheet
How can I delete all users without orders?
This quick tutorial shows you how to do it:
WooCommerce – Delete Customer Accounts without Orders Quickly
How can I find all users by their orders count?
We show you how to do it in this tutorial:
How can I export my users by their orders count?
You can do it by following the steps in this tutorial:
How can I find and export user names and phone numbers by city, state or country?
We have a detailed tutorial to show you how you can do it:
WooCommerce – Export customer names and phone numbers by city, state, and country
How can I find and export user emails by city, state or country?
Here’s a tutorial to show you how you can do it quickly:
WooCommerce – Export Emails of Customers From a Specific City, State, or Country
How can I reset passwords for all my users?
You can reset all your users’ password following the steps in this tutorial:
WordPress – How to Reset Passwords on Thousands of Users Quickly
WooCommerce Coupons Spreadsheet
How can I set minimum amount on hundreds of coupons?
You can learn how to set minimum amount on your coupons by following this tutorial:
WooCommerce – Set Minimum Amount for Hundreds of Coupons in Seconds
How can I open the Coupons Spreadsheet?
To open the Coupons Spreadsheet, please go to WP Sheet Editor > Edit Coupons.
How can I duplicate my coupons?
You can learn how to duplicate your coupons by following this tutorial:
How to Duplicate WooCommerce Coupons – Create Hundreds of Copies
How can I edit my coupon quantity restrictions?
The following tutorial shows you how to edit your coupon category restrictions:
How can I delete all my coupons?
Please follow this tutorial to learn how to delete your coupons:
How to Delete WooCommerce Coupons Quickly – Thousands at once
How can I bulk edit my coupons discount amounts?
To learn how to bulk edit your coupon discount amounts, please follow this tutorial:
How can I edit my coupons expiry dates?
Please follow this tutorial to learn how to extend your coupons expiry dates:
How to Extend or Restrict WooCommerce Coupons Expiration Date
How can I disable my coupons?
The following tutorial shows you how to quickly disable your coupons:
How can I delete my unused coupons only?
You can quickly delete all unused coupons. Please follow the steps in this tutorial:
How can I restrict product categories from my coupons?
You can restrict product categories from your coupons by following this tutorial:
How can I exclude products from my coupons?
You can quickly exclude specific products from your coupons. Just follow the steps in this tutorial:
WooCommerce – How to Exclude Specific Products from All Coupons in Seconds
How can I bulk enable individual use only on my coupons?
You can enable the Individual Use Only option on hundreds of products by following the steps in this tutorial:
How to Enable Individual Use Only for All WooCommerce Coupons
How can I exclude sale items from my coupons?
You can do it in five minutes or less. Just follow this quick tutorial:
WooCommerce – Exclude Sale Items from All Coupons in Five Minutes
Can I import coupons from Excel or Google Sheets?
Yes. You can do it. Just follow these tutorials:
Can I export my coupons to Excel or Google Sheets?
You can do it quickly. Just follow the steps in this tutorial:
How can I find my most used coupons?
You can learn how to find your most used coupons by following this tutorial:
How can I delete all my expired coupons?
You can learn how to do it by following this tutorial:
Media Library Spreadsheet
How can I set product categories, tags and attributes as image alt text?
It requires you to follow the steps in the following tutorial: WooCommerce – Set Product Categories, Tags and Attributes as Image Alt Text
Can I set post title and categories as image alt text?
Yes. You can do it by follow this tutorial: WordPress – Set Post Title and Categories as Image Alt Text automatically
Can I filter my images by product color or size?
Sure! Just follow this tutorial: WooCommerce – Search Images by Product Color or Sizes
How can I find product images in my media library?
Just follow this tutorial: WooCommerce – Find Images Uploaded to Products in the Media library
Can I filter all my images by Width and height?
Yes. You just need to follow these simple steps: WordPress – Find Images by Width and Height in Media Library
How can I find files by format or extension?
You can do it by following the steps in this tutorial: WordPress – Search Files by Format or Extension in the Media Library
How can I edit thousands of images’ SEO alt text?
You need to follow this tutorial to learn How to Bulk Edit Image SEO Alt Text
How can I filter my images by product category or attribute?
You can learn how to do it with this tutorial: WooCommerce – Search Images by Product Category or Attributes in the Media library
Can I filter my images by blog category?
Yes. You just need to follow this tutorial: WordPress – Search Images by Blog Category in the Media Library
Can I find and delete broken images from my WP media library?
Of course! Just follow these tutorials:
How can I remove hyphens or symbols from my images’ alt text?
Just follow this tutorial to learn how to do it: Remove Hyphens or Symbols from the Alt Text of All Images in the WP Media Library
How can I find all images with short alt text?
You can do it by following this tutorial: WordPress – Find All Images with Short Alt Text in the Media Library
How can I find images missing captions?
You can quickly do it. Just follow the steps in this tutorial: WordPress – Find All Images with Empty Captions in the Media Library
How can I find all my images missing alt text?
You can follow this tutorial to learn how to do it: WordPress – Find All Images with Empty Alt Text in the Media Library
Can I set a default alt text for all my images?
Yes. You just need to follow this tutorial to learn how to Set Same Alt Text on all Images in the WordPress Media Library
Can I filter my images by specific year, day, month, etc?
You can do it easily by following this tutorial: WordPress – How to Search Images by Day, Week, Month, or Year
Can I import alt texts from a CSV file?
Of course. Just follow this tutorial to see how to do it: How to Bulk Import Alt text for Images in the WordPress Media Library
Can I filter my images by caption, alt text or title?
Sure! Just follow the steps in this tutorial: WordPress – How to Search Images by Caption, Alt Text, or Title
How can I find images by extension?
Follow this tutorial to learn how to do it: WordPress – Find Gallery Files by Extension
How can I find images by file size?
You can quickly do it by following the steps in this tutorial: WordPress – Find Images by File Size in Media Library
How can I delete all unattached images?
You can do it by following this tutorial: WordPress – Delete All Unattached Images from Media Library
How can I bulk delete images?
You can delete images by following the steps in this tutorial: WordPress – Delete Thousands of Images in Media Library
How can I find images missing alt text or caption?
You can do it by following this tutorial: WordPress – Find Images Without Alt Text or Caption
How can I edit my images’ captions?
Here’s a tutorial for you to learn how to do that: WordPress – How to Bulk Edit Image Captions