In this entry, we show you how to display your WordPress posts or events in a table to give users a simplified experience. We’ll use Posts Table Pro. With this plugin, you can create tables to display different post types on the front end of your site in a simplified way.

For example, if you have an events website, you can display the events in a table that contains substantial information so that users don’t go back and forth looking for the event information.
If you have a blog with thousands of posts and tutorials, you might want to show all the posts in the table so your users don’t have to scour so much to find what they need. With this table, they’ll be able to filter the posts by title, category, etc. with a simple click at the top of the table.
As you can see, this plugin is convenient from all points of view. It will bring many advantages for your readers or visitors and for you since the simplified user experience is crucial if you want to have more reach in your posts and conversions (attendees) in your events.
Just follow these simple steps:
1- Buy and install the Posts Table Pro plugin
The Posts Table Pro plugin allows you to display posts, events and several other post types in a table to give your users a simplified experience.
You can see the pricing and plans of this plugin following the button below.
2- Configure the plugin’s global settings
This plugin offers you multiple customization options so that your content is displayed on the table the way you want it to be displayed. Below, we show you each of them in detail.
a) Posts selection
Here, you can select which post type you want to display in the table.
- For posts/entries, you need to select the post type posts.
- For events, you need to select the post type tribe_events.

The post types available for you will depend on the post types in your WordPress site. We can display the following post types: posts, pages, events, downloads, courses, etc.
b) Table content
Here, you can select what information of the selected post type will be displayed in the spreadsheet.

Columns: Customize the columns you’ll use in the table.
- If you’re creating a table for your blog posts, you can enter the following columns: image, title, excerpt, author, category.
- If you’re creating a table for events, you can select these columns: title, date, time, cost, organizer.
Just enter the column names separated by commas; you don’t need spaces between words.
Image size: Select the image size for the Image column. By default, it’s 70*70 pixels, but you can change it.
Image lightbox: By marking this checkbox, you choose to display the featured images in a lightbox when the post is opened.
Shortcodes: With this checkbox, you choose whether display formatting in the columns or just simple text.
Content length: Enter how many words you want to display in the content column. If you want to display the full content, enter -1.
Excerpt length: Enter the number of words you want to display in the content column. If you want to display the full content, enter -1.
Link: Select the links you want to include in the table.
c) Table loading
Choose how the loading of content in the table will behave.
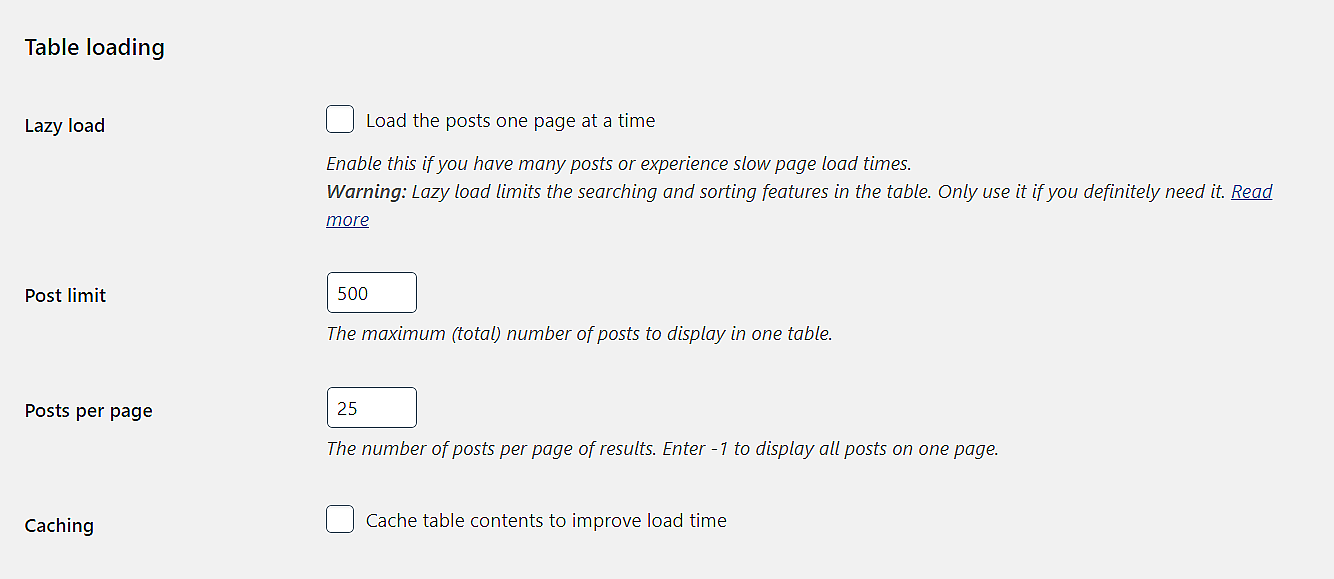
Lazy load: This checkbox is useful if you have many posts or if your users experience slow page load times. Keep in mind that the lazy load limits the searching and sorting features in the table, so use if only if strictly necessary.
Post limit: Select the total number of posts to display in the table. By default, the plugin will have 500, but you can enter any other number.
Posts per page: Select the total number of posts per page of results when you apply search filters. Enter -1 to display all posts.
Caching: This checkbox helps you cache table contents to improve load times.
d) Sorting
This is to select how the contents of the table will be sorted:

Sort by: This is the initial order applied to the table:
- Title
- ID
- Date published
- Date modified
- Page order
- Post slug
- Author
- Comment count
- Random
- Custom
Sort direction: Automatic, Ascending (A to Z, 1 to 100), Descending (Z to A, 100 to 1)
e) Table controls

Search filters: Here you can select the search filters you want to enable for the posts. Users can filter posts by category, tag, attribute, or custom taxonomies.
- Disabled
- Show based on columns in table
- Custom
Page length: You decide where you want to show the “Show [x] entries” dropdown list: above, below, above and below, hidden.
Search box: Select the position of the Search box: above, below, above and below, hidden.
Totals: Select the position of the post totals. For example, “Showing 1 to 5 of 10 entries”. The positions can be: above, below, above and below, hidden.
Pagination buttons: The position buttons are the ones that scroll between results. They can be: above, below, above and below, hidden.
Pagination type: You’ll have these options:
- Numbers only
- Prev|Next
- Prev|Next
- Prev|Next|First|Last
- Prev|Next|First|Last + Numbers
Reset button: Mark this checkbox if you want to show the reset button above the table.
3- Create the posts or events table
Creating the posts or events table is really simple. You just need to go to wp-admin > Pages > Add new. Once there, you just need to enter a simple shortcode in the page content.
Important. The page must have a Full Width template.
In this example, we show you the posts table and how it will look after the page has been published.
- Enter the page title. You decide how you’ll call this page. For example, if you’re showing posts, you may call it Blog. If you’re displaying events, you may call it Events. But you decide.
- Enter this shortcode in the page content: [posts_table]
- Select the Full width template.
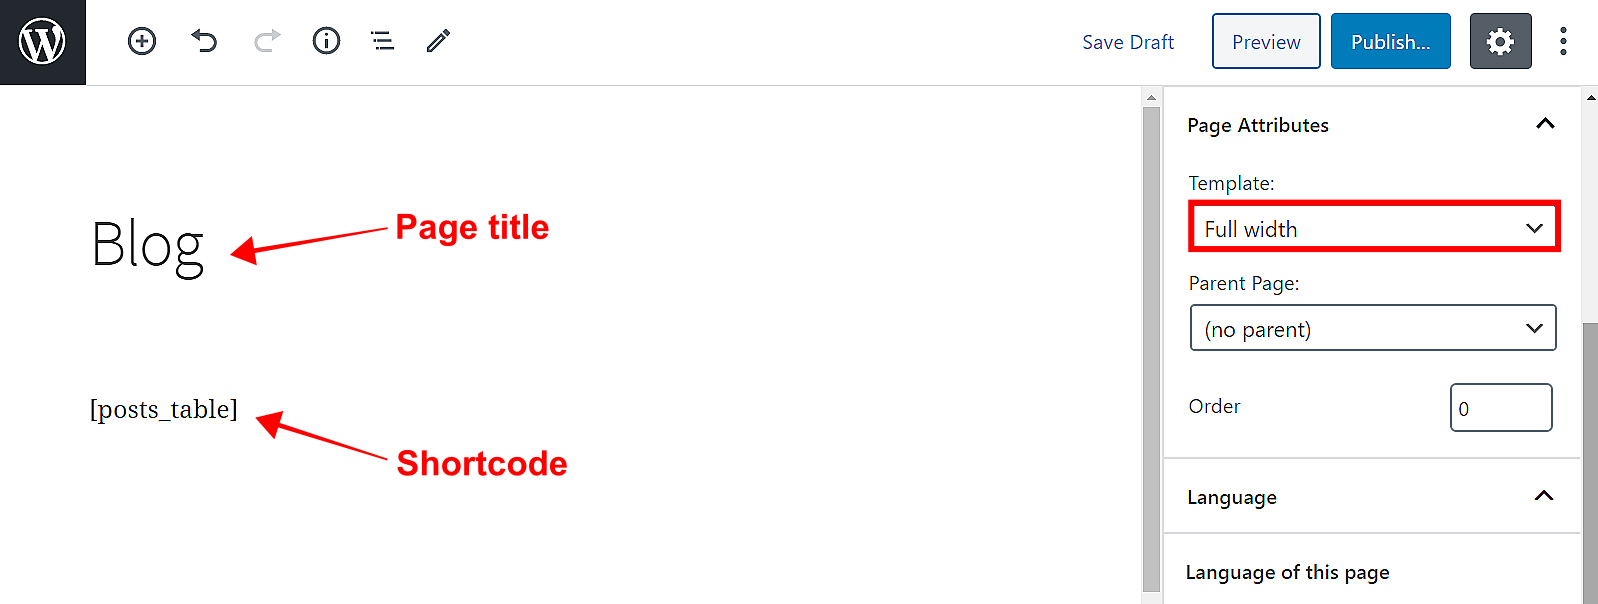
After adding this shortcode to a full-with page, you just need to publish the page or preview it. It will display all your posts or events in the front end.
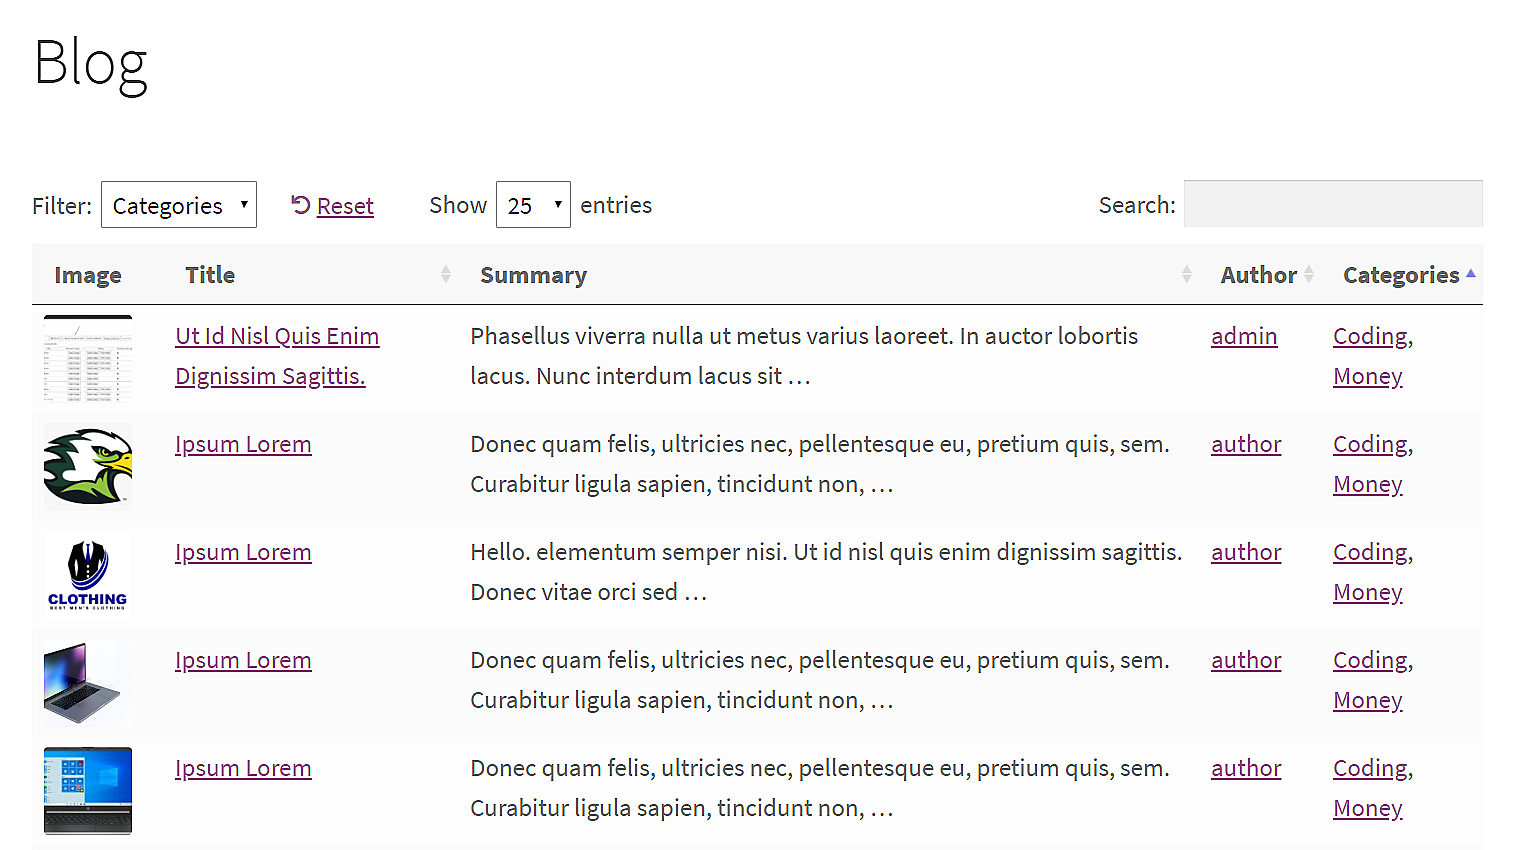
This table displays all the options we chose in the Global Settings.
- Filter: This dropdown shows us the post categories.
- Reset: This button resets the search filters.
- Show [x] entries: We decide how many entries we want to see in the table.
- Search: We can enter any keyword, and the table will show all the posts containing it on their titles.
These are the columns we choose to display in the table:
- Image
- Title
- Excerpt
- Author
- Category
Increase your reads and attendees!
With the Posts Table Pro plugin, you can quickly create tables to show your posts or events in the frontend. That way, your readers will have a simplified experience and your potential event attendees will have it easier to buy tickets.
You should get it now and start increasing your reads and attendees with these simple steps.