In this tutorial, we will show you how to export and import discount codes from Easy Digital Downloads to a CSV file to import them back after editing with Excel, Google Sheets or any other CSV editor.
Now you will be able to migrate discount codes to another site, as well as create or update hundreds of discount codes by importing them from a CSV file to WordPress easily and quickly.
To do this, we will use the WP Sheet Editor – Custom Tables plugin, which generates a spreadsheet editor for each custom table in your database.
In addition, you will be able to manage all the information quickly, perform advanced searches, bulk edit thousands of items, migrate from one site to another, etc.
You can bulk edit hundreds of discount codes, perform advanced searches with a few clicks, and export or import discount codes through CSV files.
You can download the plugin here:
Download Custom Database Tables Spreadsheet Plugin - or - Check the features
Once you install and activate the plugin, you need to follow these steps to export and import your EDD discount codes.
1. Open the EDD discount codes spreadsheet
For this, you’ll have to go to WP Sheet Editor > Edit custom database tables, where you can open the Edit WP Edd Adjustments spreadsheet.
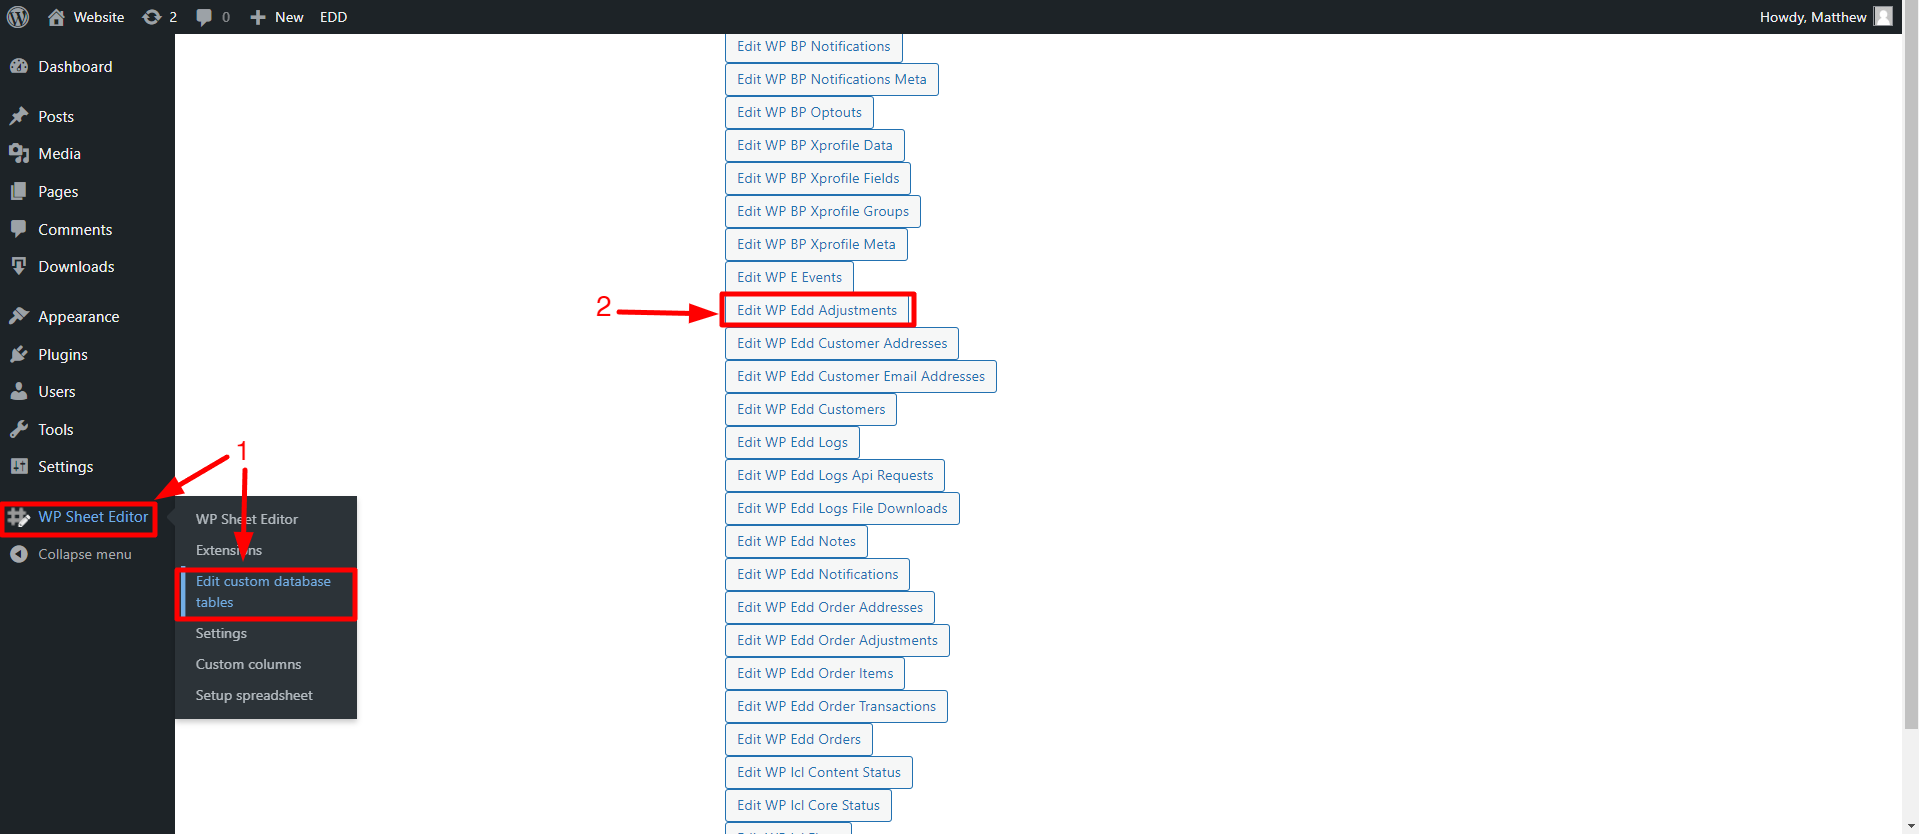
After setting up the spreadsheet, you’ll see all the discount codes displayed on it.

Optionally, you can easily export the results from an advanced search.
Here are some important searches:
Now let’s see how to export and import Easy Digital Downloads discount codes:
2. Export EDD discount codes to a CSV file
Now, we’ll show you how to export your EDD discount codes to a CSV file.
For this, you need to use the Export tool, which allows you to download all or some discount codes to your computer in a CSV file.
Open it with one click on Export on the top toolbar.

Once the tool is open, follow these steps:
a) Select the columns to export
The options are:
– Export certain columns
You can select the columns from the drop-down menu or type the name.

– Export only the active columns of the spreadsheet

Note: Remember that you can enable or disable columns at any time using the columns manager located in the toolbar.
– Export all columns

b) Select the rows you want to export
Here, you have the option to export all the rows from the current search (it can be all or specific discount codes that have been previously filtered using the Search tool) or to export the rows selected manually with the checkbox on the spreadsheet.

c) Select the app with which you are going to edit the CSV file (Optional)

d) Name the export (Optional)
To save some time in the future, you can name the download so that the current search query and export settings will be saved so that you can run the same export simply by using the drop-down in the export menu.

e) Click on “Start new export”

This is what our EDD discount coupons look like once they’ve been downloaded to our computer in a CSV file. You can apply changes using Excel or Google Sheets, add new rows (new discount codes), and you’ll be ready to import the CSV into a new site, or back to the same WordPress site.

3. Import changes or new EDD discount codes from a CSV file
You could create a spreadsheet containing the info to create new discount codes, but you can also import changes. For example, if you make changes to the CSV you exported, you can import it again.
For that, you need to start by opening the Import tool. It’s on the toolbar.

Once in the Import tool, follow these steps:
a) Select the CSV you’ll import
The Source field allows you to decide where the CSV file you’ll upload is located.
Let’s see how each source option works:
– CSV file from my computer
If you upload the CSV from your computer, you need to click Choose File and search for the file on your computer.

– CSV file from URL
You need to paste the URL of the CSV file in the File URL field.
This accepts internal and external URLs.

– Copy & paste from another spreadsheet or table
You can use this option if you want to copy some information from one spreadsheet or table into WP Sheet Editor.
The first row that you paste must contain the column titles.
However, you must take into account that this is not recommended for large amounts of data, if you have large amounts of data, importing a CSV File is better.

– CSV file in your server
If you select this option, the CSV file must be uploaded to your server, and you enter the path of the physical file here.
For example, this is a valid path: /var/www/site.com/htdocs/file.csv

IMPORTANT: You can select the separator. It can be a period or a comma.

Once you have entered the source and file, just click on Next to go on.
b) Select the columns you want to import
To select which columns you will import, you have at least two options:
– Import all the columns
With this option, all the columns will be mapped automatically.

– Select individual columns to import
With this option, you can manually map the columns, but if you don’t want to import specific columns, you can select Ignore this column in the dropdown or by clicking on the X button next to each column.
Once you’re done, just click on Next.

c) Configure how you will import the content
After manually or automatically mapping the columns, you need to configure how you will import your Easy Digital Download discount codes to your site.
Here are the options you have:
- Create new items and update existing items
- Import all rows as new
- Only create new items, ignore existing items
- Update existing items, ignore new items

d) Match the CSV fields with the EDD fields
After any of the options you choose (except “Import all rows as new”) you will have to match the CSV fields with the EDD fields. For example:
- CSV Field: record_id
- WordPress Field: ID

Click on Next to go on.
e) Review and start the import
After you see the preview, you’ll also see the Show advanced options’ checkbox, which allows you to configure these options:
- Number of rows to process per batch. You can enter a number of items your server will update in each batch. Consider the speed/resources of your server.
- Start from row number. If you stop an import to edit your CSV file or change the import speed, you can start a new import and continue from where you left off.
- Decode quotes? Mark for yes, unmark for no. This is when your CSV file has encoded quotes and the values aren’t read properly
- Auto retry failed batches. We import the file in batches (i.e. 4 rows every few seconds). When one batch fails, we normally pause the import and ask you if you want to retry or cancel the import. Select this option to auto-retry. Be careful, you should use this ONLY if you are updating existing rows (step 3 of the import). If you’re importing everything as new rows, every retry might duplicate some previously imported rows.

Finally, click on The preview is fine, start import.
And this is how simple and fast you can export and import Easy Digital Downloads discount codes with WP Sheet Editor.
You can download the plugin here:
Download Custom Database Tables Spreadsheet Plugin - or - Check the features