We are sure that you want to increase your WooCommerce store sales and that you are always looking for the best way to improve your conversion rate. So, in this post, we will show you how to list or display WooCommerce products in table format on your online store. This way, your customers will not have to go from one page to another to see your WooCommerce products, but will be able to view and filter your store’s products in a grid product format.
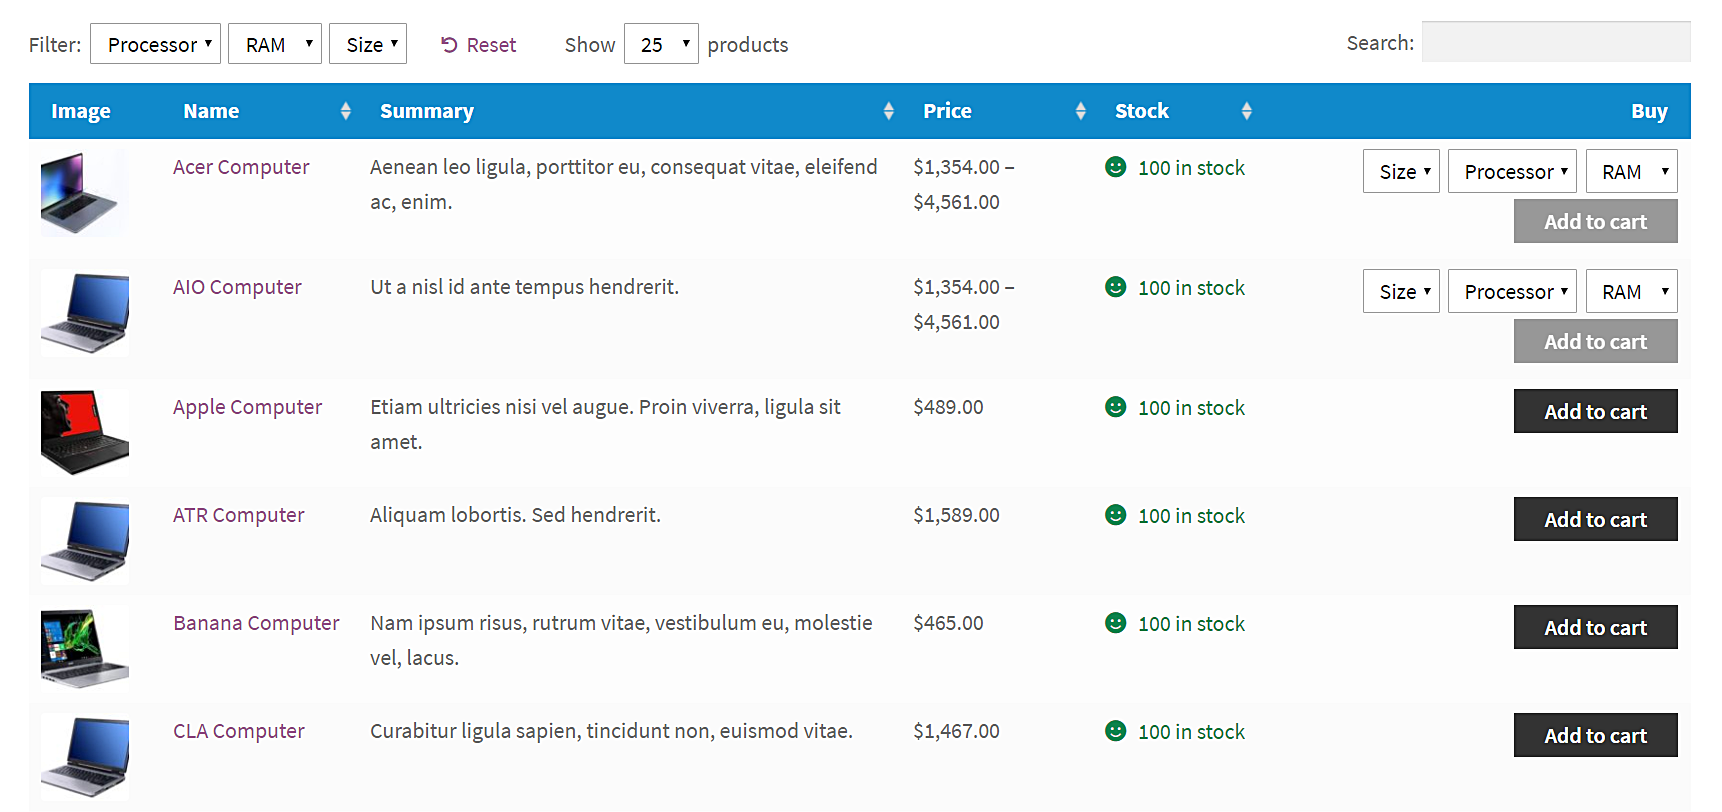
This is what your store’s product catalog will look like in a table format:
Your customers should be able to buy your products using the easiest way possible, and creating a front-end products table or product grid view is one of the most intuitive ways to improve customer experience.
For this we will use the WooCommerce Product Table plugin developed by Barn2 Plugins.
We highly recommend this plugin because it’s well-developed, they provide great support, and it has all the features that you will need to display your WooCommerce products on a table or grid view.
Step 1. Buy and Install WooCommerce Product Table
Here you can buy the WooCommerce Product Table plugin.
After buying the plugin, you need to install and activate it on WordPress. Now you’ll be ready to generate the product table for your WooCommerce store.
2- Customize the plugin’s global settings
After installing the plugin, you need to go to WooCommerce > Settings > Products > Product Tables to customize the global settings.
Here, we show you in detail each of the options that this plugin will show you in the Global Settings.
a) Table design

You can select the Default or the Custom design.
If you select “custom design” you’ll be able to change the colors of the elements inside the table:

- Borders
- Header Background
- Cell background
- Header font
- Cell font
b) Table display
This section is very helpful because you can replace the normal “shop” page or “product category” listings with a beautiful table.

c) Table content
Here you can decide how the content will be displayed in the table.
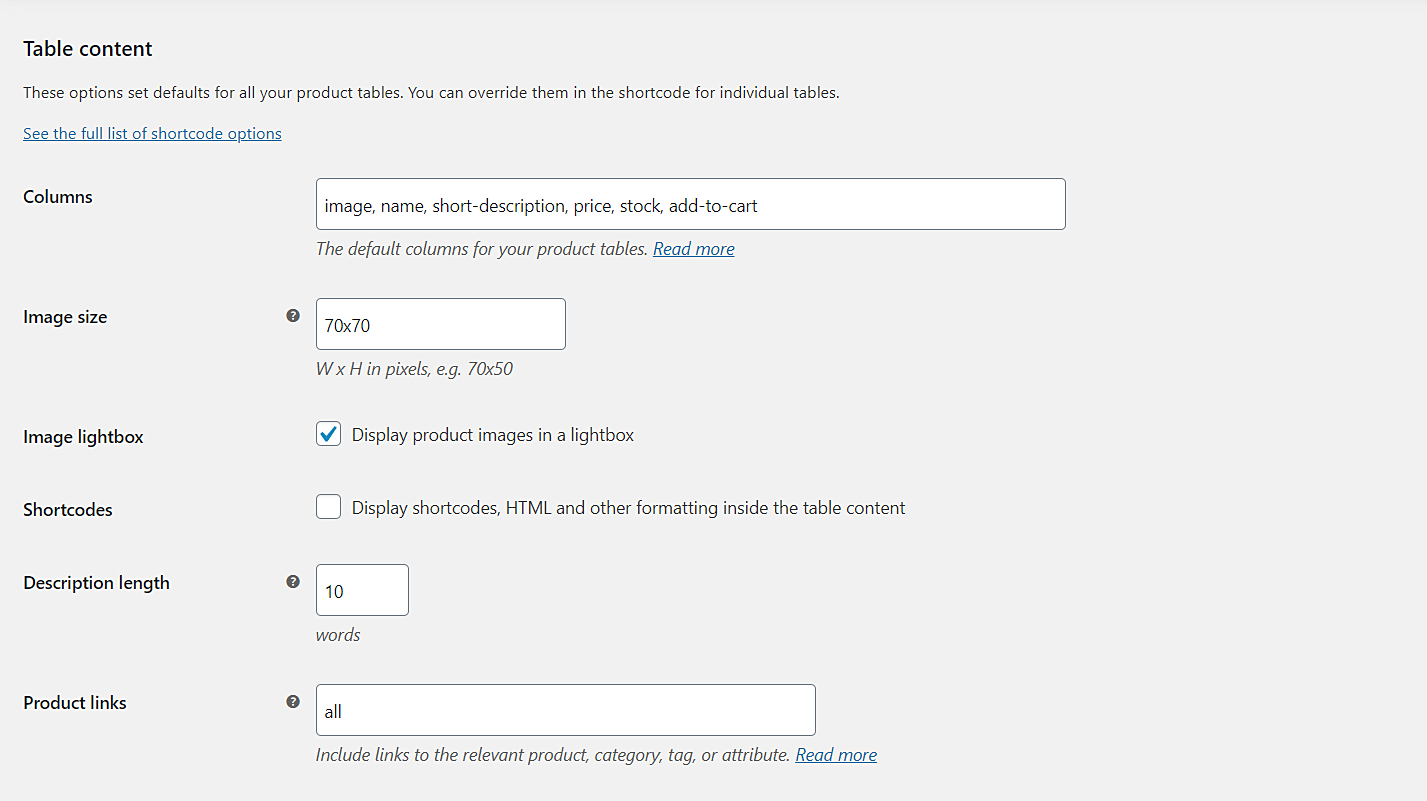
Columns: Enter the column names separated by commas. For example, we can display the products in a grid view with these columns:
- Image
- Name
- Short descriptions
- Price
- Stock
- Add to cart
The columns option lets you customize the table completely. You can display the necessary information for your customers.
Image size: Select the size of the product images in the table.
Image lightbox: Decide if you want to display the product images in a lightbox.
Shortcodes: You can display the product description as plain text or enable the full formatting of descriptions.
Description length: Select the number of words that will appear in the description.
d) Performance
In this section, you can cache the table to load many products very fast or select the pagination parameters to control the size of the table.

Lazy load: You can enable this option if you have many products in your store or if sometimes your page loads are too slow. Of course, you need to know that this option adds some limits to the experience. For instance, you can’t search, sort, or display variations in the table. Therefore, you should use it if it’s strictly necessary.
Product limit: Here, you can select the number of products that will be displayed in the table by default.
Caching: If you want to improve load times, you can enable this option. The plugin will cache the table contents to become user experience smoother.
Rows per page: Here, you can select the number of rows that will be loaded in the table per page of results. By default, it’s 25 rows per page, but you can change it as you want.
e) Sorting
In this section, you can select how the products will be displayed in the table.
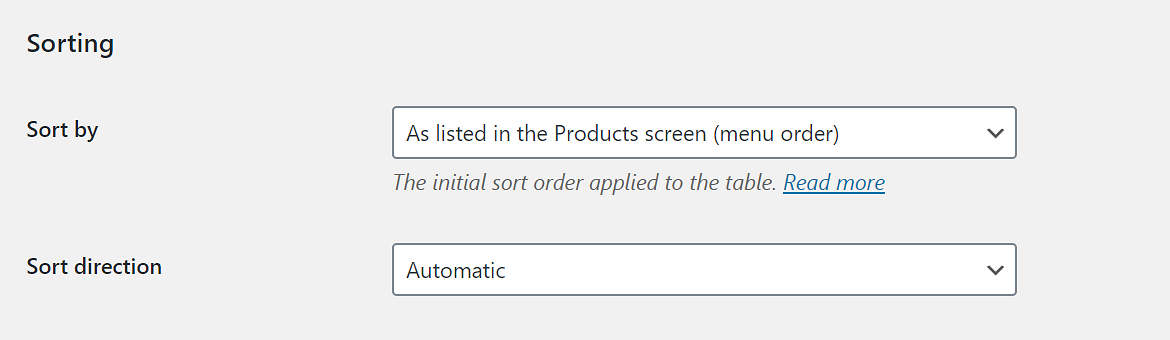
Sort by: Your products can be displayed using the WooCommerce default options, or you can select the column by which they will be sorted. These columns include SKU, name, ID, price, number of sales, etc.
Sort direction: It can be Automatic, Ascending (A to Z, 1 to 100), or Descending (Z to A, 100 to 1).
f) Add to cart column
In this section, you can select how the Add to cart column will behave. Here are the details:

Add to cart button: You can display the button only, a checkbox only, or both. If you select the checkbox or button and checkbox, an Add selected button will appear above or below the table, depending on your preferences.
Add to cart behavior: With this checkbox, the plugin will use AJAX when adding products to the cart.
Quantities: If you tick this checkbox, a quantity selector will be displayed next to the Add to cart button. Customers will be able to select how many units of the same product they want to buy.
Variations: With this dropdown, you can select how the variations of your products will be displayed in the table. You’ll have these options:
- Link to product page
- Dropdown list in add to cart column
- Separate rows in table (one per variation)
‘Add Selected’ position: When you decide to display a checkbox in the Add to cart column for customers to select the products, the plugin will display the Add Selected button. This dropdown shows you where it will appear.
- Above table
- Below table
- Above and below table
‘Add Selected’ button text: This field allows you to edit the Add Selected button text. You decide what to call it.
g) Table controls
This section shows you the main table controls. Here are the details:
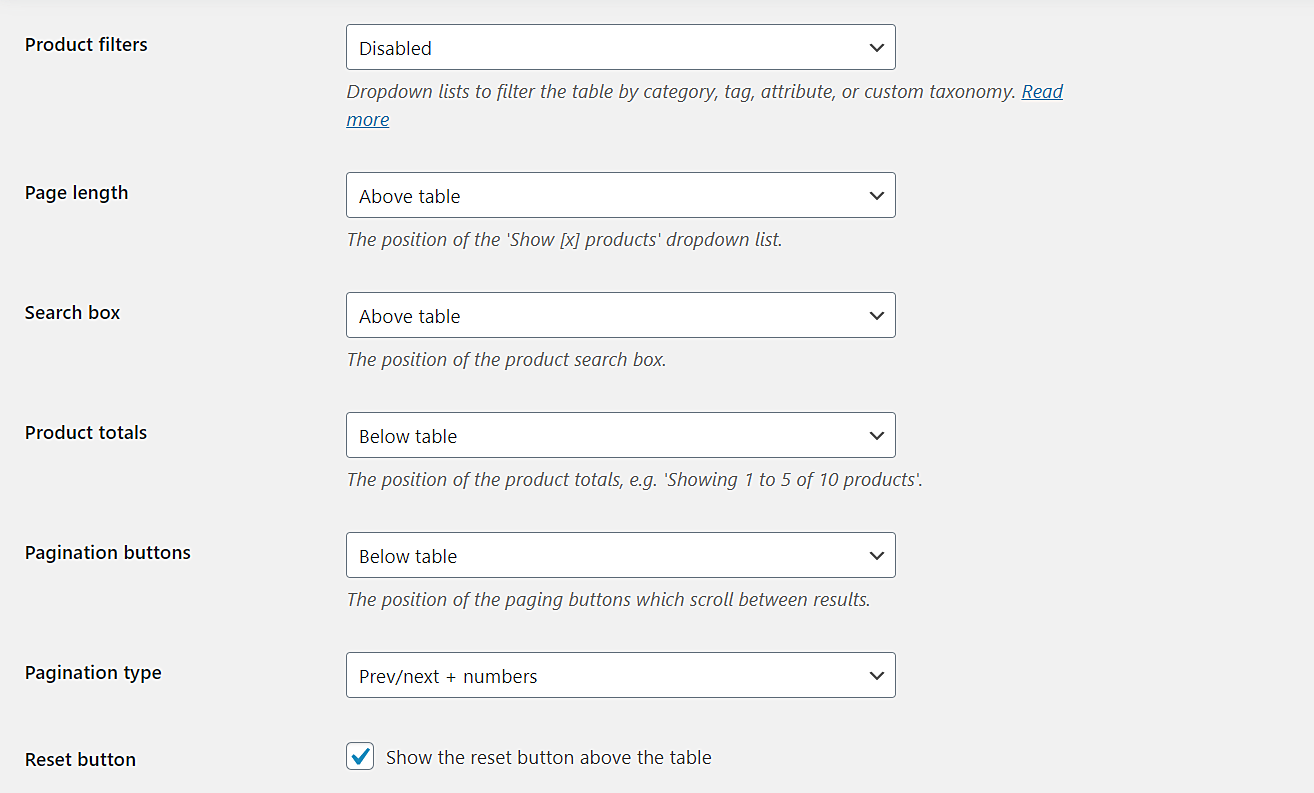
Product filters: With these filters, customers will have a simpler experience because they can decide which parameters to apply so the table displays the products. You’ll have these options:
- Disabled
- Show based on columns in table
- Custom
Page length: With this field, you can select where you want the ‘Show [x] products’ dropdown list. You can display it above, below, above and below, or hide it.
Product totals: Here you can select where on the page will the product totals appear. That is, where the ‘Showing 1 to 5 of 10 products’ message will appear.
Pagination buttons: With this dropdown, you can select where the pagination buttons will appear. You can display them above, below, above and below, or hide it.
Pagination type: You can select between these options:
- Numbers only
- Prev/Next
- Prev/Next + Numbers
- Prev/Next/First/Last
- Prev/Next/First/Last + Numbers
Reset: If you mark this checkbox, a Reset button will appear above the table. This is useful to reset the filters users apply to the products.
Once you’ve set the plugin’s global settings, you’re ready to create the table.
Step 3. Create the product table
It’s easy to display your WooCommerce products on a table or grid view. You need to start by creating a new page; do this by going to wp-admin > Pages > Add new.
Once you add the new page, enter the page title and add this shortcode to its content:
- [product_table]
Something really important to keep in mind is that the Template must be Full width.

With this simple short code, the products will be displayed on the table. By default, the table will display the following columns: Name, Summary, Price, Buy.
However, if you have selected the columns in the plugin’s global settings, the table will display the columns you selected.
In this case, our table displays the options we selected in the global settings.
As you see, the table shows the selected columns only. You can use the attribute filters to display all the products, or you can use the Search field to search for specific products by keyword. Also, you can display a specific number of products on the page.
Improve your conversions now with a product grid view on the front-end!
With these simple steps, you can display WooCommerce products on a table view on your store to completely transform your store from a complex space that scares away potential customers to a very tidy and easy-to-use space.
This way, we are sure your conversions will increase significantly. Do not hesitate to buy, install and use the WooCommerce Product Table plugin. It’s really easy to use and brings you lots of advantages.
Buy the WooCommerce Product Table plugin.