Looking for a way to automatically generate WordPress posts with Grok 4 by xAI? Keep reading because we will show you step by step how to use Grok to write WordPress posts.
Writing consistent content for your WordPress site can be overwhelming. Whether you run a business blog, a personal site, or a magazine with hundreds of categories, the challenge is always the same: how do you keep publishing fresh content without running out of ideas or burning out?
Unfortunately, many websites fall behind. Drafts pile up with only titles, some posts remain empty placeholders, and blogs start to look abandoned. This hurts SEO, reduces engagement, and makes your site feel unprofessional. Visitors expect to find complete, informative posts… not unfinished stubs.
The good news is that with WP Sheet Editor – AI connected to Grok 4 (x-ai/grok-4) via OpenRouter, you can generate full blog posts in just a few clicks. You provide the titles, and Grok 4 writes the complete articles directly in your WordPress database. This means you can go from dozens of empty drafts to a professional, SEO-ready blog in minutes.
Table of Contents
What you need to generate WordPress posts with Grok 4
Let’s set up the tools before we start creating posts. WP Sheet Editor plugins give you a spreadsheet for managing your content, and the AI extension adds the power of automated writing.
1- WP Sheet Editor – Post Types
This plugin lets you edit posts, pages, or any custom post type from a spreadsheet. It’s ideal for managing drafts, categories, SEO fields, and more. You’ll use it to access the Content column where Grok 4 will write your blog posts.
You can download the plugin here:
Download Posts, Pages, and Custom Post Types Spreadsheet Plugin - or - Check the features
2- WP Sheet Editor – AI
WP Sheet Editor – AI integrates your WordPress site with different AI providers, including OpenAI, OpenRouter, and any provider and model using the same API format as OpenAI. It allows you to run prompts directly in the spreadsheet or through bulk edits.
You can sign up here:
Sign up to the WP Sheet Editor - AI Service - or - Check the features
3- Grok 4 via OpenRouter
We’ll use xAI’s Grok 4 model through OpenRouter.
You can follow this setup guide to connect WP Sheet Editor to OpenRouter and start using Grok 4 or follow this quick guide:
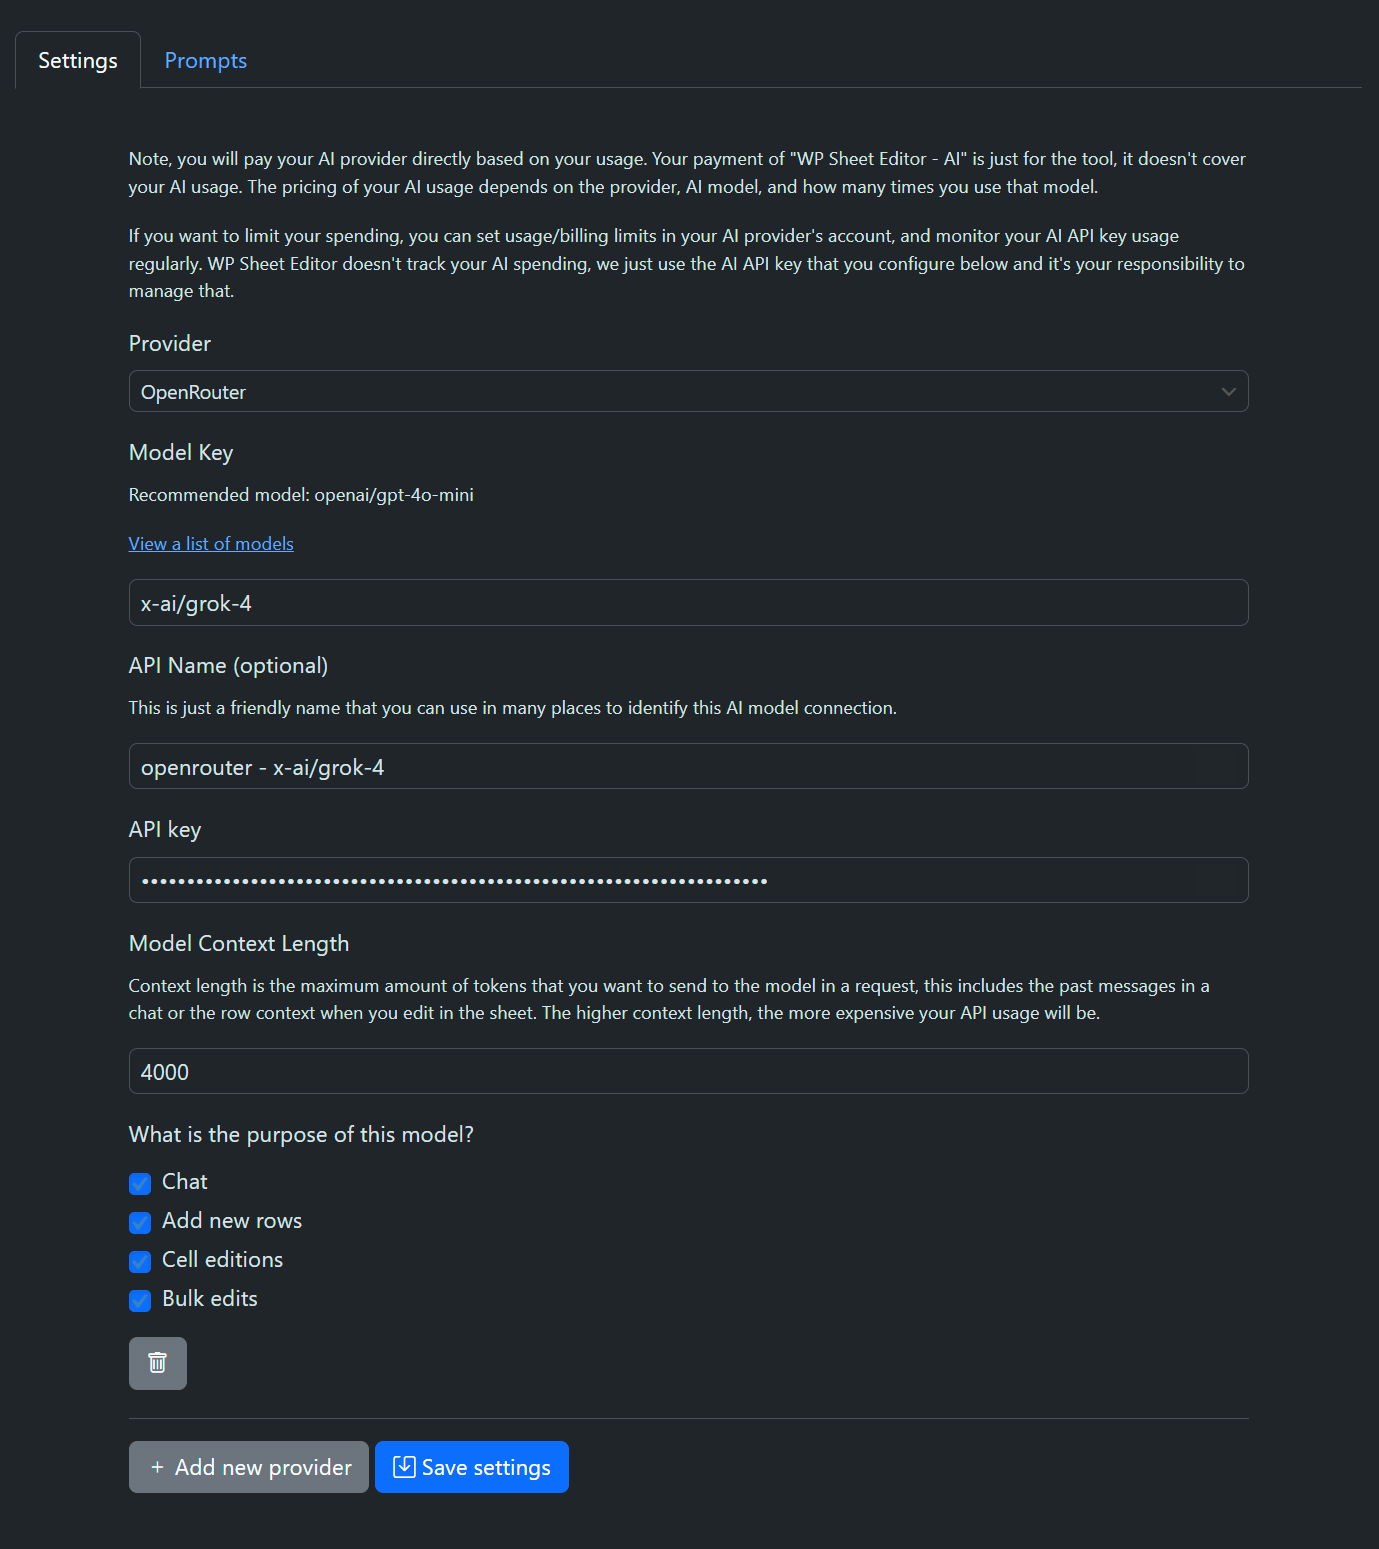
- Go to WP Sheet Editor > AI > Settings.
- Provider: We will use Openrouter in this example.
- Model Key: We will use Grok 4, so we need to enter this key:
x-ai/grok-4. - API Name: openrouter – x-ai/grok-4
- API Key: Paste your OpenRouter API key.
- Select context length and the purpose of this model (Chat, Add new rows, Cell editions, Bulk edit).
- Click on Save settings.
Step 1. Create a prompt for generating posts
AI models need clear instructions to produce the content you want. A prompt is the set of instructions you give to Grok 4, telling it how long the posts should be, which style to use, and what formatting to apply.
Here’s a sample prompt for generating WordPress posts:
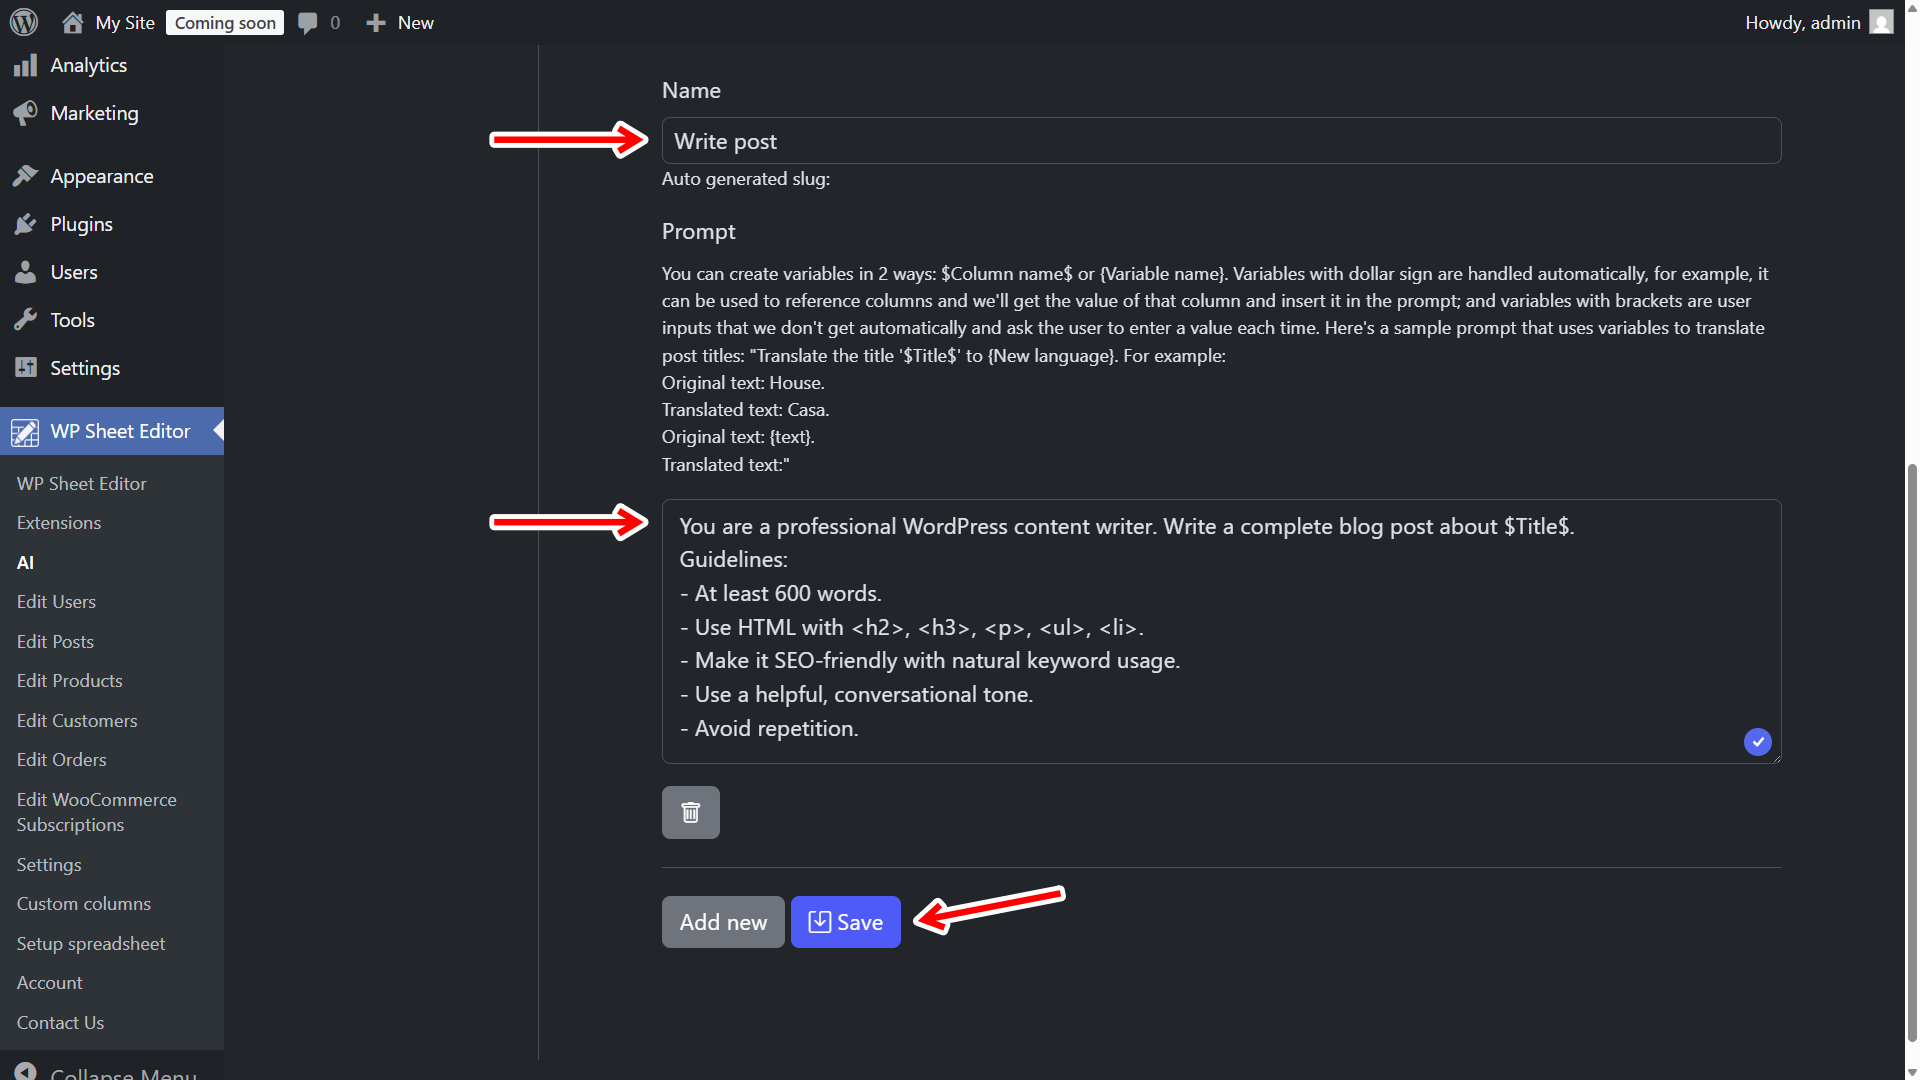
You are a professional WordPress content writer. Write a complete blog post about $Title$.
Guidelines:
- At least 600 words.
- Use HTML with <h2>, <h3>, <p>, <ul>, <li>.
- Make it SEO-friendly with natural keyword usage.
- Use a helpful, conversational tone.
- Avoid repetition.
- Return the post content only, starting with a normal paragraph as introduction.
This prompt ensures every generated post is long enough, SEO-friendly, and structured with headings and lists. You can customize it; for example, add “Include a FAQ section” or “Write in a humorous tone.”
Step 2. Save it as a global prompt
Instead of copying this text every time, you’ll save it as a global prompt inside WP Sheet Editor. This makes it reusable with a short prompt shortcut (ai:prompt-slug).
- Go to WP Sheet Editor > AI > Settings > Prompts.
- Click Add new.
- Enter a name, e.g., “Write post”
- Paste the prompt in the Prompt field.
- Click Save.
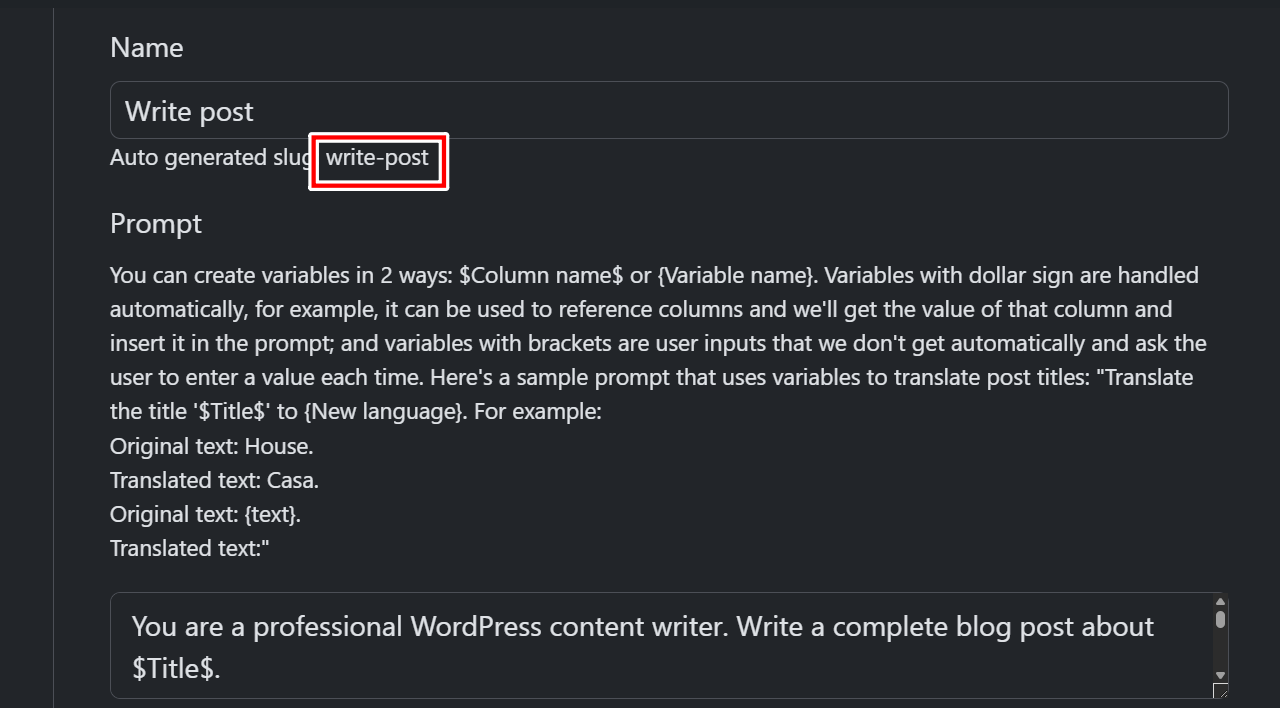
Once you save the global prompt, WP Sheet Editor will generate a slug, such as write-post. You can now run this with ai:write-post inside your spreadsheet.
Step 3. Generate WordPress posts with Grok AI
Now that you have your global prompt, it’s time to generate post content with Grok AI. The Content column is where your posts live, and Grok 4 can write them directly from your spreadsheet.
Note. For this example, we have already created the entries with the title of the posts, as we will reference the title so that Grok can write the content of the post.
Option 1: Generate posts directly in the spreadsheet
If you want to test the prompt or generate posts one by one, this method works perfectly.
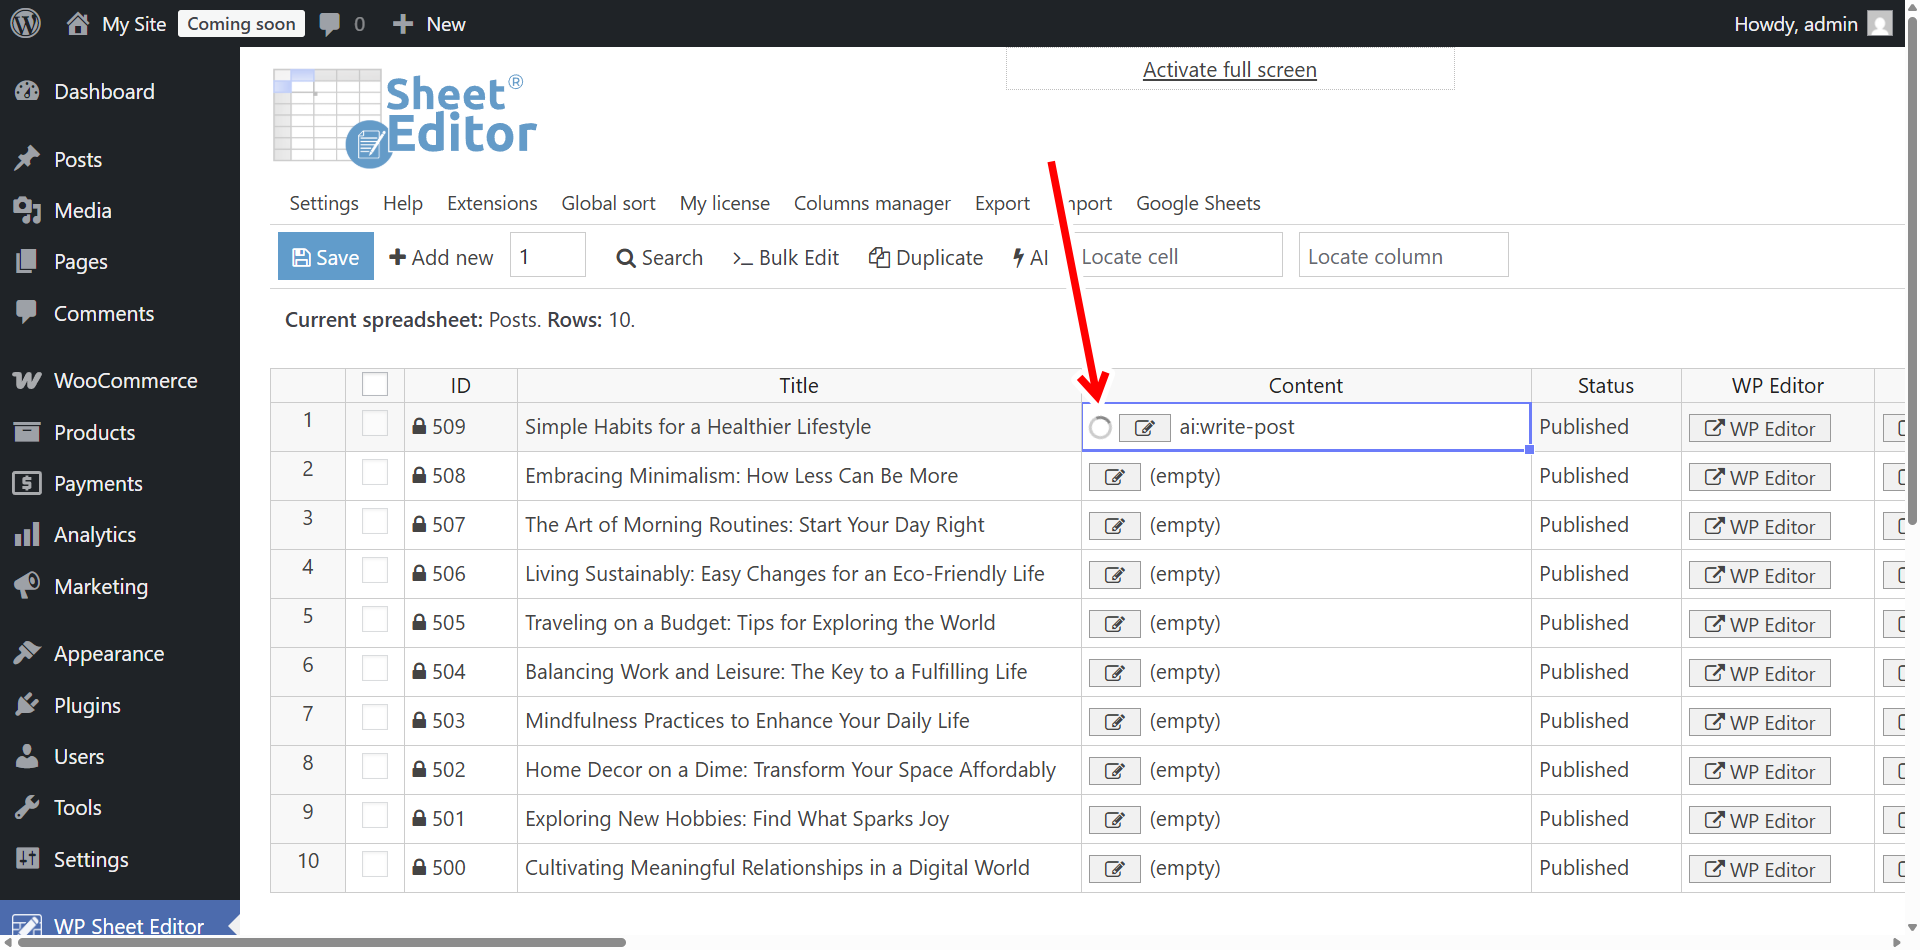
- Go to WP Sheet Editor > Edit Posts.
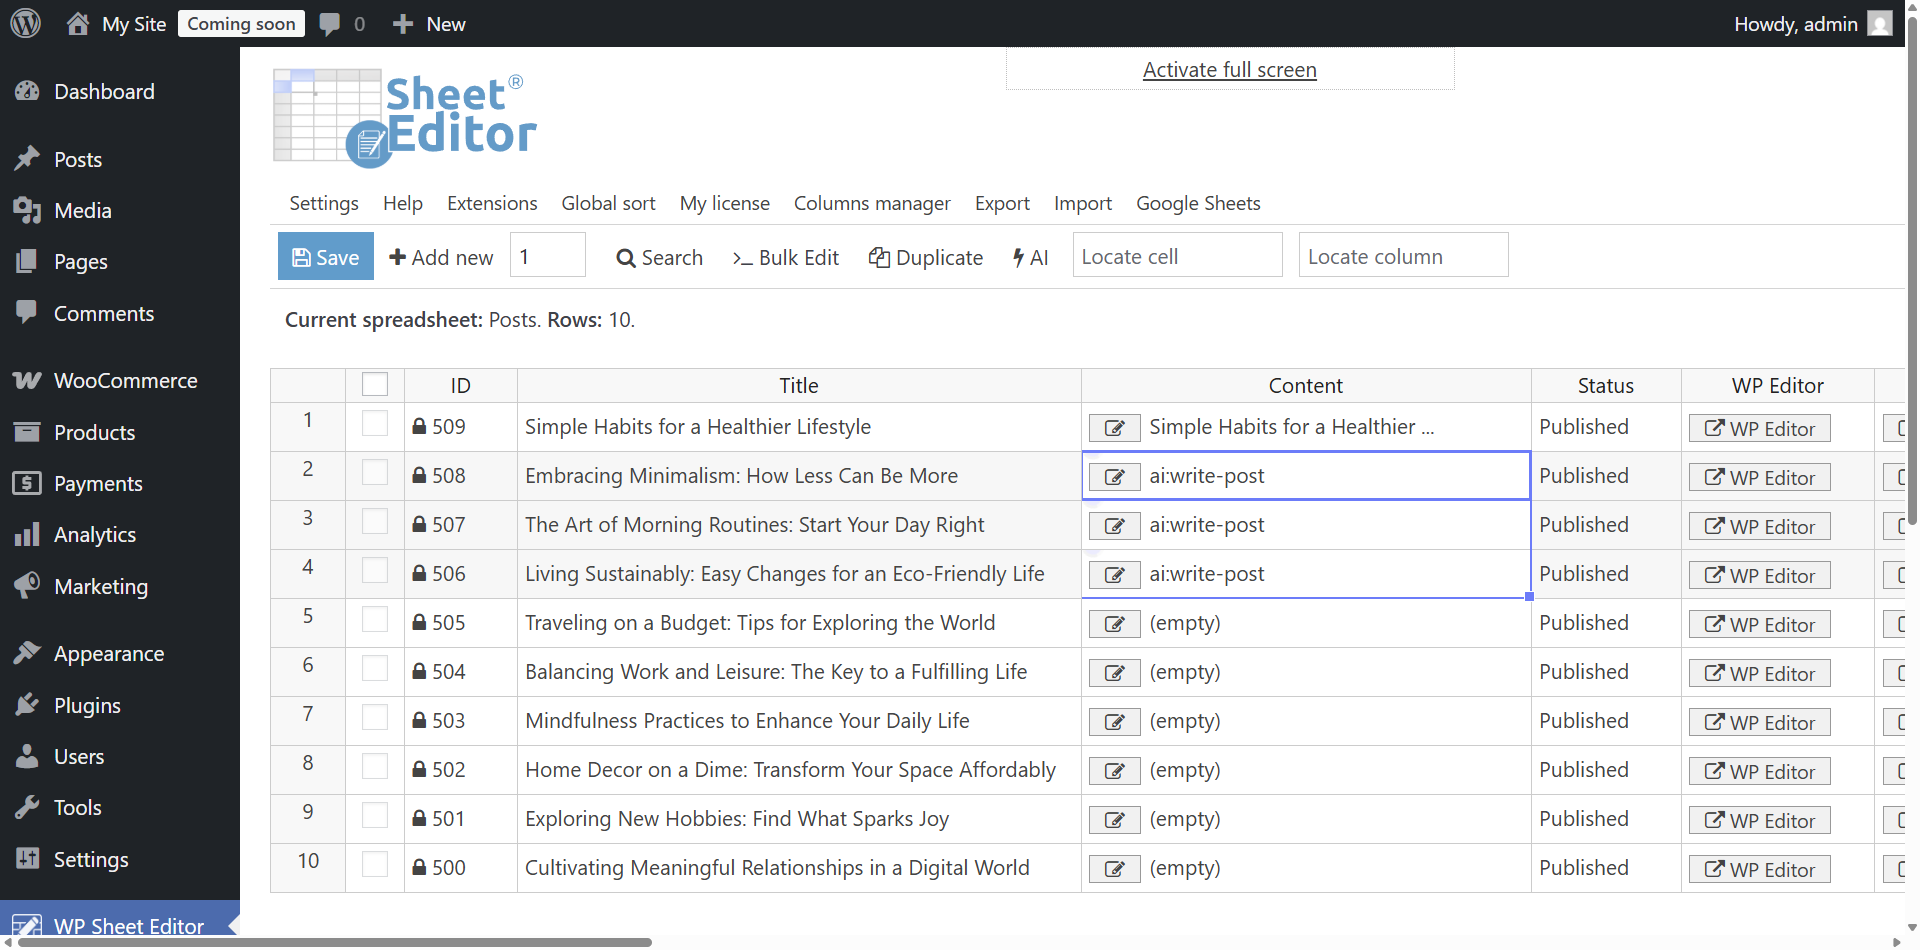
- In the Content column, type:
ai:write-post
- Press Enter.

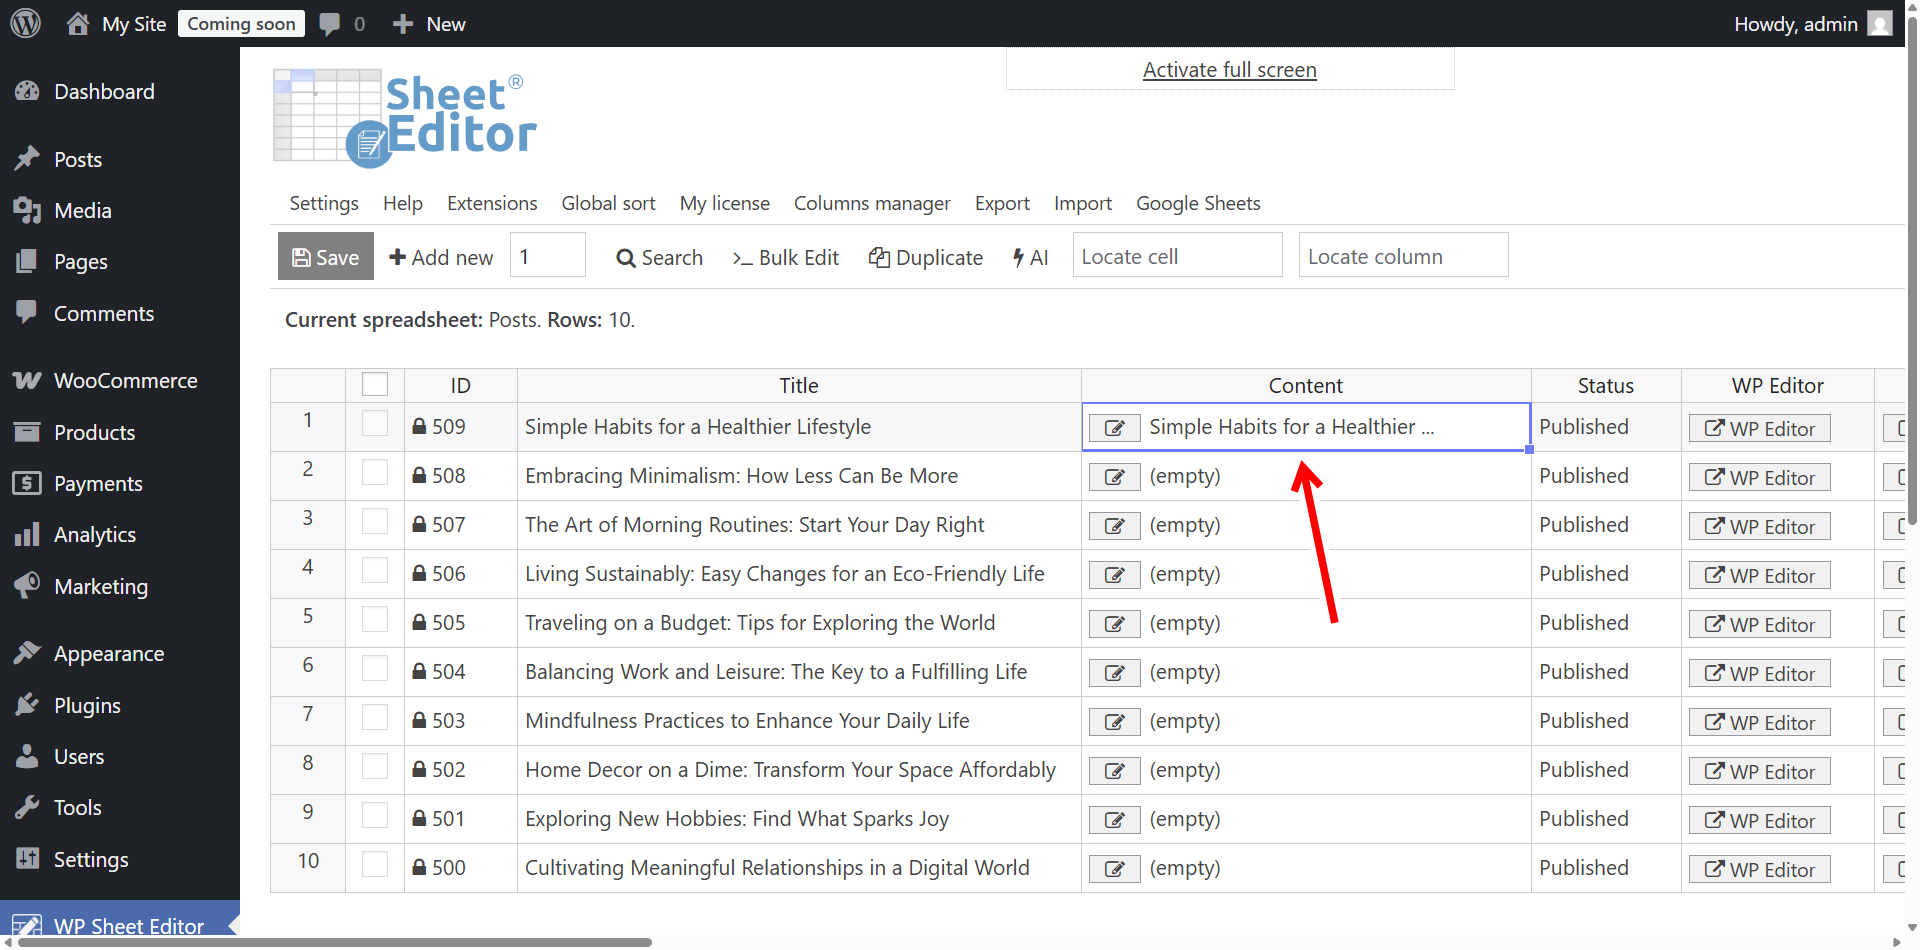
Grok 4 will immediately start writing a full post based on the title in that row.
As you can see, Grok has already written the content for our post.
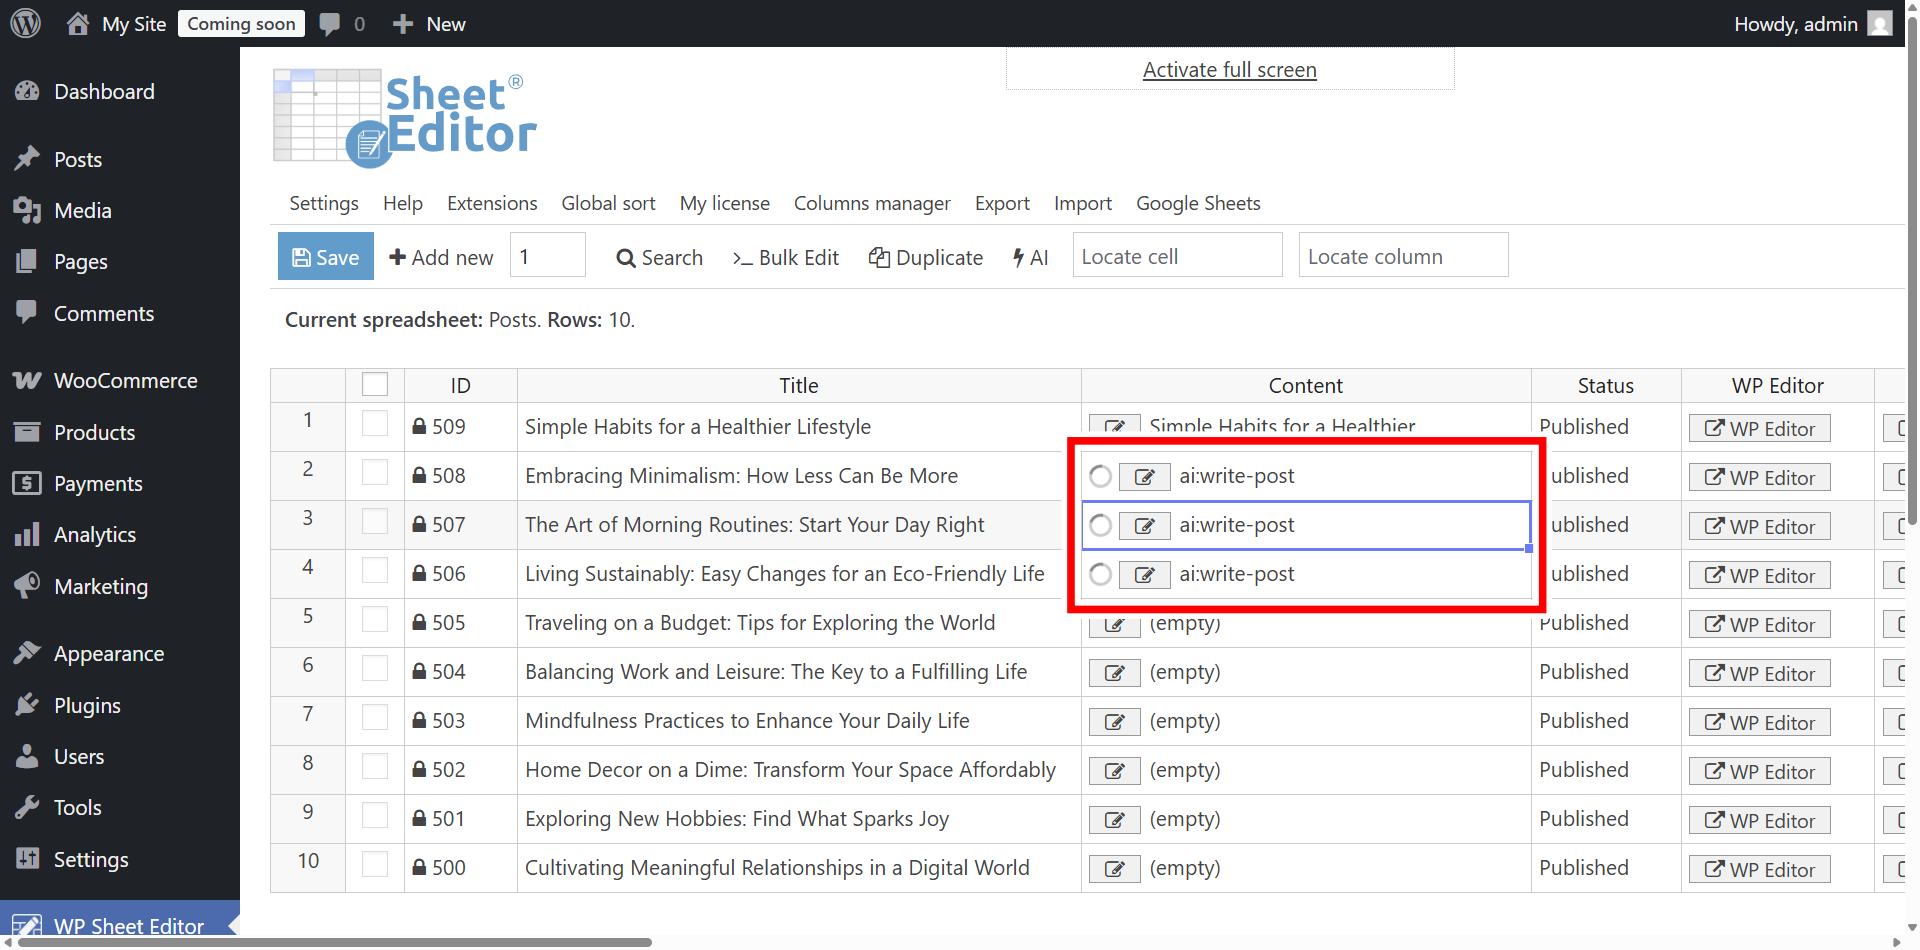
PRO TIP: You can create the prompt shortcut in multiple cells to generate content with generative AI in several posts simultaneously.
AI is working to generate the content of multiple posts at once.
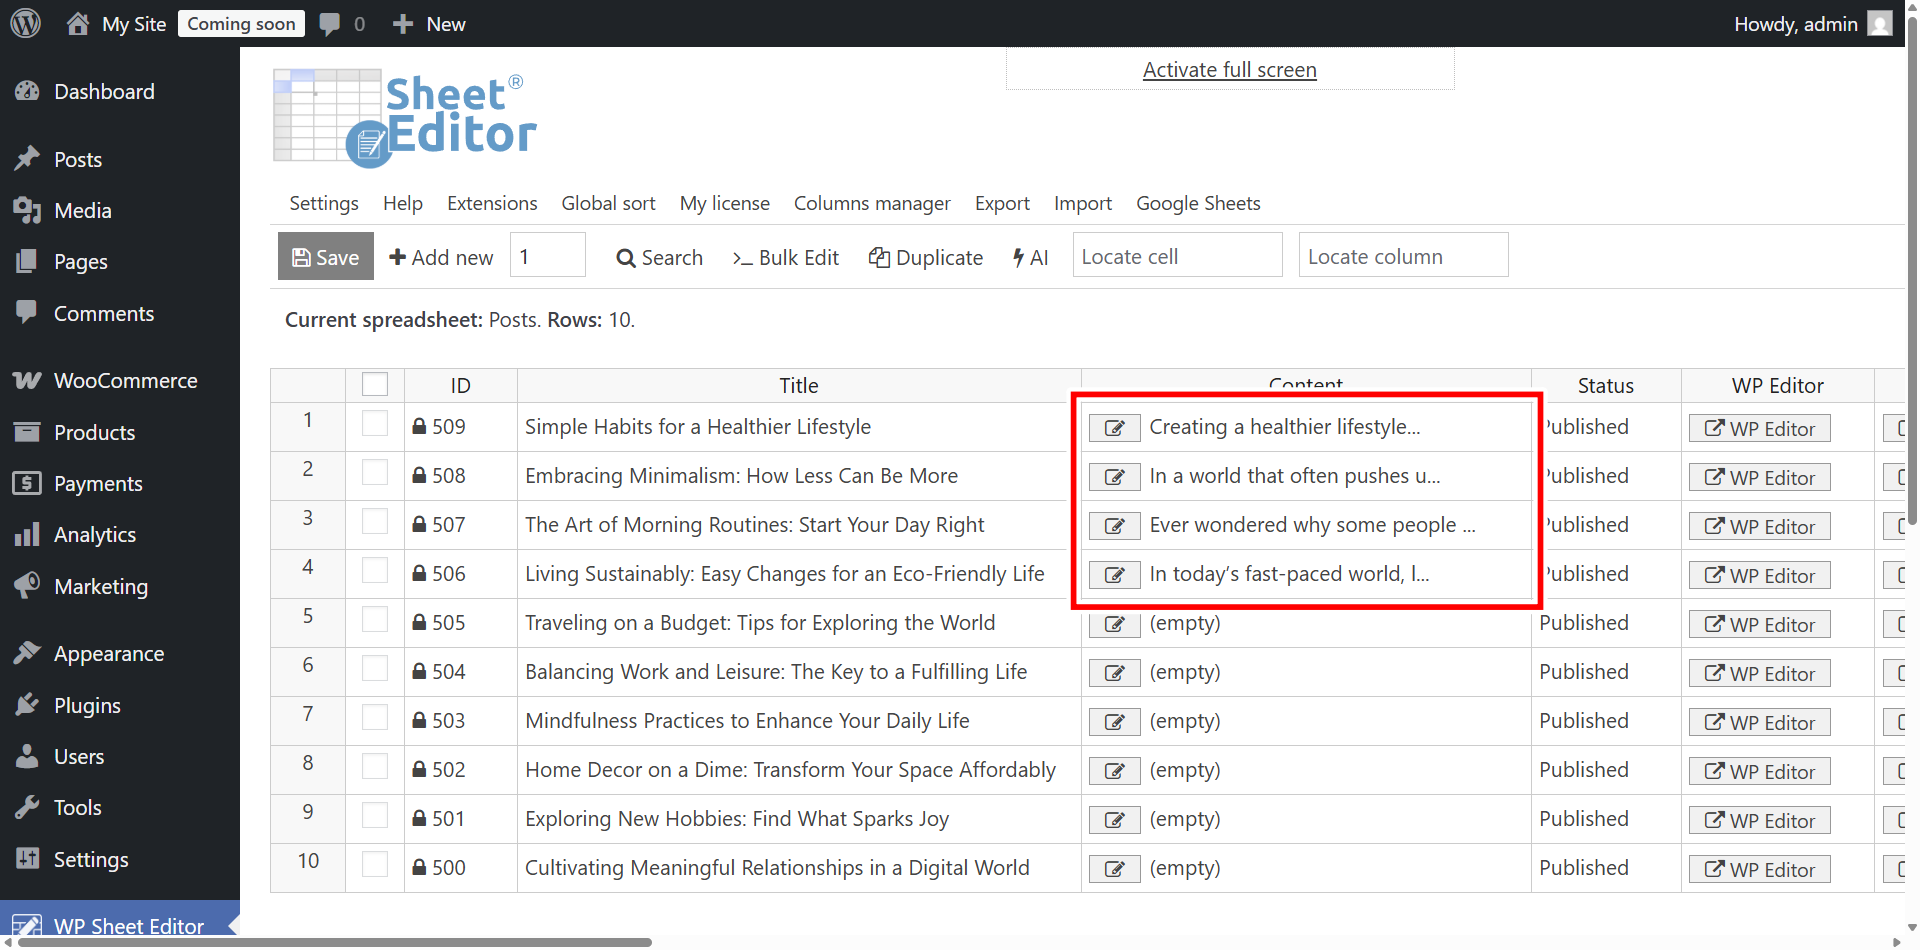
As you can see, we have generated the content of our posts easily.
Option 2: Write post content with Grok AI in individual posts
If you want to work on one post at a time to give each detail your full attention, you can open the editor in a pop-up window by clicking the Edit button in each cell of the Content column.
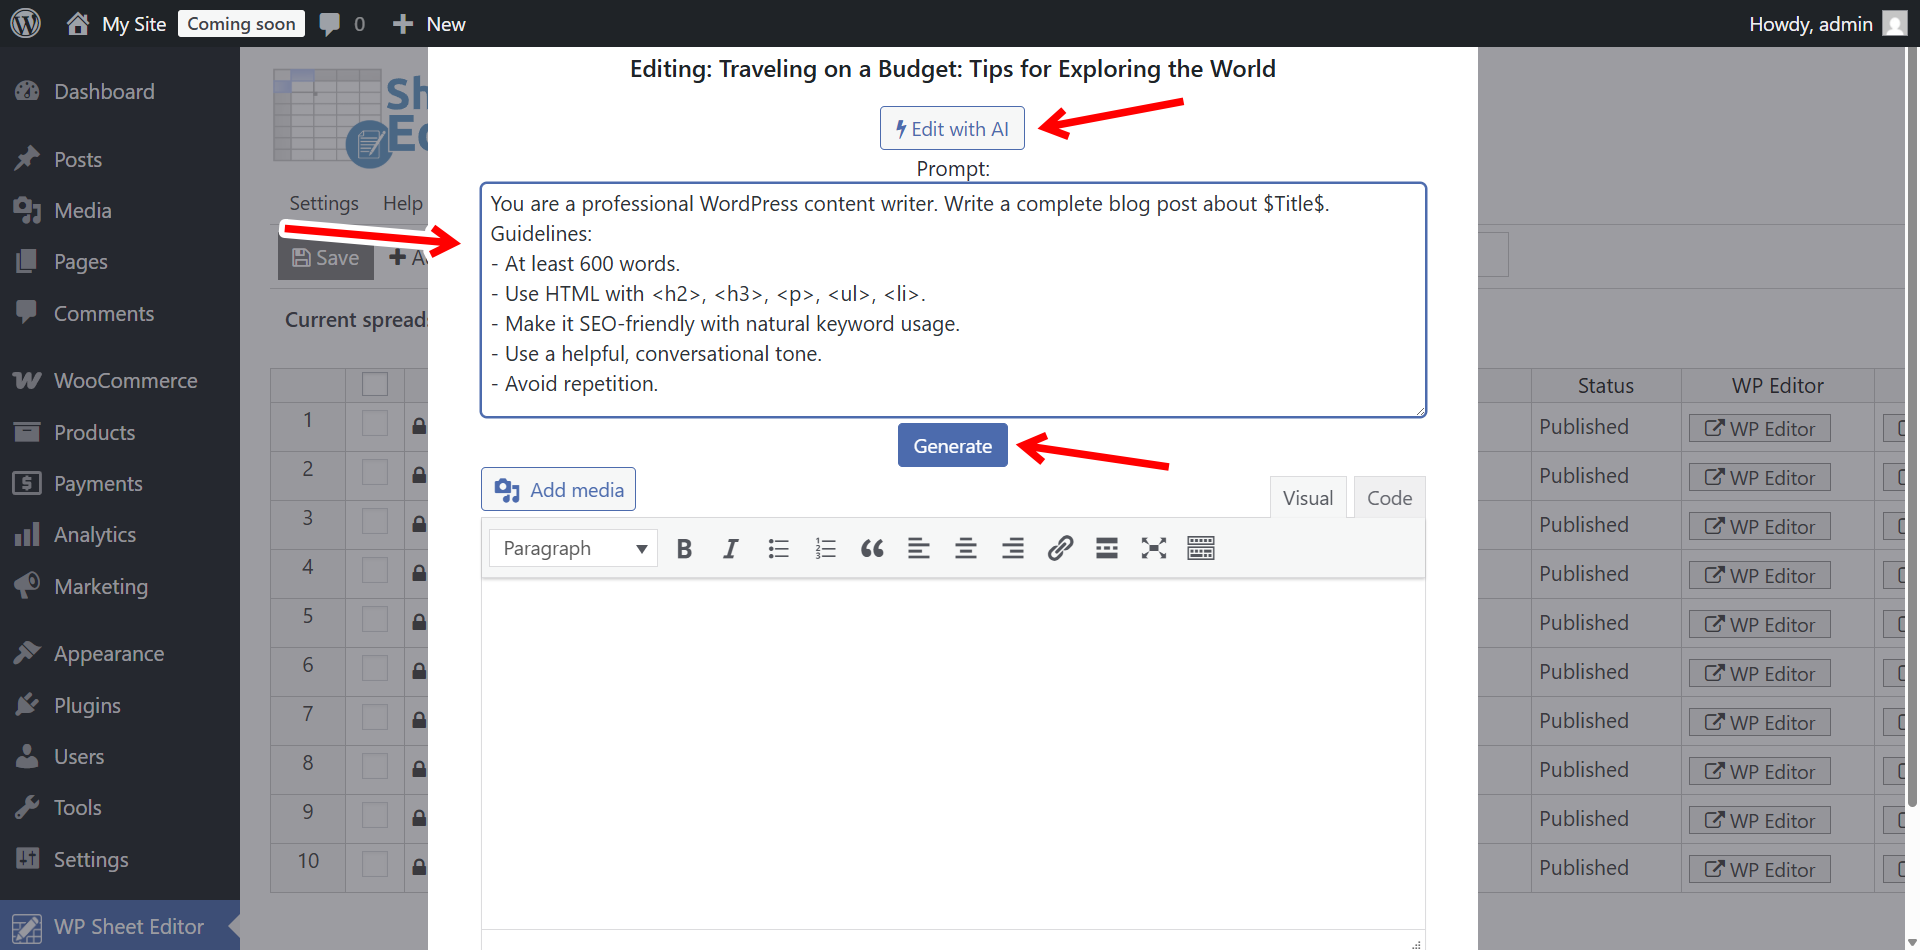
- Click on Edit with AI.
- Enter the Prompt text.
- Click on Generate.
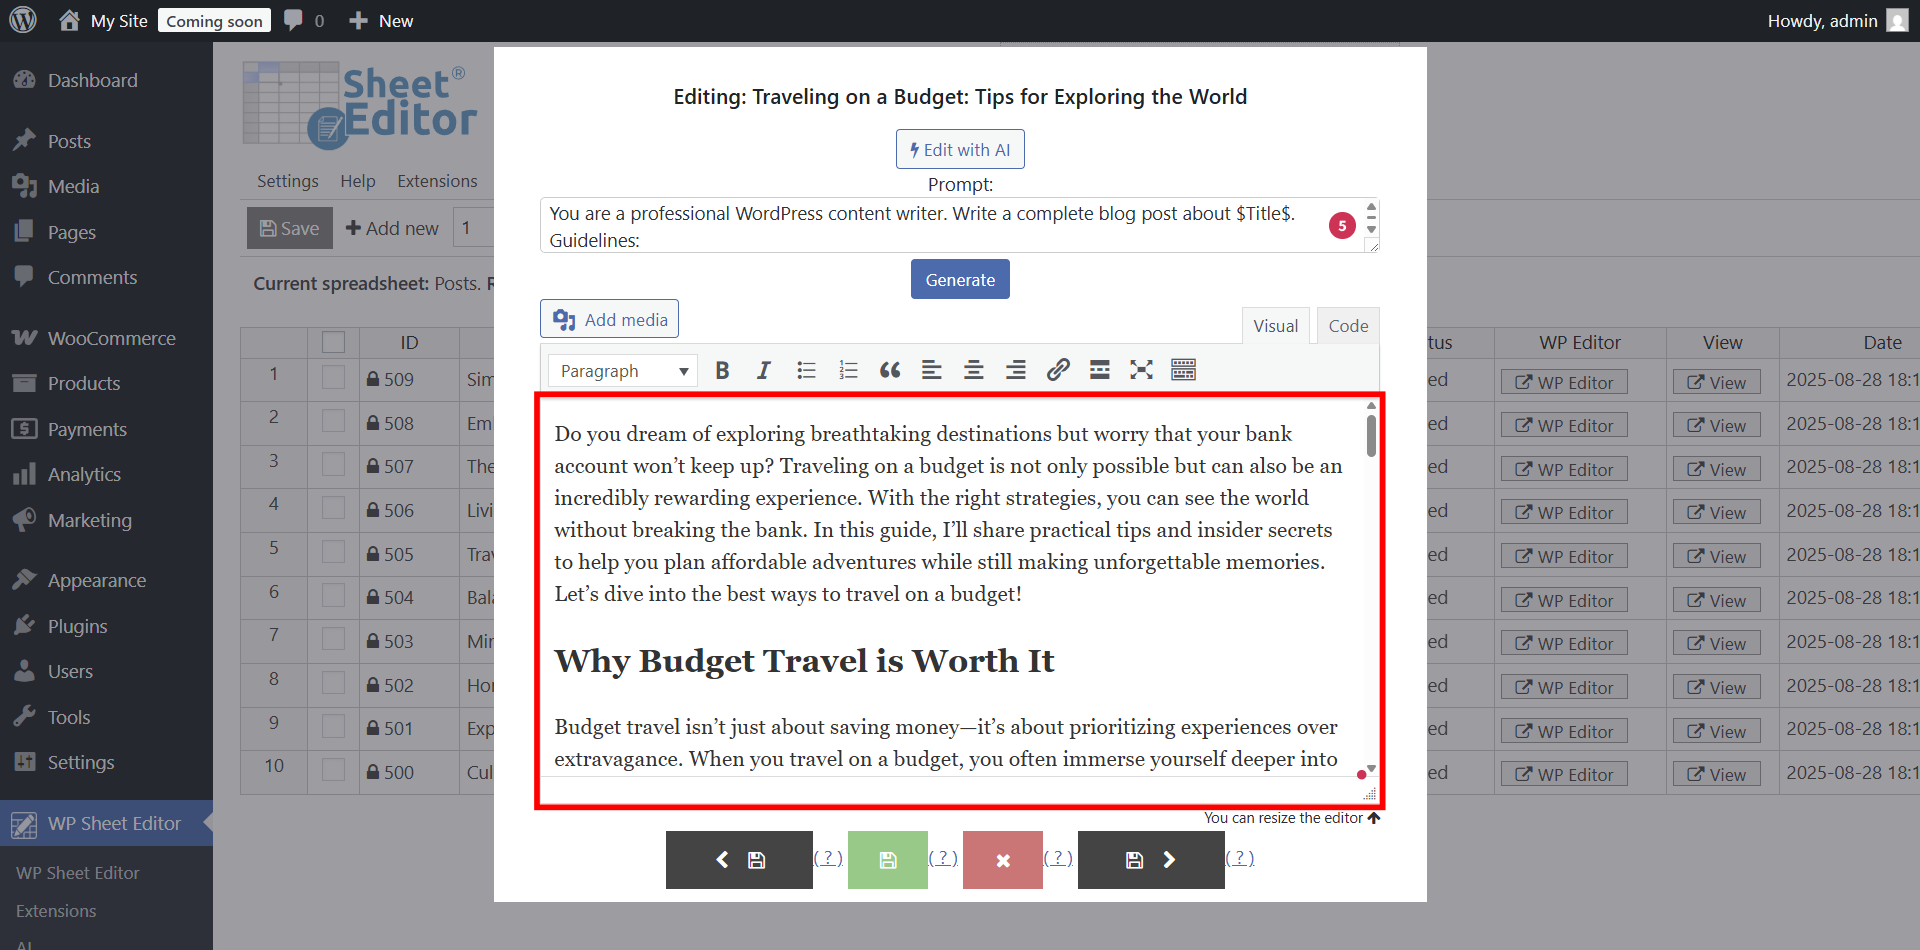
You can see that Grok is generating the post content based on the post title.

Once the content generation is done, you can use the text editor to edit your post and get it ready to publish.
Option 3: Bulk generate WordPress posts with Grok
If you have dozens or hundreds of draft posts with Title, Bulk Edit is the fastest way to populate them with content.
Our Bulk AI API allows you to bulk generate or edit WordPress content with AI in WP Sheet Editor.
In this example, we will filter all the posts missing content and then add them content with Grok AI.
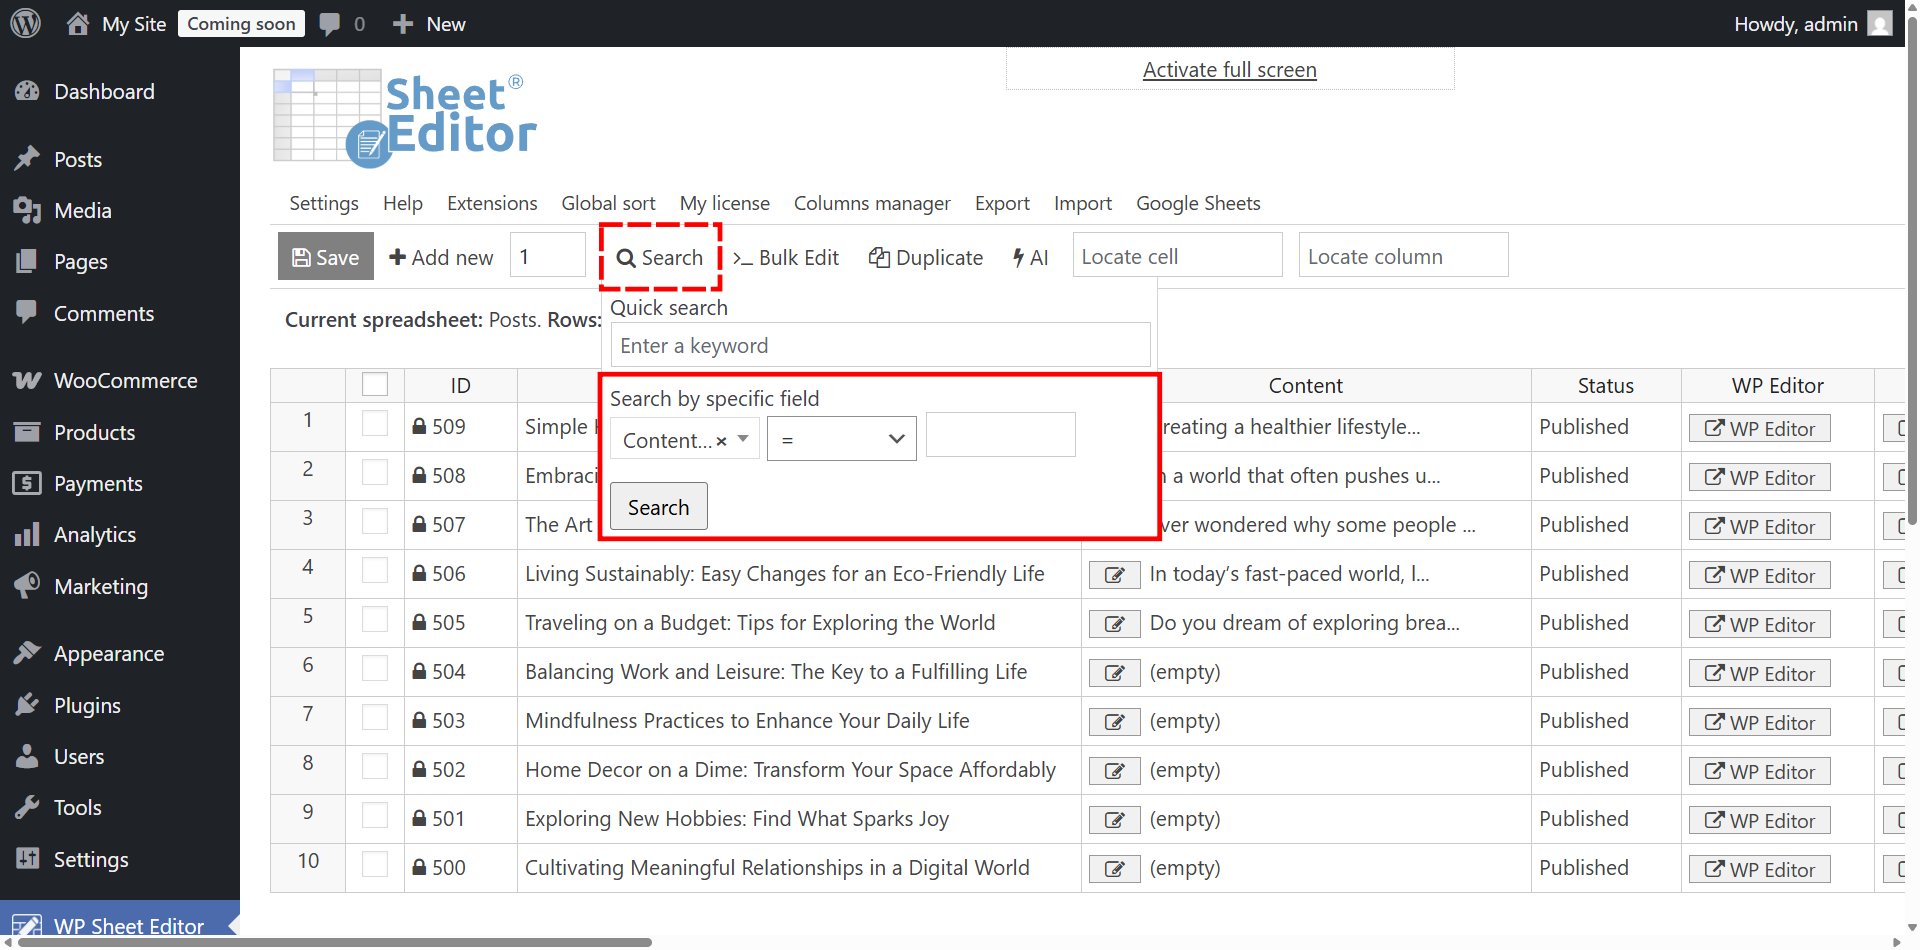
First, let’s search for posts without content.
Just hover the mouse cursor over the Search tool and select these values:
- Content = Empty
- Click on Search.
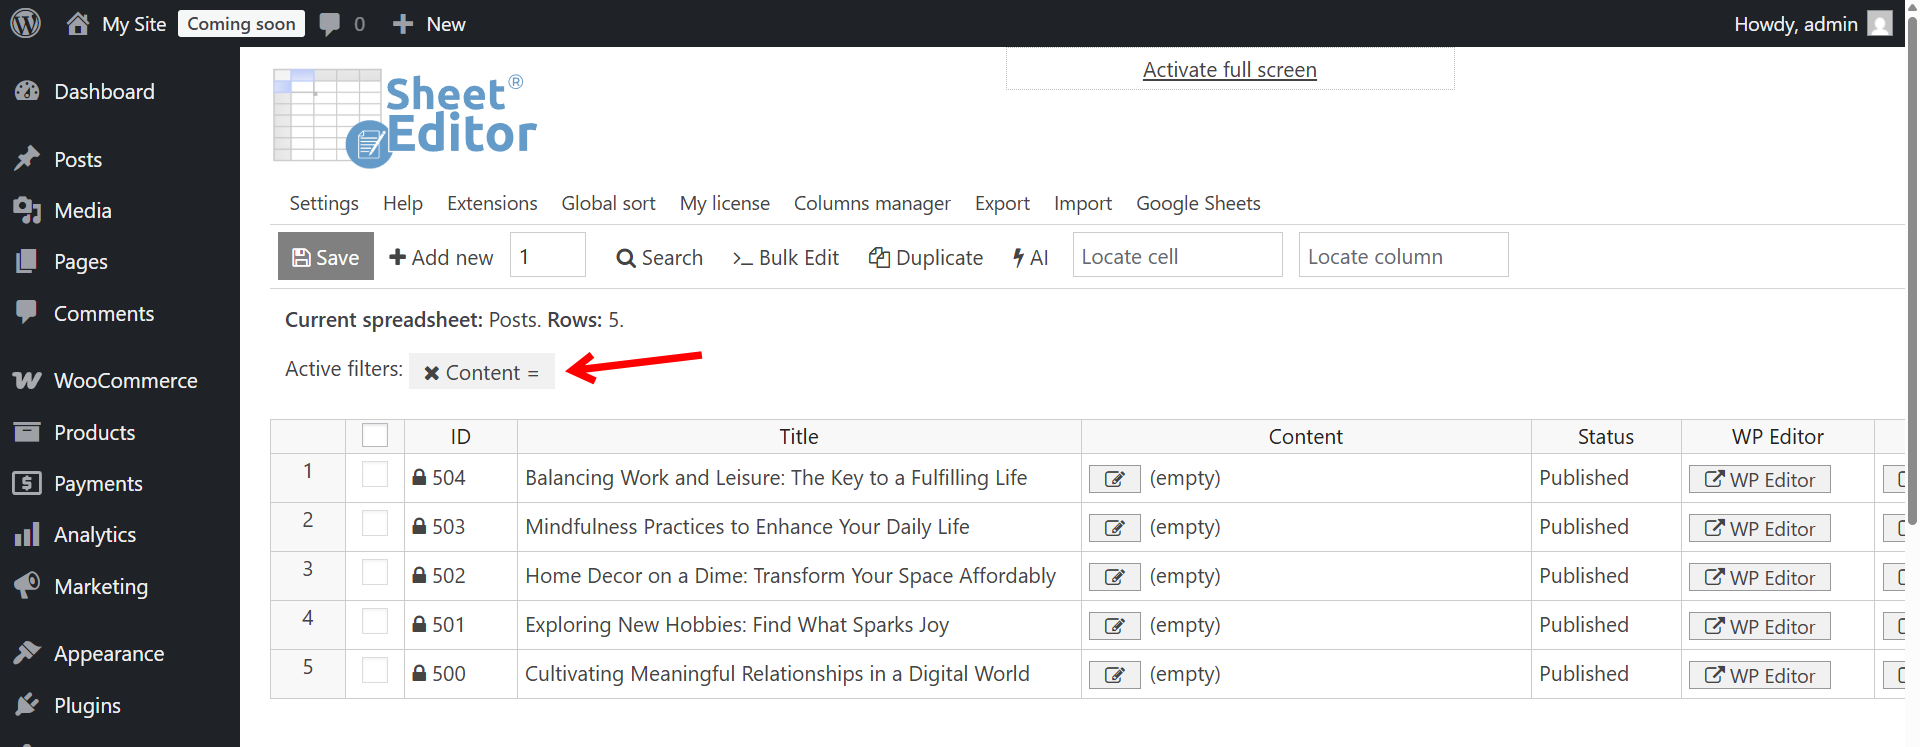
We have filtered all the posts missing content, and now we’re ready to ask the AI to automatically write the content based on the post title.
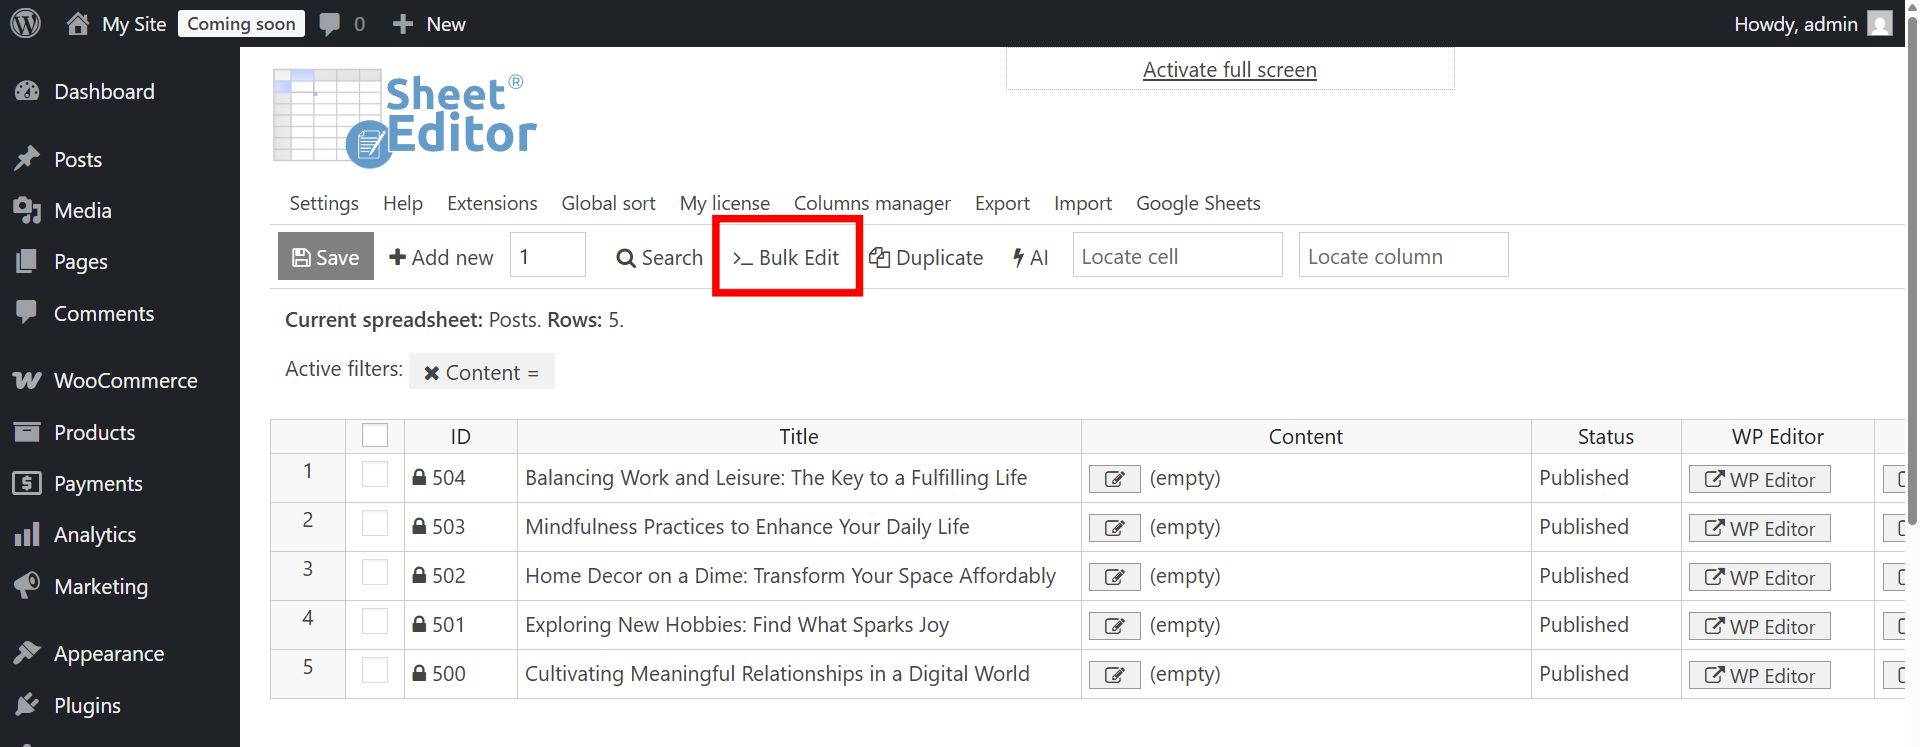
Open the Bulk Edit tool.
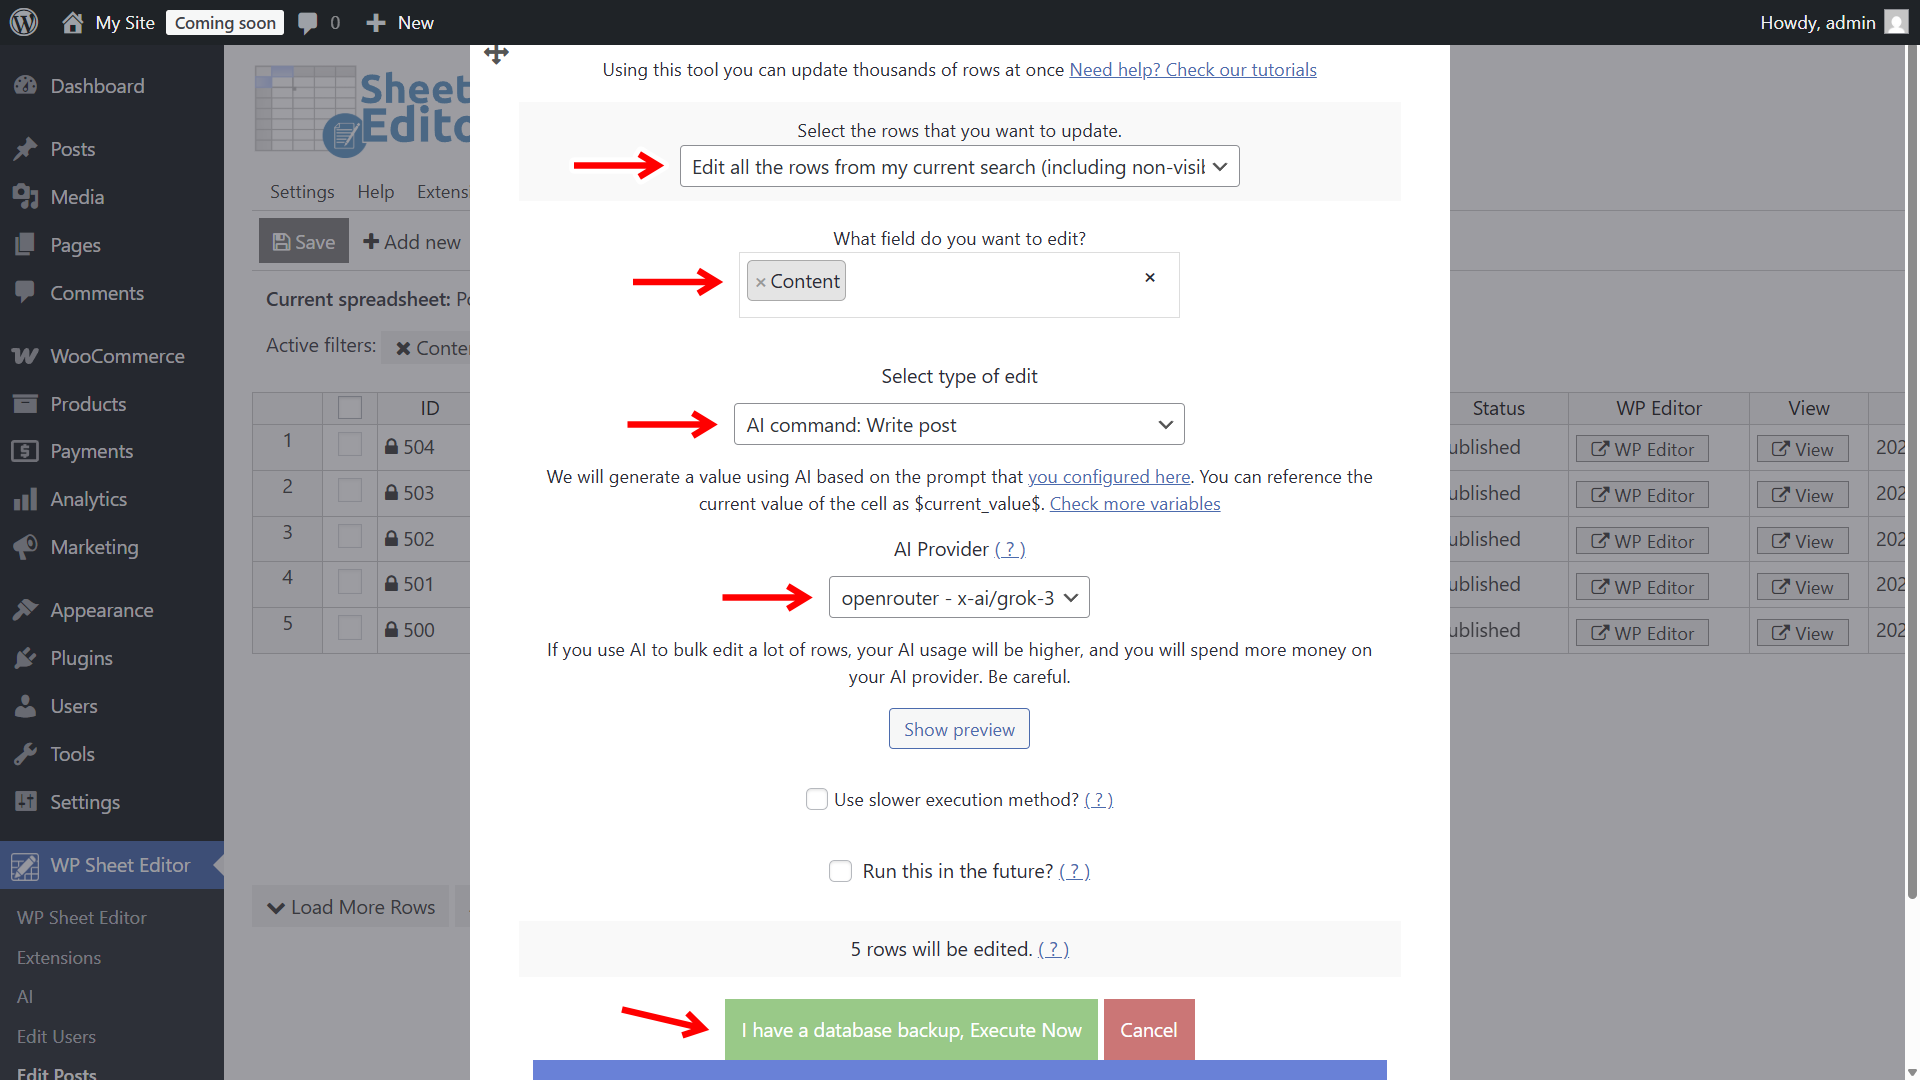
Now select the following values:
- Select the rows that you want to update: Edit all rows from my current search
- What field do you want to edit: Content
- Select type of edit: AI command : Write post
- AI Provider: Select your favorite provider; we will use Grok 3 in this example, but you can use Grok 4 or any other.
- Click Execute Now.
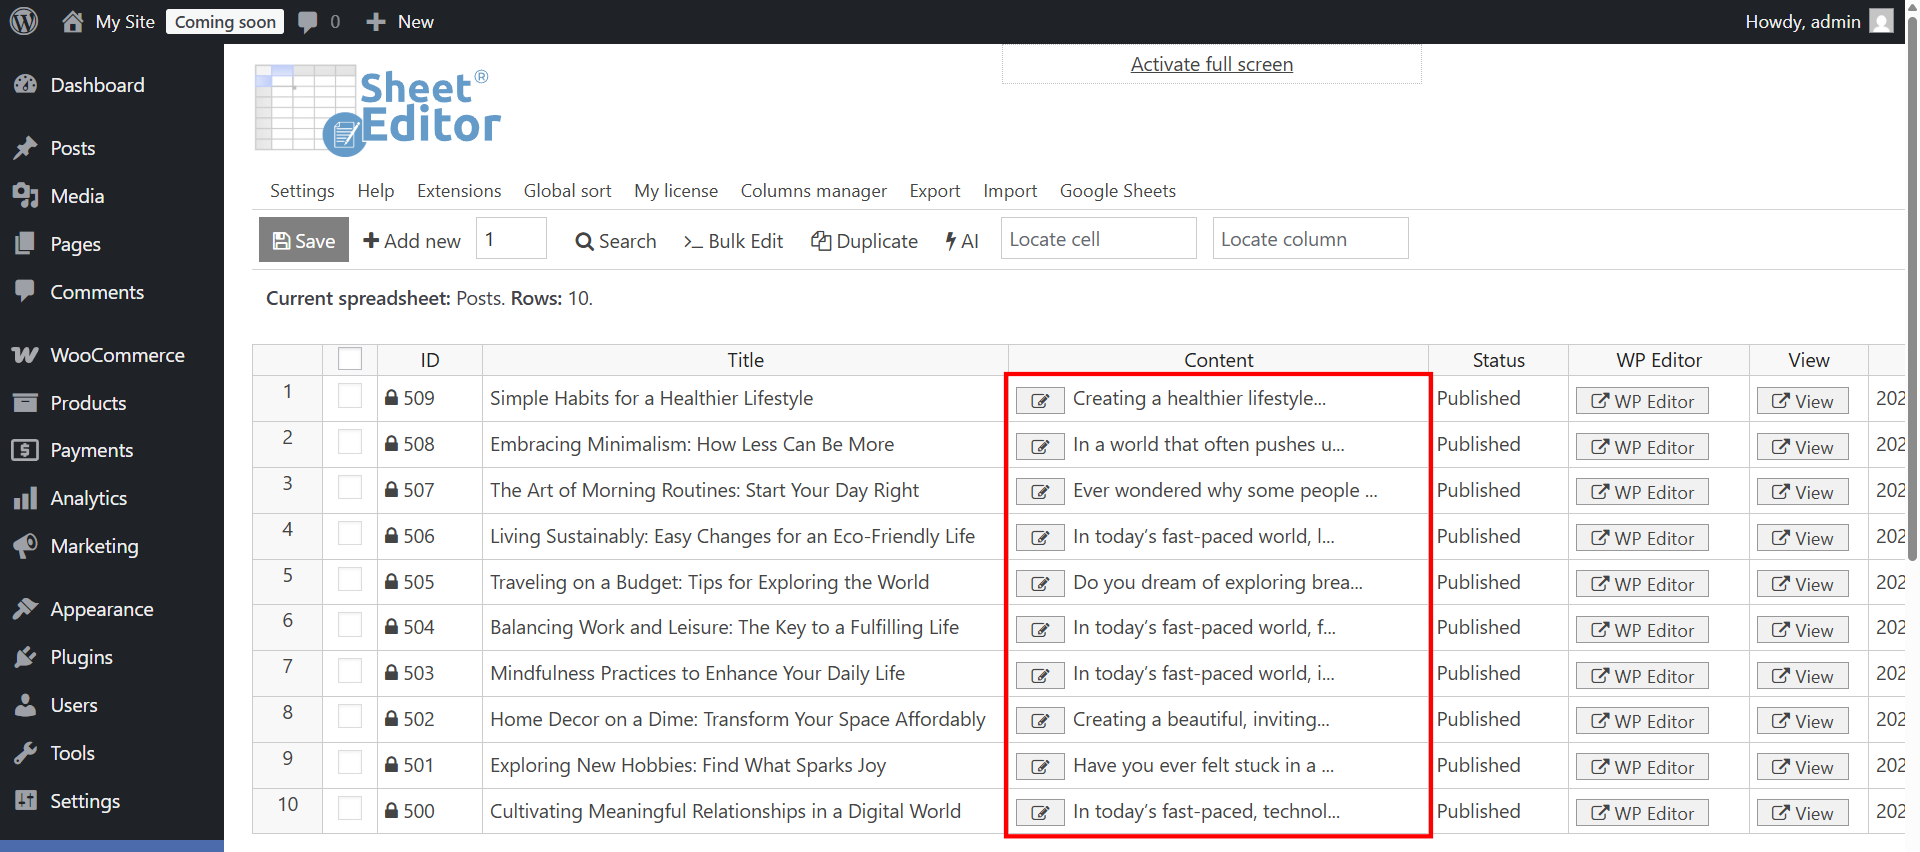
Grok will start working and, once the process is finished, you’ll have complete posts ready to publish.
After having nothing but the titles of our posts, we have now generated the content of our posts with Grok AI.
Step 4. Use and optimize the generated posts
Once the posts are generated, they’re ready on WordPress. From here you can:
- Review the content and tweak any details specific to your site.
- Add images, videos, or media for better engagement.
- Polish or generate SEO titles and meta descriptions using AI.
- Schedule posts to ensure a consistent publishing rhythm.
With Grok AI and WP Sheet Editor, you go from empty titles to polished, SEO-ready articles in a fraction of the time.
Frequently Asked Questions
Will Grok create unique posts for every title?
Yes. Since you’re feeding unique titles and prompts, Grok generates unique content for each one. The prompt also ensures structure and tone consistency across your site.
What if I already have some draft content?
You can adjust the prompt to “Expand and improve the existing post.” This way Grok will build upon your drafts instead of starting from scratch.
Can I generate posts in different languages?
Absolutely. Just add “Write in Spanish” or “Generate this post in French” to your prompt, and Grok AI will produce posts in that language.
Do I need to pay separately for AI tokens?
Yes. The WP Sheet Editor – AI service connects your WordPress site to external AI providers, but the actual text generation happens on the provider’s side (OpenAI, OpenRouter, DeepSeek, xAI, etc.).
This means you’ll need an active account with your chosen provider and enough credits or tokens to run your prompts. Token usage depends on factors like article length, model type, and formatting. For example, generating a 600–800 word blog post usually costs just a few cents, but you should always monitor your provider’s dashboard to track usage and expenses.
In short, WP Sheet Editor gives you the tools to integrate AI into WordPress, but the AI processing costs are handled separately by the provider.
Related tutorials
- Find Low Quality WordPress Posts Using AI
- Improve Low Quality Posts with AI
- Generate SEO titles and descriptions with AI
- Generate featured images with AI
You’ve learned how to generate WordPress posts with Grok 4 using WP Sheet Editor. With just a few steps, you can turn empty drafts into complete, SEO-friendly posts and keep your content pipeline full.