Managing website data, especially for large e-commerce stores or content-heavy sites, often involves handling large CSV files. Transferring these files manually can be tedious and inefficient. Our FTP Import feature provides a powerful solution, allowing you to import data directly from an FTP/SFTP server into your WordPress site. This completely automates your data workflows, saving you time and reducing the risk of manual errors. Whether you need a one-time data migration or recurring updates from an external inventory system, this tool makes the process seamless.
Required plugins
To use this functionality, you will need the following:
1. WP Sheet Editor: The core plugin that provides the spreadsheet interface for managing your WordPress data.
You can download the plugin here:
Download Posts, Pages, and Custom Post Types Spreadsheet Plugin - or - Check the features
2. Automations Add-on: An extension for WP Sheet Editor that enables you to schedule automated imports and exports.
You can get the add-on here:
How to import from an FTP server
Follow these steps to import a CSV file from your FTP server into WordPress using our spreadsheet editor.
Step 1: Add your FTP connection to wp-config.php
For security reasons, your FTP server credentials must be defined in your website’s wp-config.php file. This prevents sensitive information from being stored in the database. Copy the following code block, add it to your wp-config.php file, and replace the placeholder values with your actual FTP server details.
You can add multiple servers by duplicating the inner array block.
define('WPSE_AUTOMATIONS_FTP_SERVERS', array(
array(
'name'     => 'My FTP server name', // This must never change
'hostname' => 'my-ftp-server-ip-or-domain.com', // Domain name or server IP
'port'     => 22, // Port number (e.g., 21 for FTP, 22 for SFTP)
'username' => 'my-ftp-username',
'password' => 'my-ftp-password',
'secure'   => false, // Set to true for SFTP connections
)
));
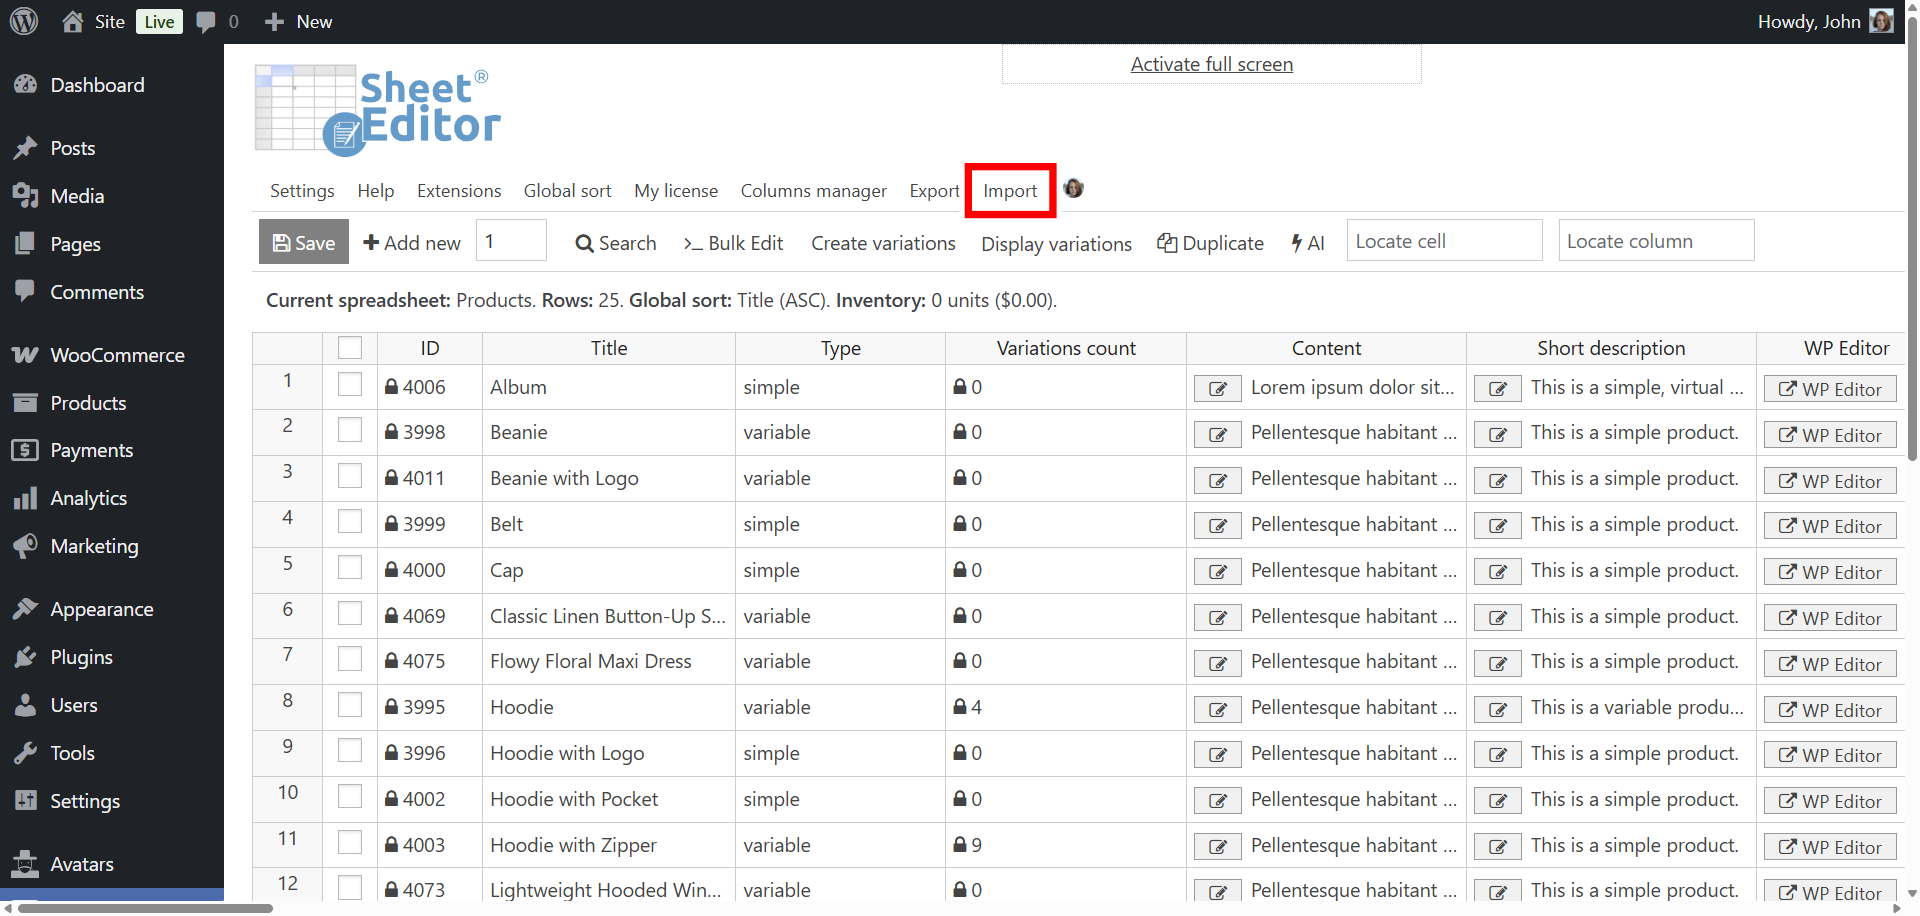
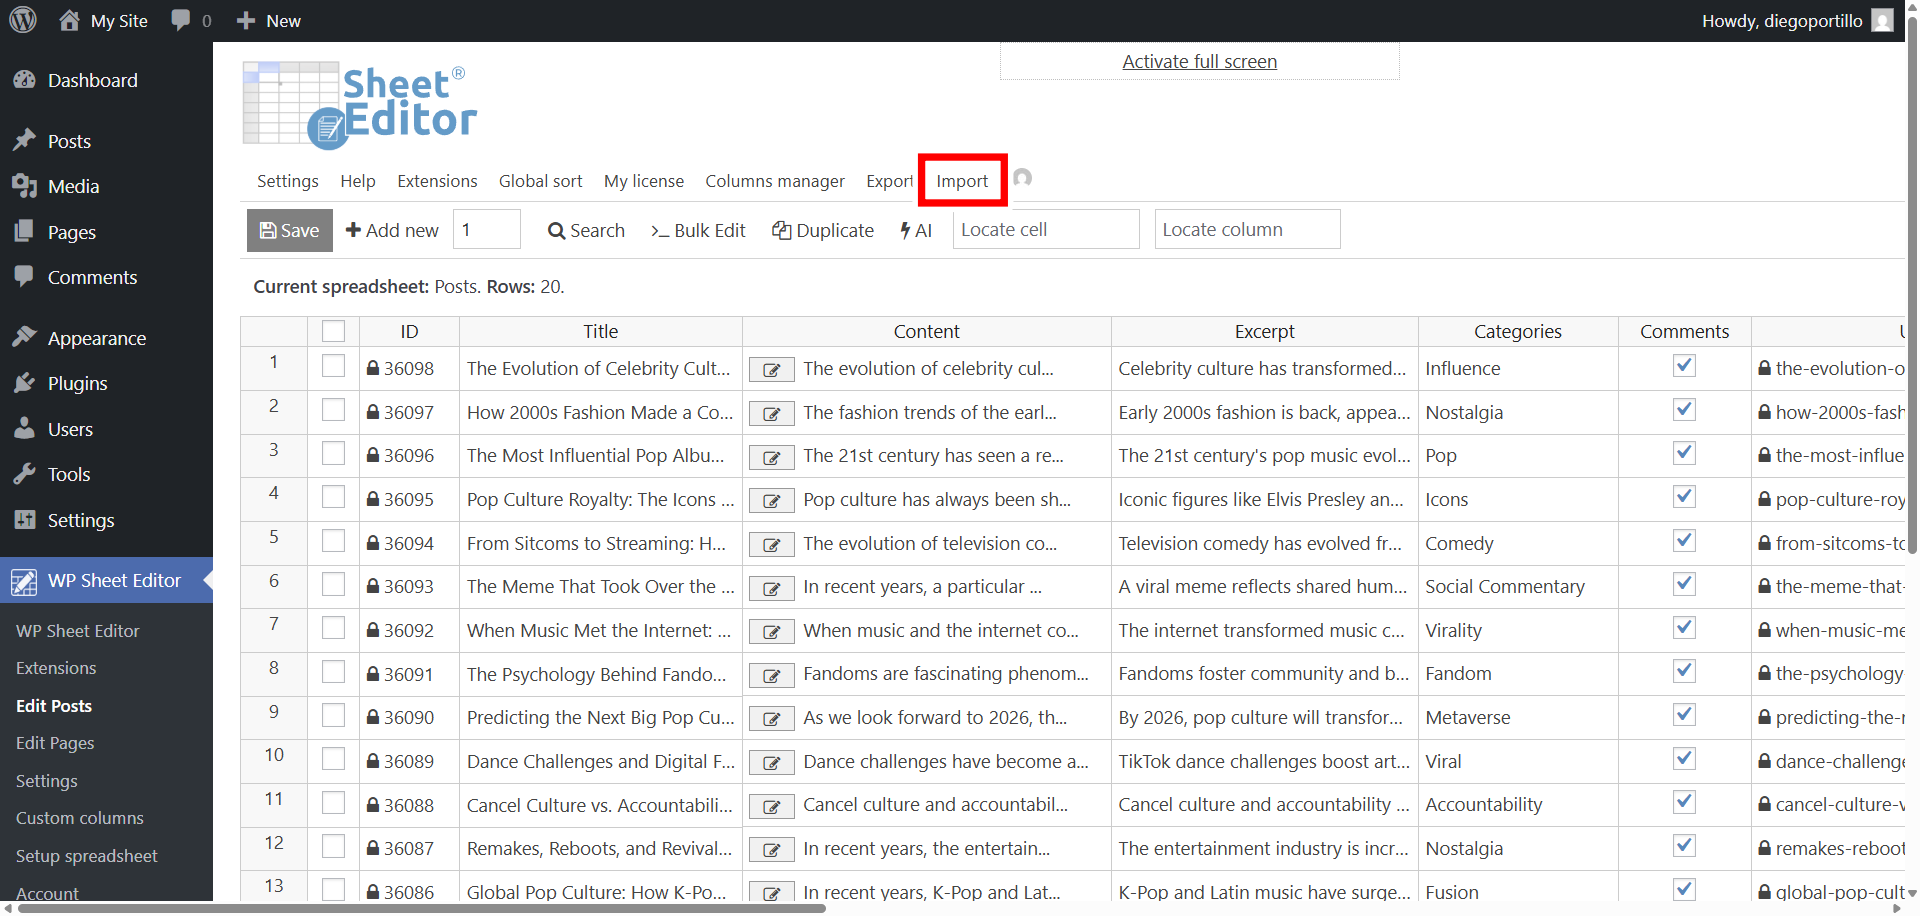
Step 2: Open the Import tool
Once your FTP connection is configured, navigate to the WP Sheet Editor spreadsheet interface for the post type you want to import (e.g., Products, Posts). Click on the “Import” button located in the top toolbar to open the import wizard.
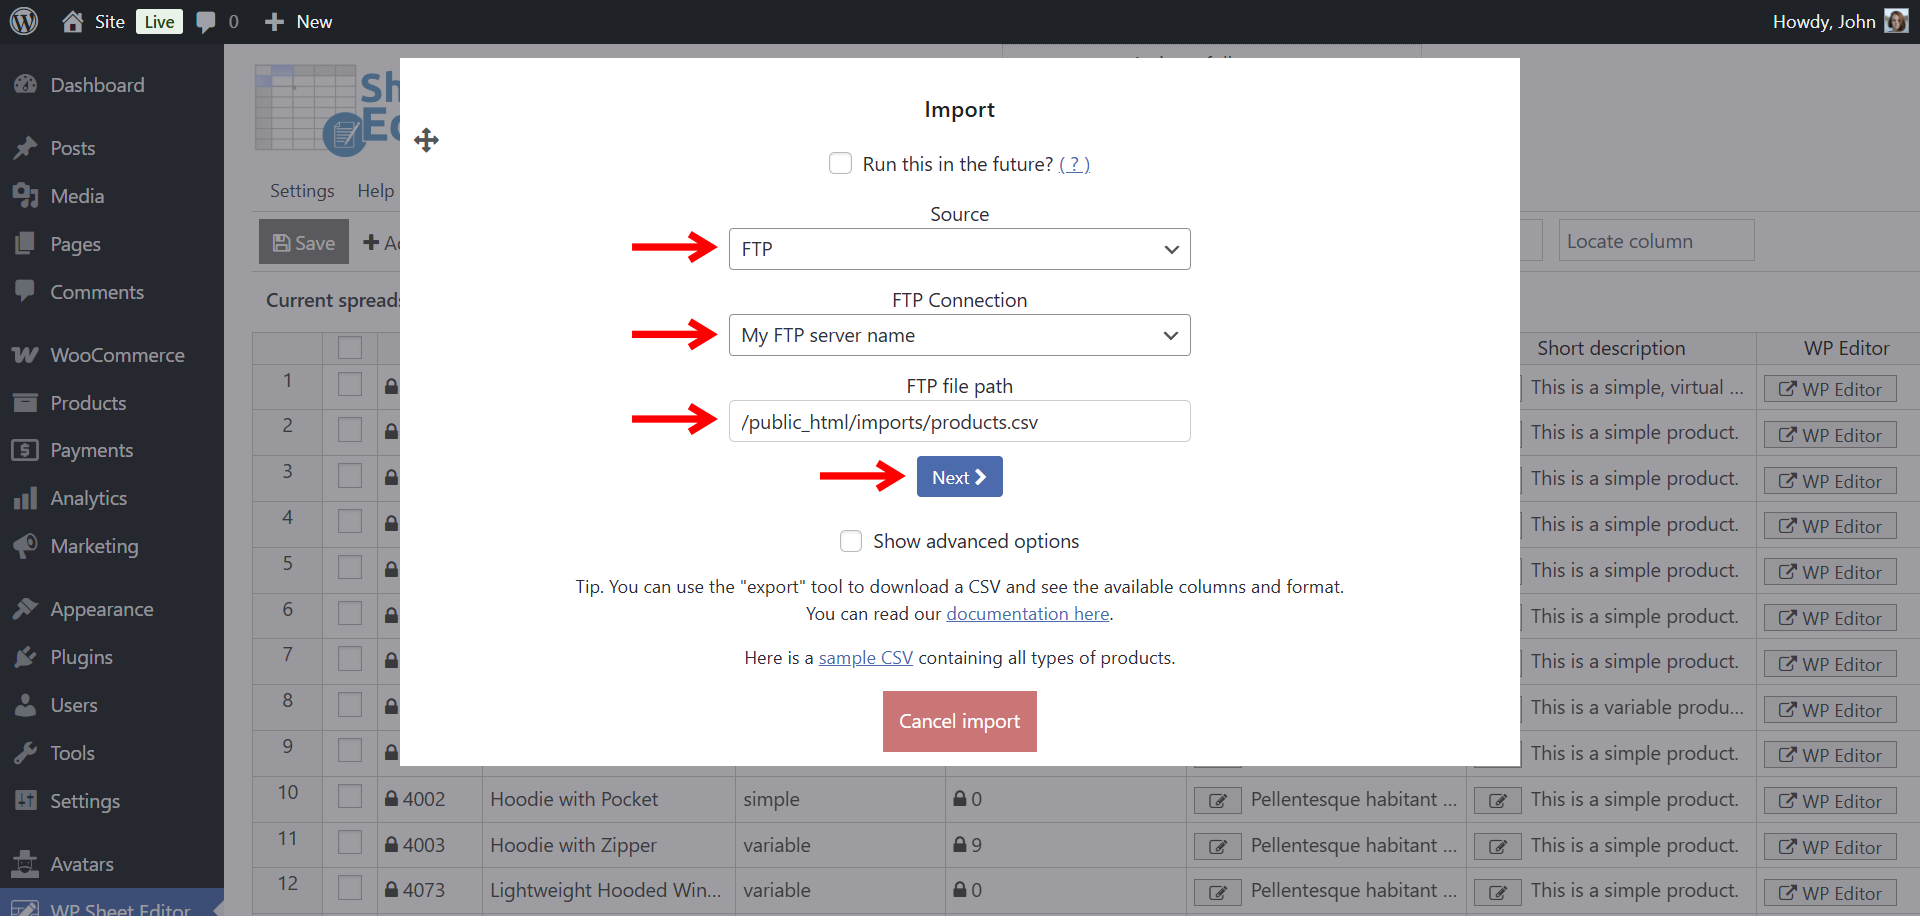
Step 3: Select the data source
Select these values in the data source:
- Source: FTP
- FTP Connection: Select the server.
- FTP file path: Add the path to the CSV file here.
- Click on Next.
After selecting your connection and entering the file path, click “Next” to proceed.
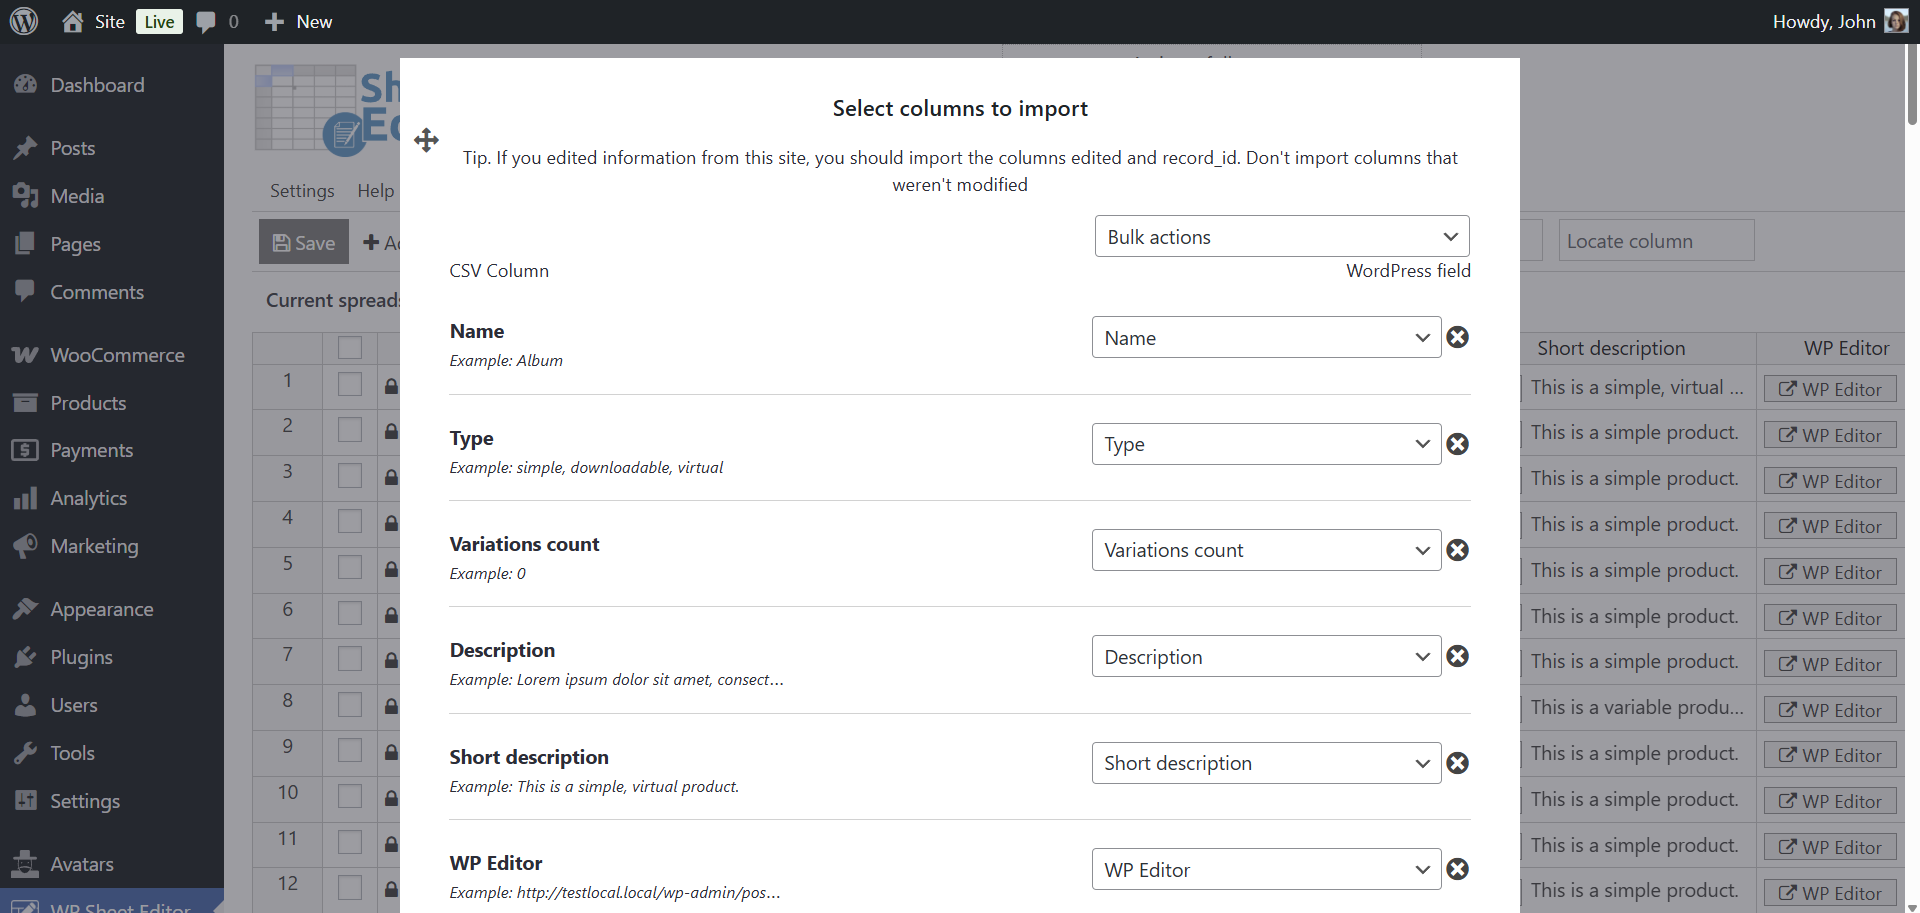
Step 4: Map CSV columns to WordPress fields
The editor will read your CSV file and display its columns. In this step, you need to map the columns from your file to the corresponding fields in WordPress. For example, you would map a column named product_name from your CSV to the post_title field in WordPress. Our tool will automatically try to map matching column names.
You can review the automatic mapping and configure any unmapped columns manually. Once your columns are mapped, click “Next”.
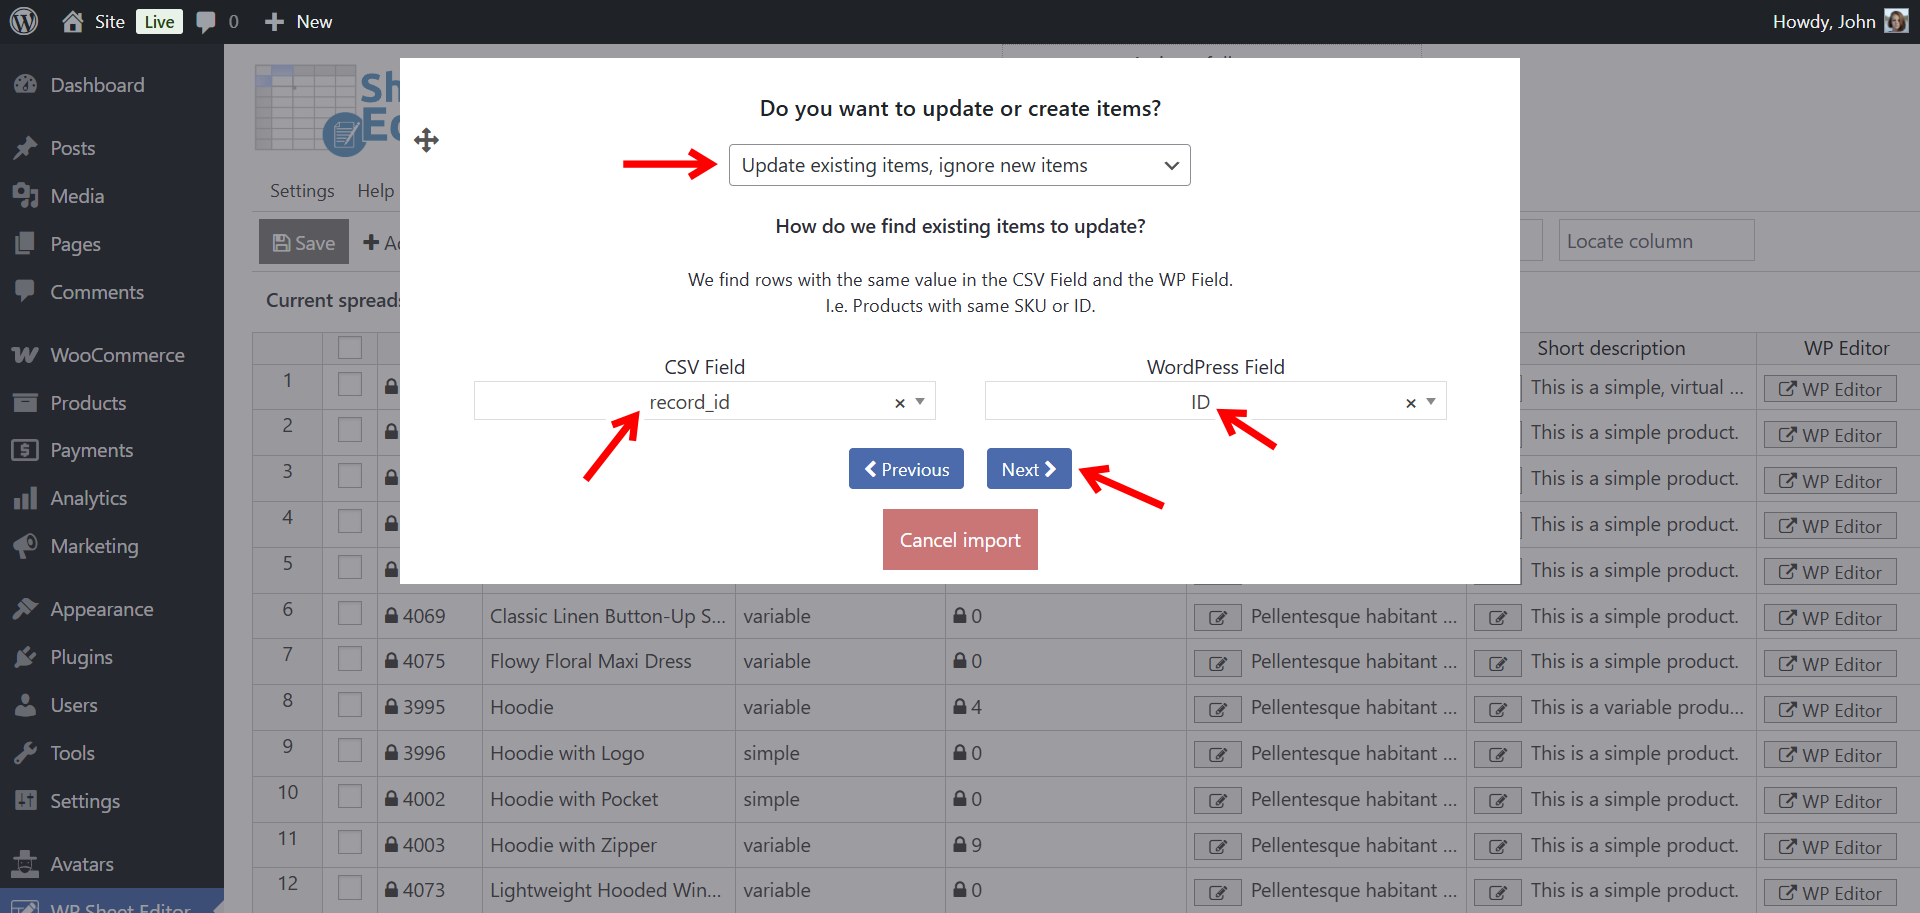
Step 5: Configure the Import type
Next, you will decide how the data should be imported.
- Create new items and update existing items: This option does both. It creates new items for rows that don’t exist and updates items for matching rows.
- Import all rows as new: Creates a new item for every row in your file, regardless of whether it already exists.
- Only create new items, ignore existing items: This will only import rows for items that are not already on your website.
- Update existing items, ignore new items: This option will only update existing items and skip any new ones.
If you choose an option that involves updating existing items, you will need to specify how to match the data between the CSV file and your WordPress database (e.g., by Product SKU, Post ID, etc.).
Click “Next” to continue.
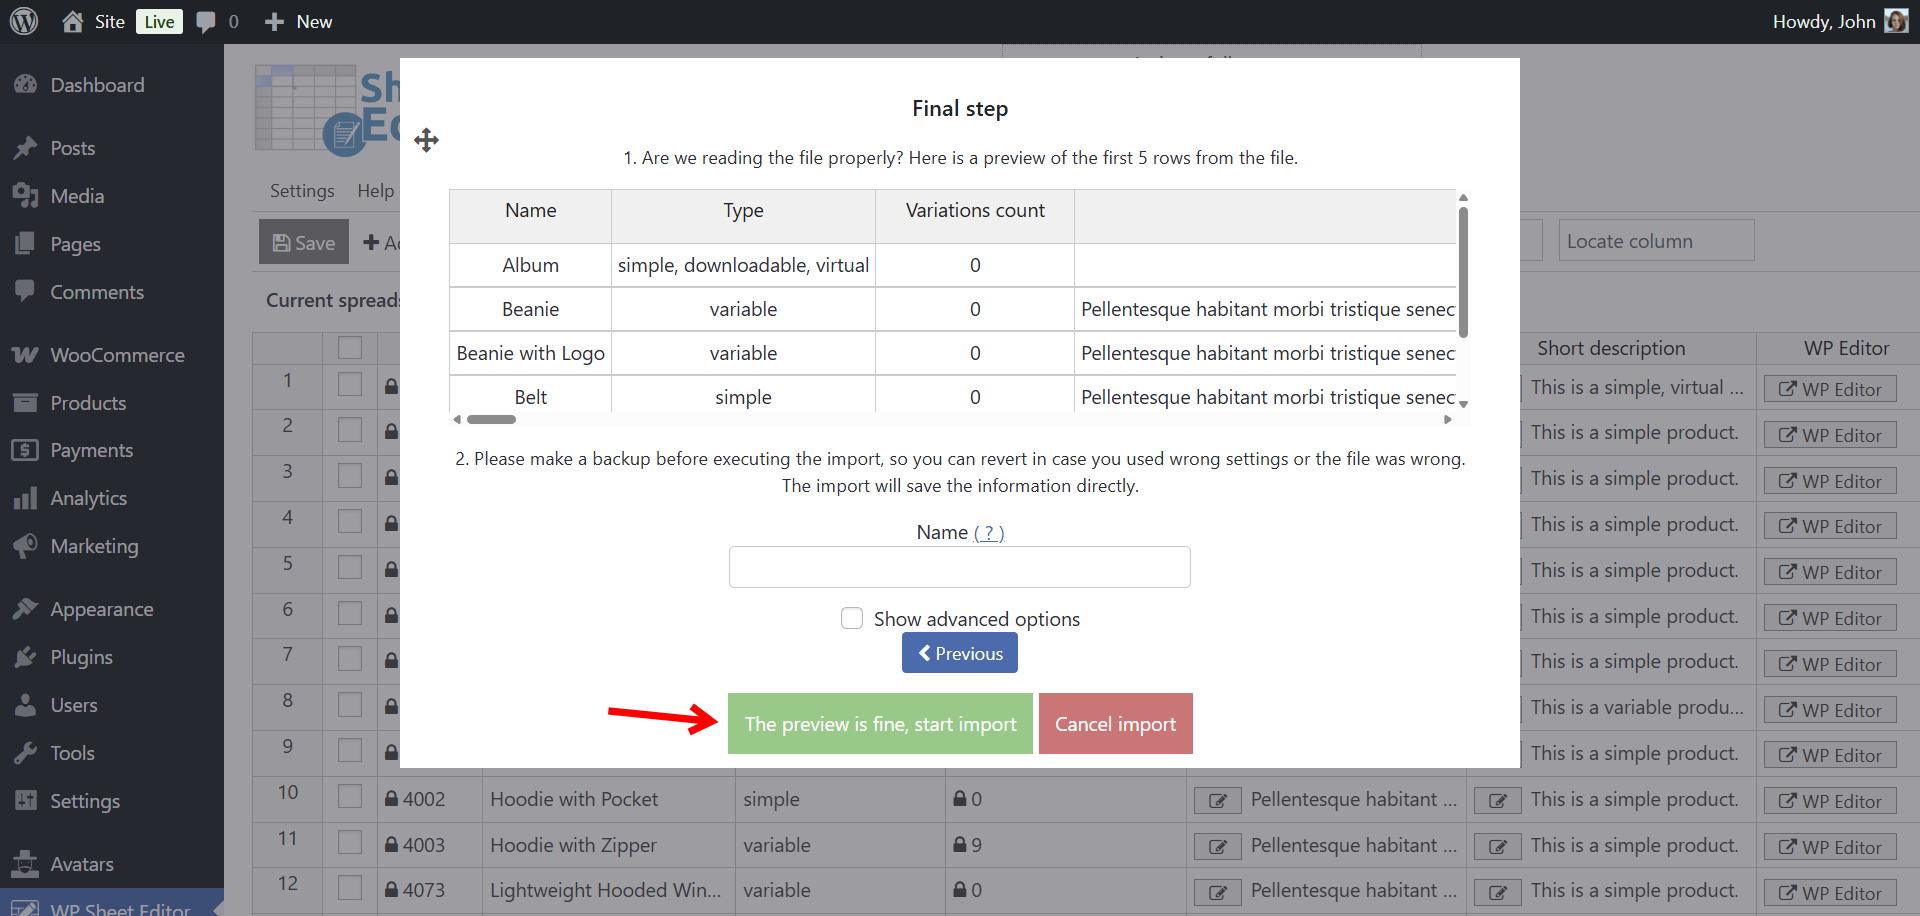
Step 6: Preview and run the import
The final step shows a preview of the first few rows from your file as they will be imported. If everything looks correct, click the “The preview is fine, start import” button to begin the process. The import will run, and you can monitor its progress in real-time.
How to schedule an FTP import
With the Automations add-on, you can schedule your FTP imports to run automatically once or in recurring intervals. This is perfect for syncing inventory, updating product prices, or any other recurring data task.
Step 1: Open the Import tool
You need to open the Import tool from the toolbar.
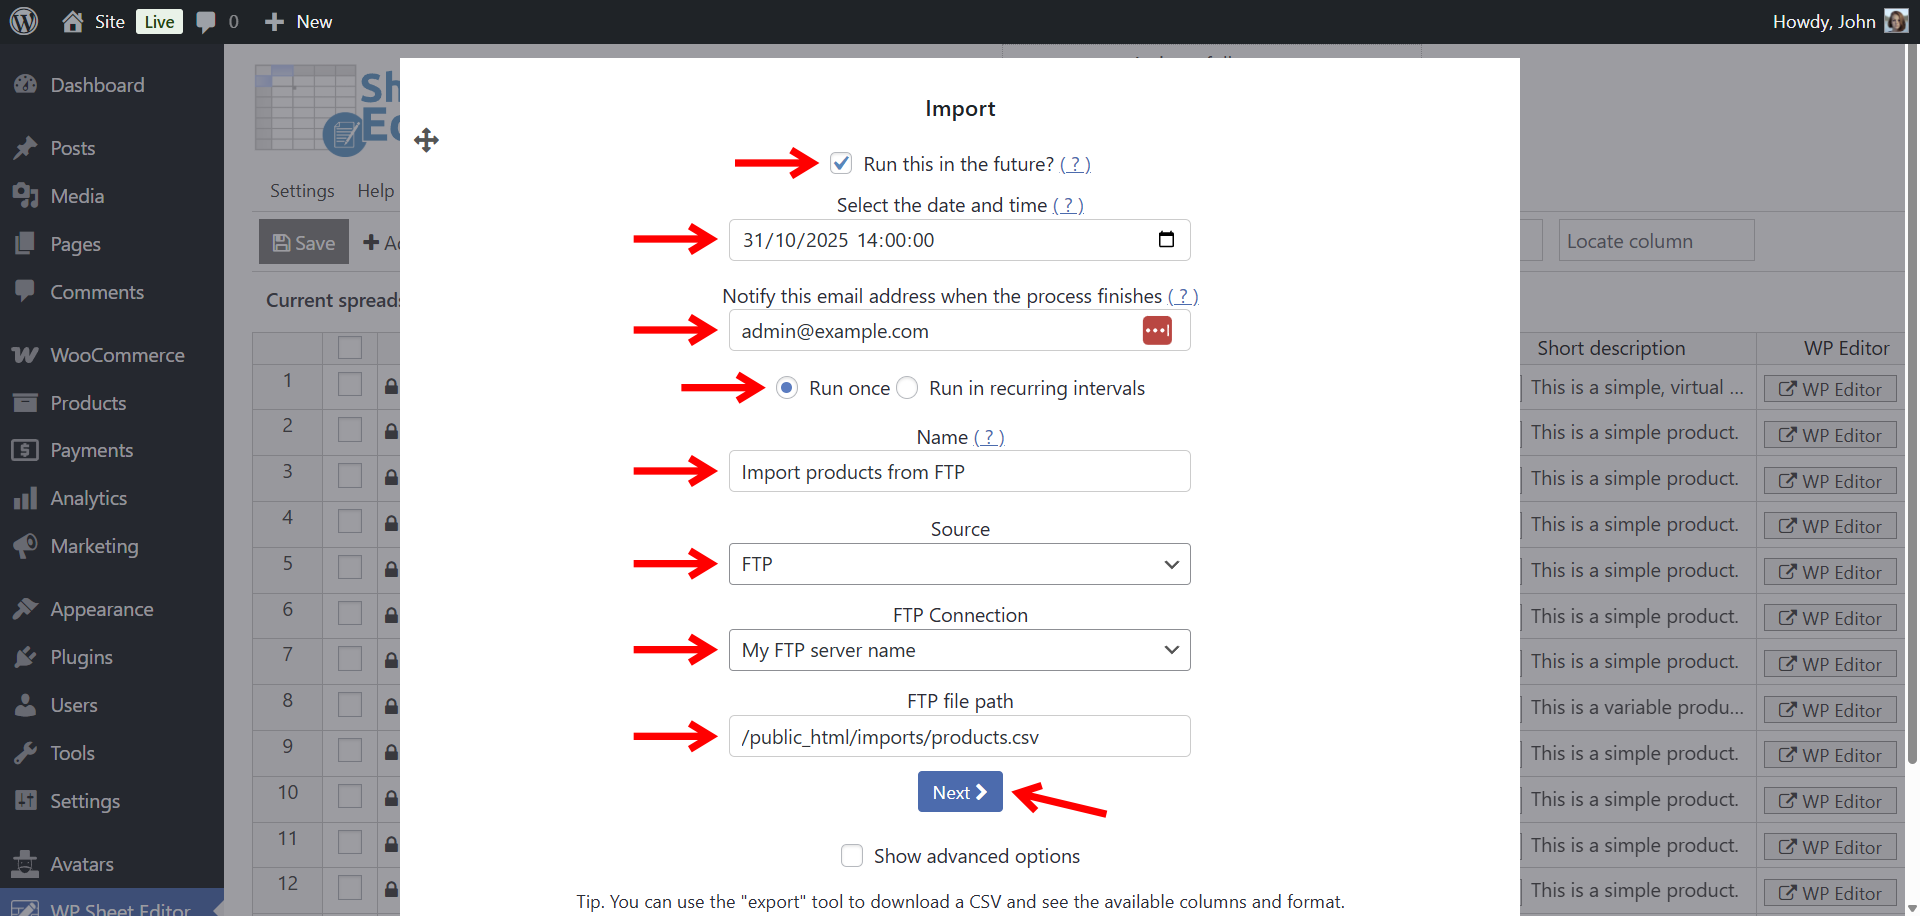
Step 2: Set up the schedule and recurrence of the import
Select these values in the Import tool in order to schedule an automatic FTP import:
- Tick the Run this in the future checkbox.
- Select the date and time: Select when you want to run this import.
- Notify this emails address when the process finishes: Enter an email address to get a notification.
- You can run this FPT import one or in recurring intervals:
- Run once: Select a specific date and time in the future for the import to run a single time.
- Run in recurring intervals: Set up a recurring schedule, such as every few minutes, hourly, daily, weekly, monthly, etc. to keep your site’s data automatically updated.
- Name: Add a descriptive name to this scheduled task.
- Source: FTP
- FTP Connection: Select the server.
- FTP file path: Add the path to the CSV file here.
- Click on Next.
Step 3: Map CSV columns to WordPress fields
The editor will load your CSV file and display all available columns. At this stage, you’ll need to link each column in your file to the matching field in WordPress.
For instance, a column called product_name should be connected to the post_title field. The tool will attempt to detect and match columns automatically.
You can verify the suggested mappings and adjust any fields that weren’t matched. When everything looks correct, click “Next”.
Step 4: Configure the import type
Next, you will decide how the data should be imported.
- Create new items and update existing items: This option does both. It creates new items for rows that don’t exist and updates items for matching rows.
- Import all rows as new: Creates a new item for every row in your file, regardless of whether it already exists.
- Only create new items, ignore existing items: This will only import rows for items that are not already on your website.
- Update existing items, ignore new items: This option will only update existing items and skip any new ones.
If you choose an option that involves updating existing items, you will need to specify how to match the data between the CSV file and your WordPress database (e.g., by Product SKU, Post ID, etc.).
Click “Next” to continue.
Step 5: Preview and schedule the import
The final step shows a preview of the first few rows from your file as they will be imported. If everything looks correct, click the “The preview is fine, start import” button to schedule the FTP import.
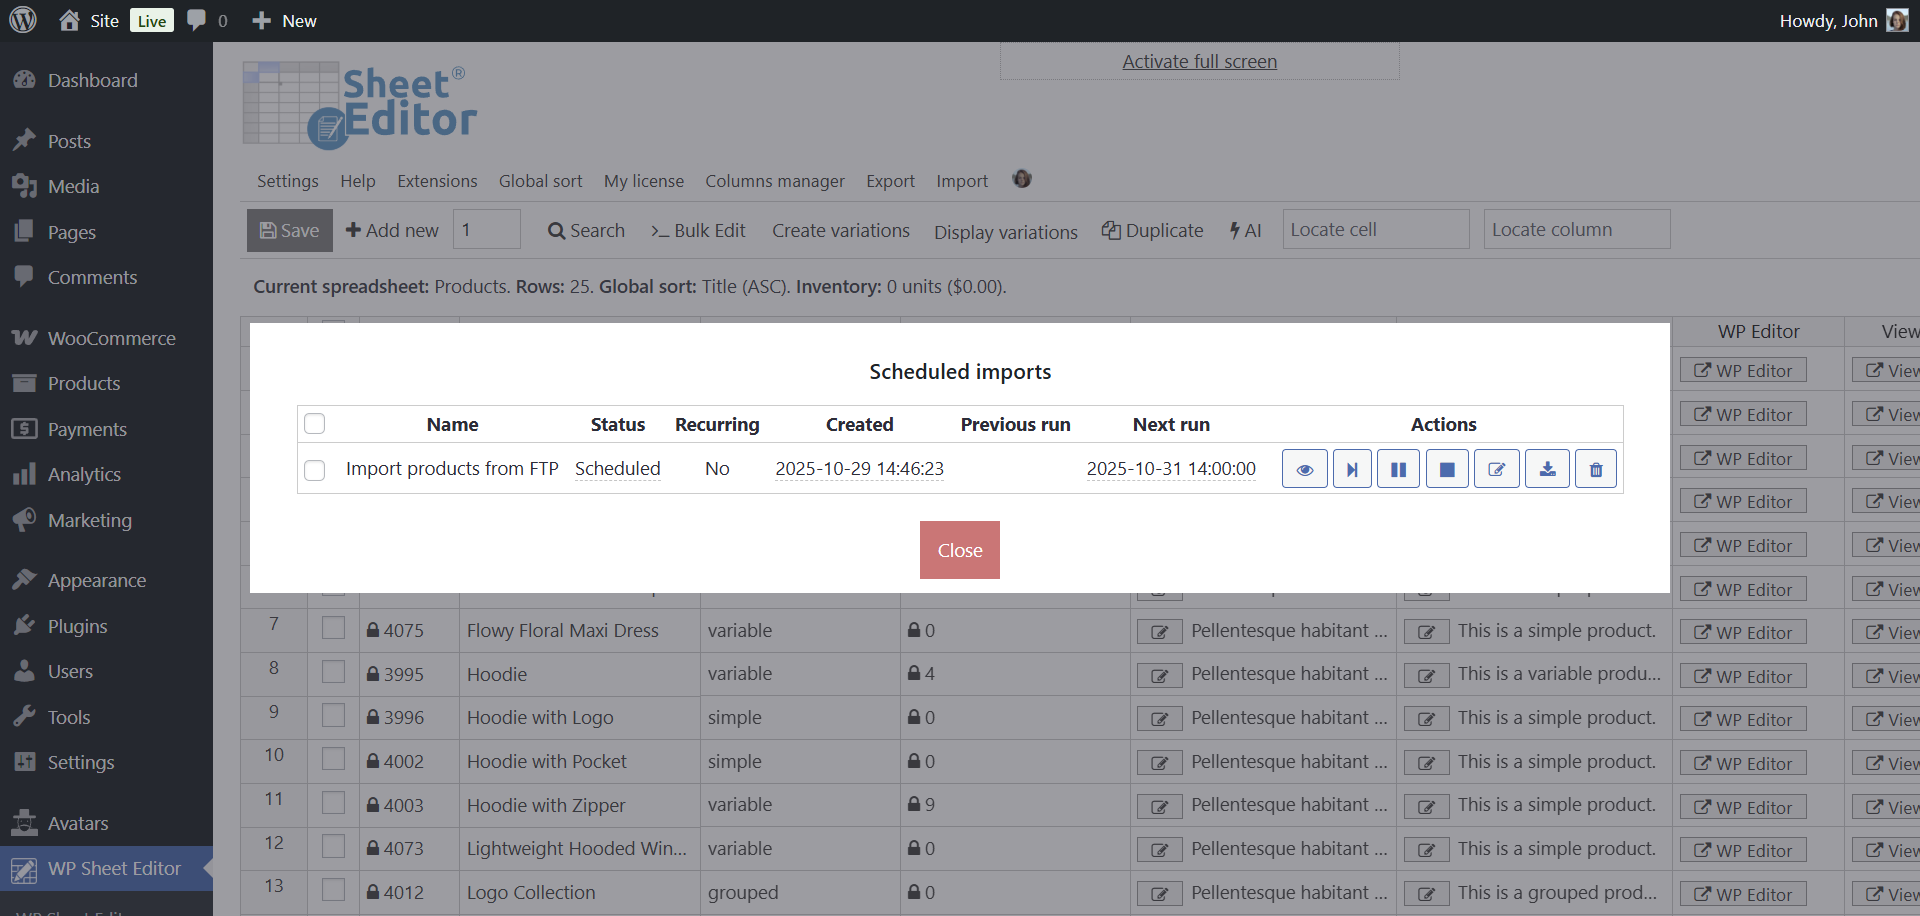
Step 6: Manage the scheduled imports
You can view and manage all your scheduled tasks from one place.
In the main spreadsheet view, click on the “View scheduled imports” button in the top toolbar.
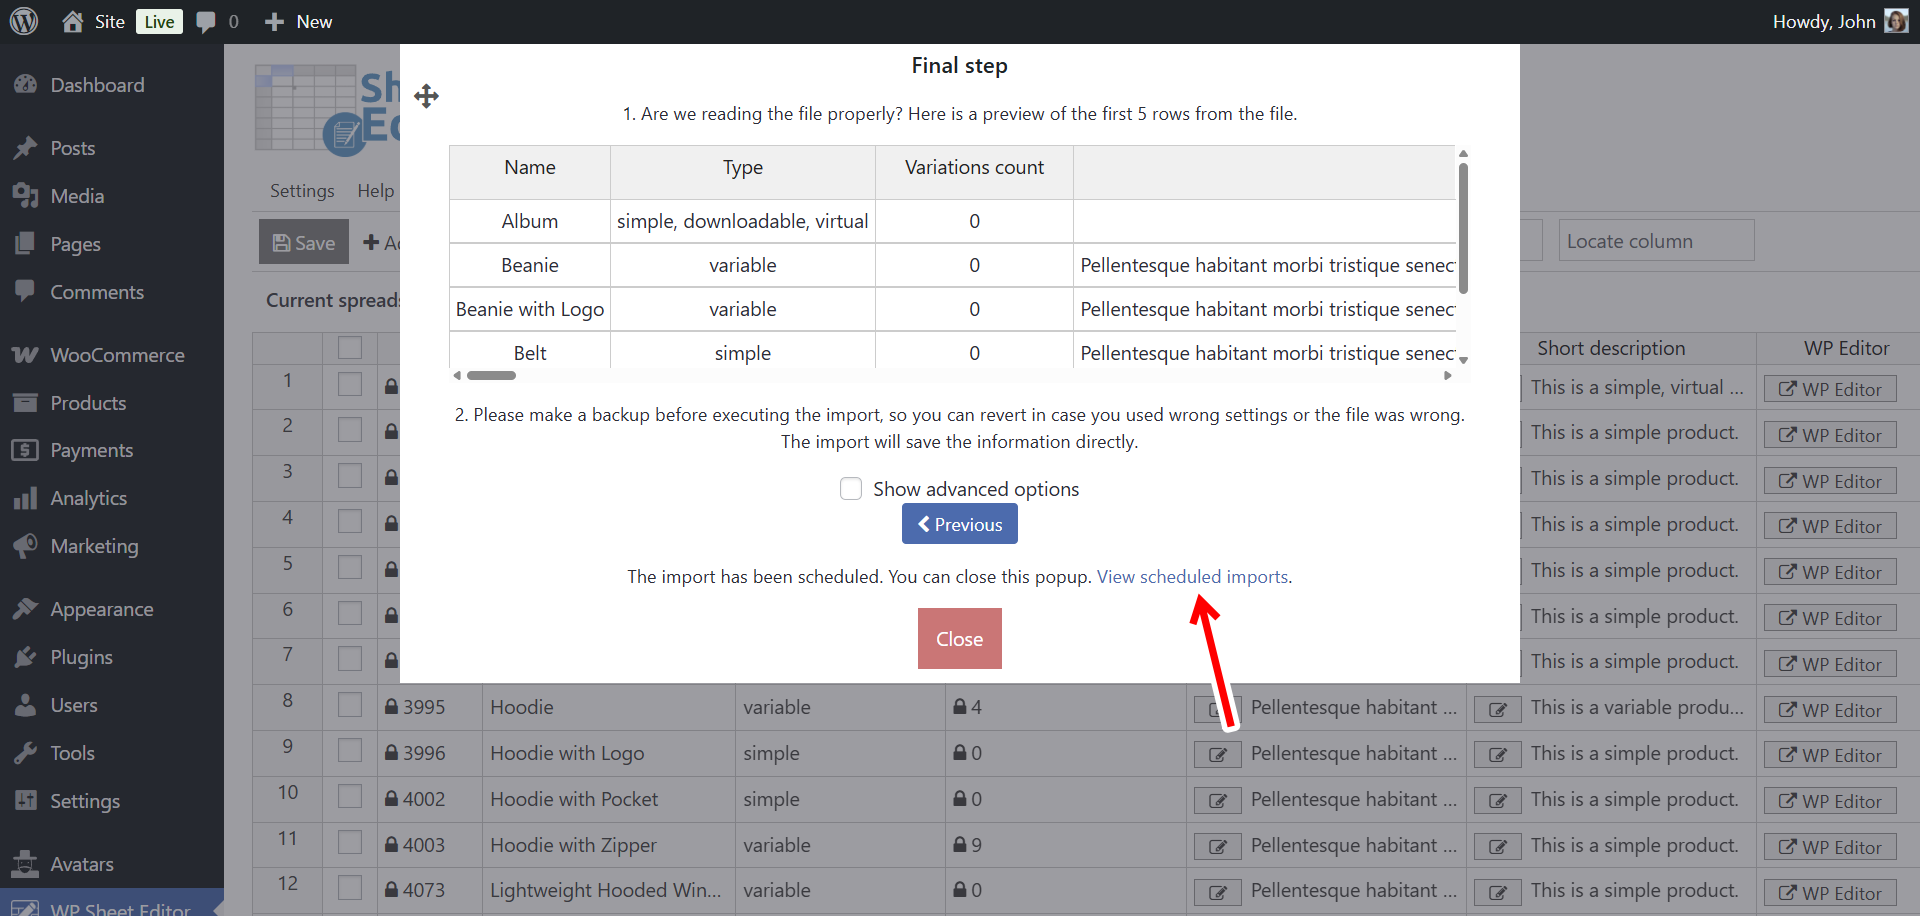
A popup will appear, displaying a table of all your scheduled imports. From here, you can see their status, run them manually, pause them, edit their settings, or cancel them.
Conclusion
The ability to import data directly from an FTP server is a game-changer for anyone managing a WordPress site at scale. It eliminates repetitive manual work and ensures your data is always current. By combining the power of WP Sheet Editor with the Automations add-on, you can build a fully automated and efficient workflow that lets you focus on growing your business.
Ready to automate your data management? Purchase WP Sheet Editor and the Automations add-on today to unlock FTP imports and many other powerful features!