IMPORTANT: THIS PLUGIN IS NO LONGER AVAILABLE IN THE WORDPRESS REPOSITORY.
If you use the Dynamic Featured Image plugin, you know it is an excellent tool for adding multiple featured images to your WooCommerce products. It is highly useful for creating image sliders, alternate product views, or secondary thumbnails without relying solely on the standard product gallery.
However, managing these extra image slots becomes a tedious administrative task as your catalog grows. If you need to update a secondary promotional image across 200 products, or clear out an old dynamic image, WooCommerce requires you to open each product individually, locate the meta box, replace the image, and save. Doing this manually for a large store takes hours of repetitive work.
In this tutorial, we will show you how to bypass the standard product editor and bulk manage your dynamic featured images using a spreadsheet interface. You will learn how to set, replace, or completely remove these images from hundreds of products in bulk.
We will use the WP Sheet Editor – WooCommerce Products Spreadsheet plugin to handle this data efficiently.
You can download the plugin here:
Download WooCommerce Products Spreadsheet Plugin - or - Check the features
Video Tutorial
1. Open the WooCommerce Products Spreadsheet
Once WP Sheet Editor is installed and activated, navigate to WP Sheet Editor > Edit Products in your WordPress dashboard.
Your entire WooCommerce catalog will load into a grid interface. Every product is displayed as a row, and every data point is displayed as a column.

How do the Dynamic Featured Image fields appear?
WP Sheet Editor automatically detects the custom fields generated by the Dynamic Featured Image plugin. If you scroll to the right side of your spreadsheet, you will see these image slots represented as individual columns.
They are typically labeled sequentially, such as DfiFeatured: 0: 1, DfiFeatured: 0: 2, and so on, representing each additional image slot you have configured.

2. Edit Dynamic Featured Images Manually in the Grid
If you only need to update a few specific products, you do not need to open their individual WooCommerce edit pages. You can manage the images directly in the spreadsheet cells.
To assign an image to a slot, you simply paste the direct URL of the image (which you can copy from your WordPress Media Library) into the corresponding cell.

Once you have pasted the URLs into the necessary fields, click the Save button on the top toolbar to apply all the changes at once. This method is practical for quick, targeted updates.
3. Filter Specific Products for Bulk Editing
If you need to update 50 or 500 products at once, you will use the Bulk Edit tool. However, before applying bulk changes, you must select the exact products you want to modify.
You have two ways to select products:
Method A: Use the Checkbox Picker
If the products you want to edit are grouped together or easily visible, simply tick the checkboxes on the left side of the rows to select them manually.

Method B: Use the Search Tool
For larger catalogs, use the advanced search filters. Click the Search tool on the top toolbar.

You can isolate your products using the following criteria:
- Contains Keyword: Find all products with a specific word in the title.
- Enter Tags: Filter products by a specific category, attribute, tag, or shipping class.
- Search on variations: Tick this if you need to apply the images specifically to product variations rather than main parent products.
Configure your filters and click Run Search to isolate your target products.

4. How to Bulk Edit Dynamic Featured Images
Once your target products are selected (either via checkboxes or the search tool), click the Bulk Edit tool on the toolbar.
Depending on your goal, configure the Bulk Edit tool using one of the three practical workflows below.
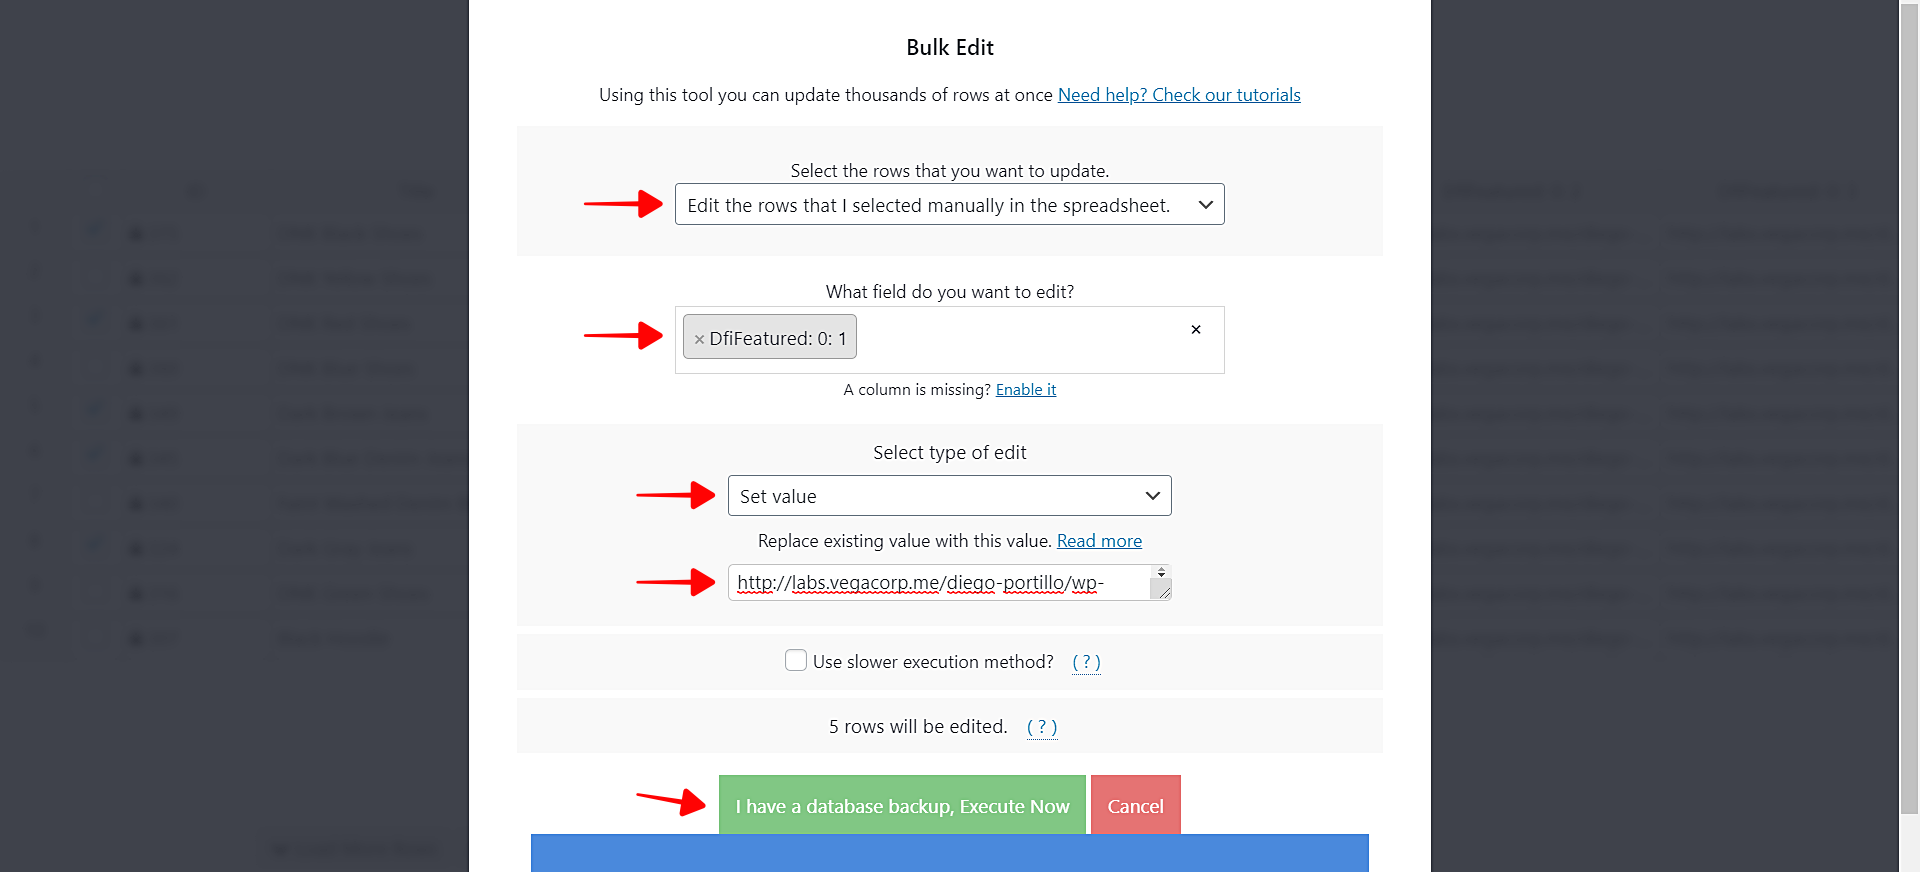
Option A: Set a new dynamic featured image for all selected products
If you want to add the exact same secondary image (like a promotional banner or sizing chart) to a specific slot across all filtered products:
- Select the rows that you want to update: Choose either the manually selected rows or the current search results.
- What field do you want to edit: Select the specific dynamic slot you want to target (e.g., DfiFeatured: 0: 1).
- Select type of edit: Set value
- Replace existing value with this value: Paste the direct URL of the new image from your Media Library.
Click Execute Now.
Option B: Replace a specific dynamic featured image
If you updated a manufacturer’s logo or a promotional graphic and need to swap the old image URL with the new one without affecting other data:
- Select the rows that you want to update: Choose your selected rows or search results.
- What field do you want to edit: Select the relevant slot (e.g., DfiFeatured: 0: 1).
- Select type of edit: Replace
- Replace this: Paste the old image URL you want to remove.
- With this: Paste the new image URL you want to insert.
Click Execute Now.

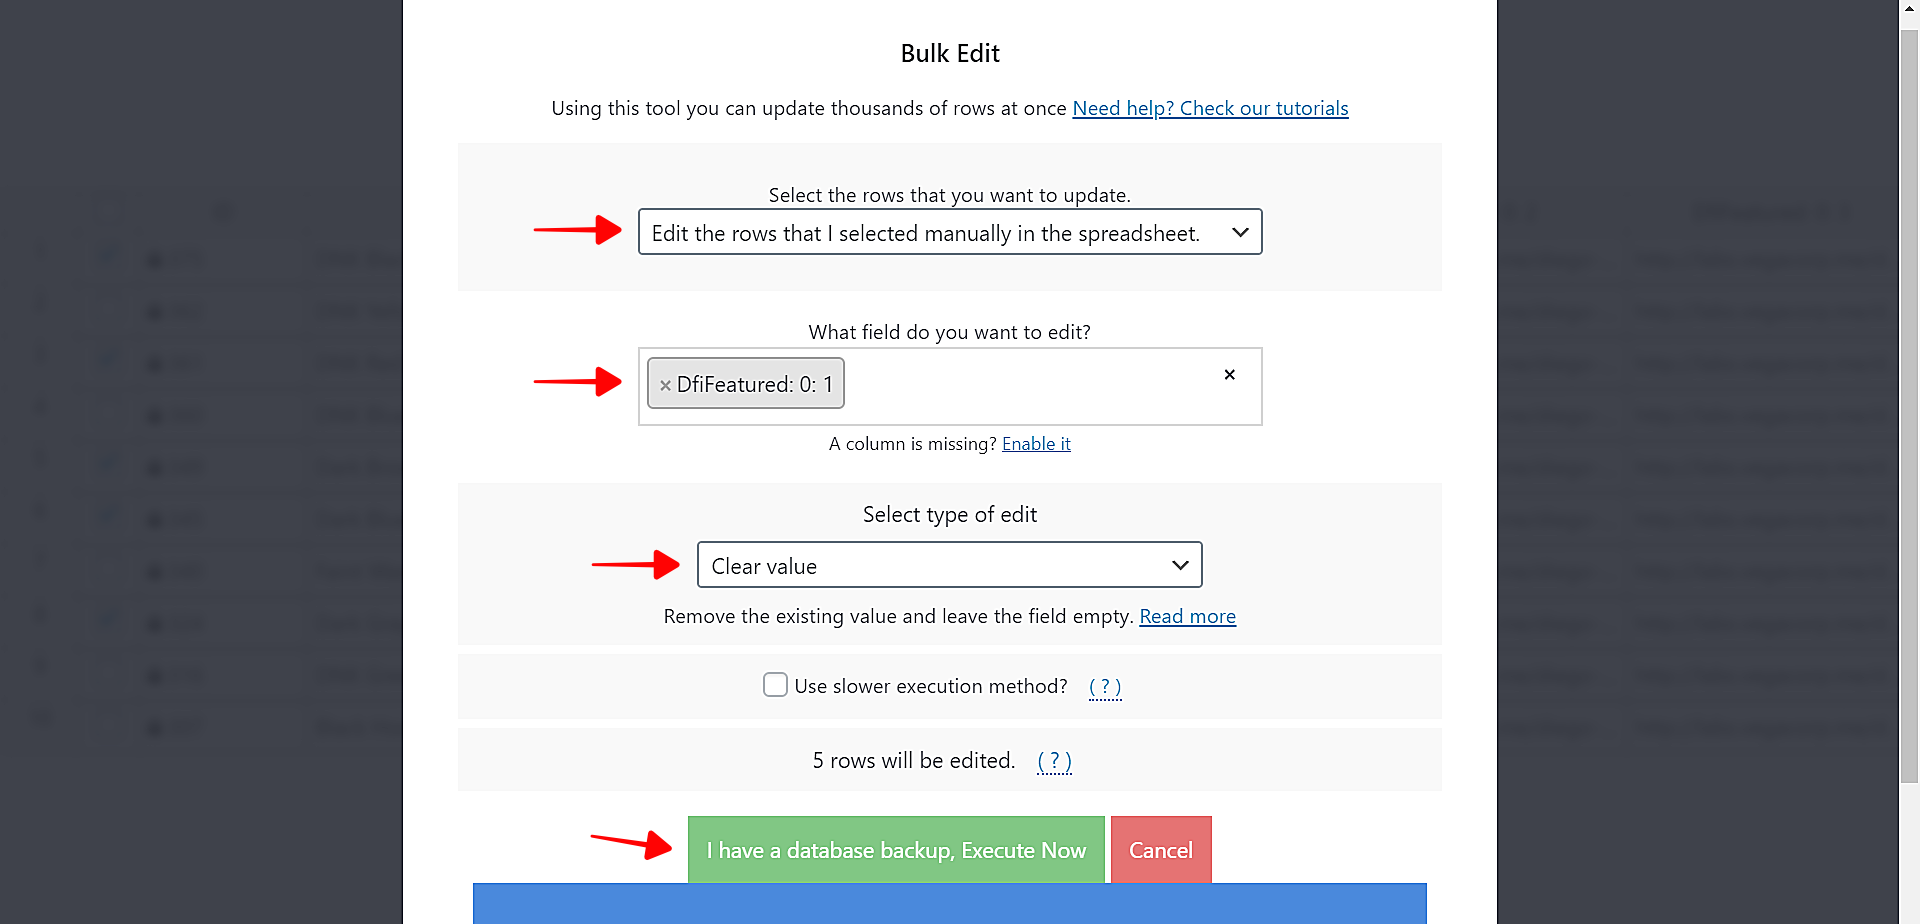
Option C: Remove a dynamic featured image entirely
If a promotion has ended or a secondary image is no longer relevant, you can clear the slot completely from your selected products.
- Select the rows that you want to update: Choose your selected rows or search results.
- What field do you want to edit: Select the slot you want to clear (e.g., DfiFeatured: 0: 1).
- Select type of edit: Clear value
Click Execute Now.
Manage WooCommerce Images Efficiently
Handling multiple image slots per product does not have to compromise your workflow. By treating these custom fields as standard spreadsheet columns, you can maintain deep control over your visual catalog while keeping your administrative tasks highly efficient.
You can download the plugin here:
Download WooCommerce Products Spreadsheet Plugin - or - Check the features