This is a complete guide on how to create a WordPress food blog with generative AI. You’ll be able to automatically generate food recipes and recipe images with artificial intelligence.
Thinking of starting a food recipe WordPress blog but overwhelmed by the amount of work it takes? You’re not alone. A successful recipe blog requires not just cooking skills, but also hours of writing, formatting, and adding images for every single post. For many, this is the biggest barrier to turning their passion for food into a blog that attracts readers and ranks on Google.
The good news? Generative AI can do most of the heavy lifting for you. Instead of writing every recipe manually, you can use AI models to generate complete, SEO-friendly posts that include titles, descriptions, ingredients, instructions, and even images. This allows you to create a fully functional recipe blog on WordPress in a fraction of the time it would normally take.
You can create 100 recipes and schedule them to publish automatically in some minutes!
In this guide, we’ll show you how to set up a food recipe blog on WordPress powered by generative AI. You’ll learn how to:
- Generate recipe posts (you just need the recipe title and let AI generate the content with ingredients and steps).
- Create recipe images automatically using AI image generation.
- Schedule the recipes in bulk to publish automatically on your blog.
- Save time with global prompts, reusable templates, and bulk editing tools.
Table of Contents
Tools to build your AI food blog
To follow along, you’ll need a few essential tools:
1- WP Sheet Editor – Post Types for managing your recipes (WordPress posts) in a spreadsheet.
You can download the plugin here:
Download Posts, Pages, and Custom Post Types Spreadsheet Plugin - or - Check the features
2- WP Sheet Editor – AI to connect with AI providers.
You can sign up here:
Sign up to the WP Sheet Editor - AI Service - or - Check the features
3- An API fey for text generation. We will use OpenRouter in this case.
4- An API key for generating recipe images. WP Sheet Editor is compatible with OpenAI’s image generation models, so you need an OpenAI API key.
With these elements, you can build a recipe blog that runs almost on autopilot, while you focus on taste-testing and growing your audience.
Step 1. Set up AI text and image generation models
Before we can start generating recipes, we need to connect WordPress to the AI models that will write and illustrate our posts. WP Sheet Editor makes this process simple: you just add your API keys once, and then you can run prompts directly from the spreadsheet.
We’ll use two types of AI models:
- Text generation: This will create the recipe content: introductions, ingredients, and cooking steps. We’ll use OpenRouter to connect to modern LLMs like GPT, Gemini, Grok, Claude, DeepSeek, etc. You need an OpenRouter API key to get started.
- Image generation: This will generate unique recipe photos and illustrations. For this, we’ll use OpenAI’s DALL·E 3, which produces high-quality images from text prompts. You’ll need an OpenAI API key to access it.
Let’s configure both providers:
Connect to OpenRouter (text generation)
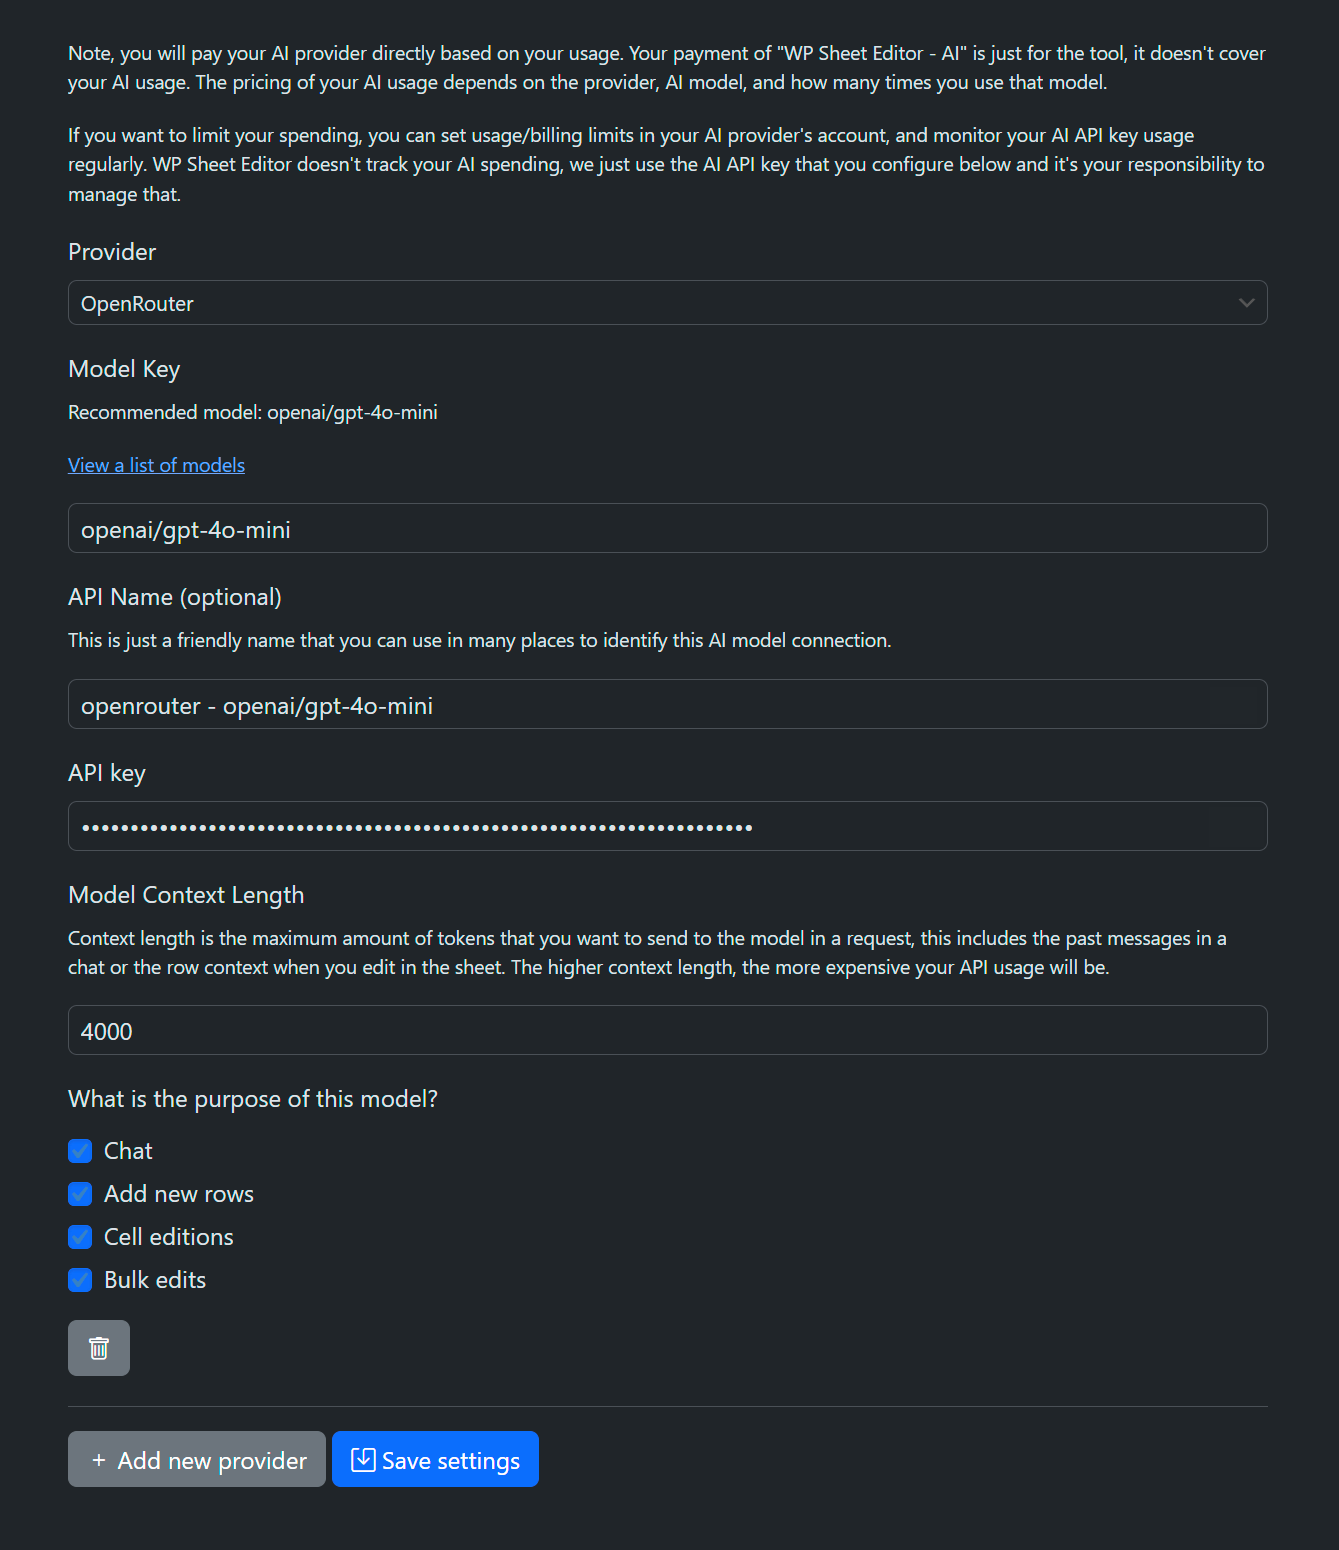
- Go to WP Sheet Editor > AI > Settings in your WordPress dashboard.
- Click on Add new provider.
- Provider: We will use OpenRouter, but you can use OpenAI or any other provider.
- Model Key: Enter the model you want to use. For example:
openai/gpt-4o-miniorx-ai/grok-4. You decide; you can choose from all the models on this page. - API Name: You can leave this field empty.
- API Key: Paste your OpenRouter API key.
- Model Context Length: Define the maximum number of tokens to send per request.
- Purpose: Tick all the features where you want to use this model (spreadsheet editing, bulk editing, row creation, etc.).
- Click Save settings.
Connect to OpenAI (image generation)
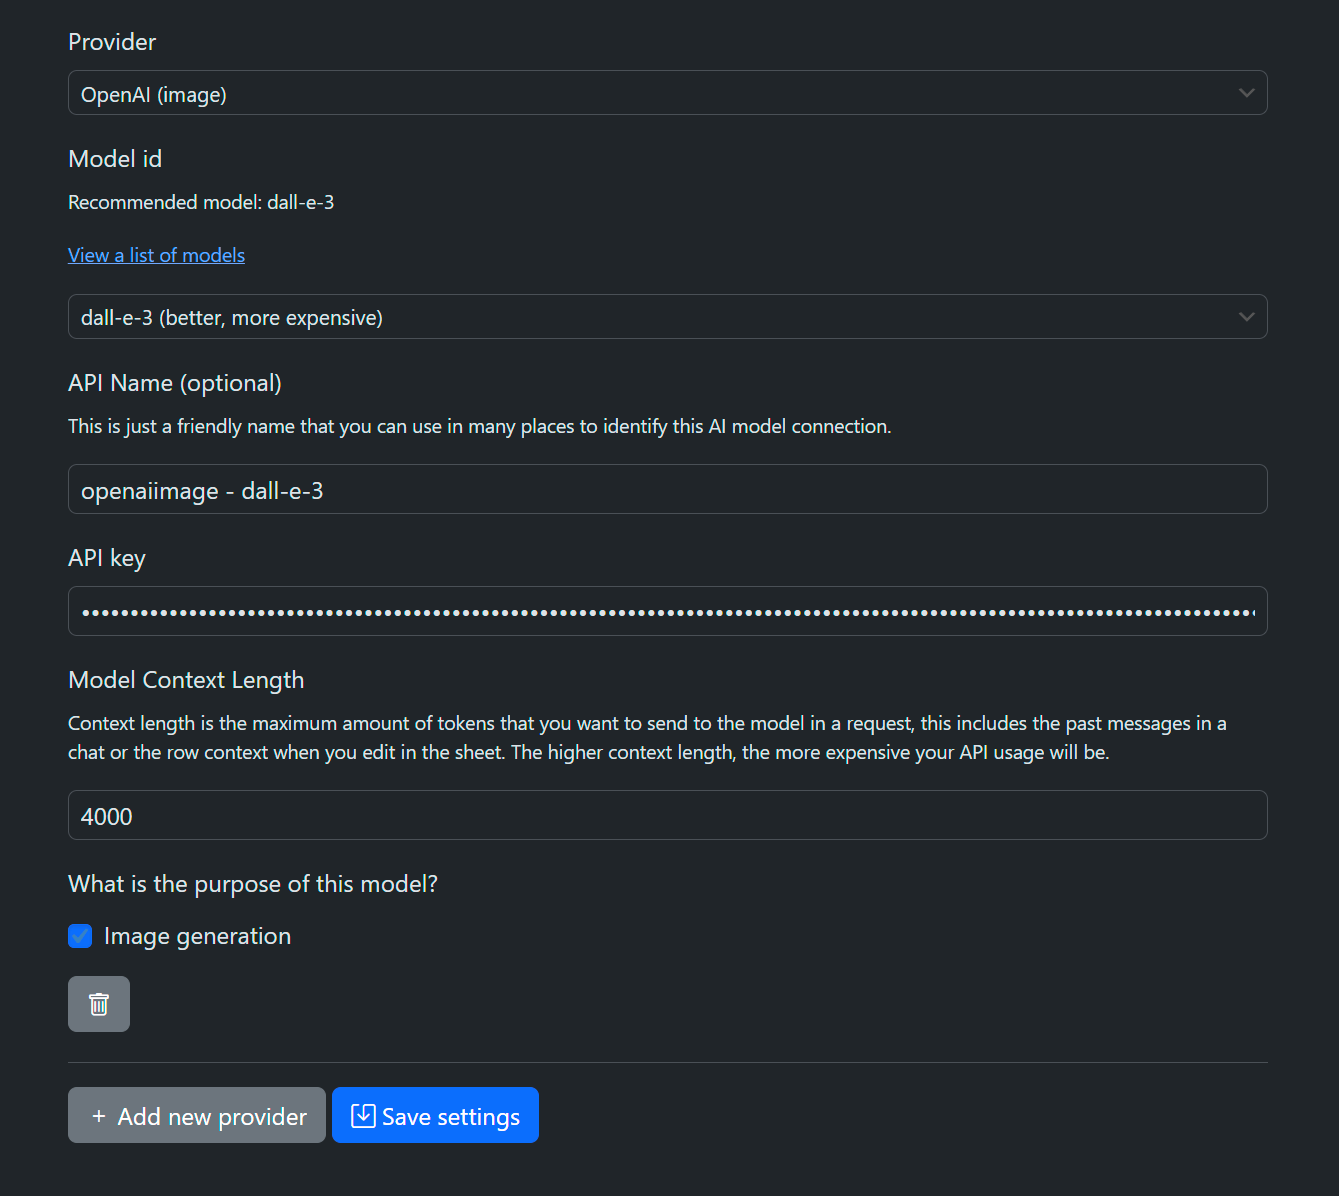
- Still in WP Sheet Editor > AI > Settings, click Add new provider to register another provider.
- Provider: Select OpenAI (image).
- Model Key: Select dall-e-3 or dall-e-2. Or any other available model.
- API Name: You can leave this field empty.
- API Key: Paste your OpenAI API key.
- Model context length: Define the maximum number of tokens to send per request.
- Purpose: Tick Image generation.
- Click Save settings.
Once both providers are set up, you can combine them in your workflows. For example, you can generate a recipe post with text from GPT-4o-mini and then automatically add a matching image from DALL·E 3. All without leaving your WordPress dashboard.
Step 2. Add all your recipe titles
With your AI models ready, it’s time to give them the raw material they’ll use to create complete recipes: the titles. The title is the foundation of each post, and the AI will use it as a reference and context to generate ingredients, instructions, and descriptions.
Why this step matters: AI doesn’t invent posts out of thin air. It needs a clear starting point. By providing recipe names up front, you’ll ensure that every generated recipe is relevant, structured, and easy to scale.
WP Sheet Editor makes this process effortless because you can manage all your recipes in a spreadsheet view. Instead of creating posts one at a time, you can add hundreds of rows and paste all your recipe names in bulk.
Note: If you already have a CSV file with recipe names, you can also import rows with titles only instead of creating them manually.
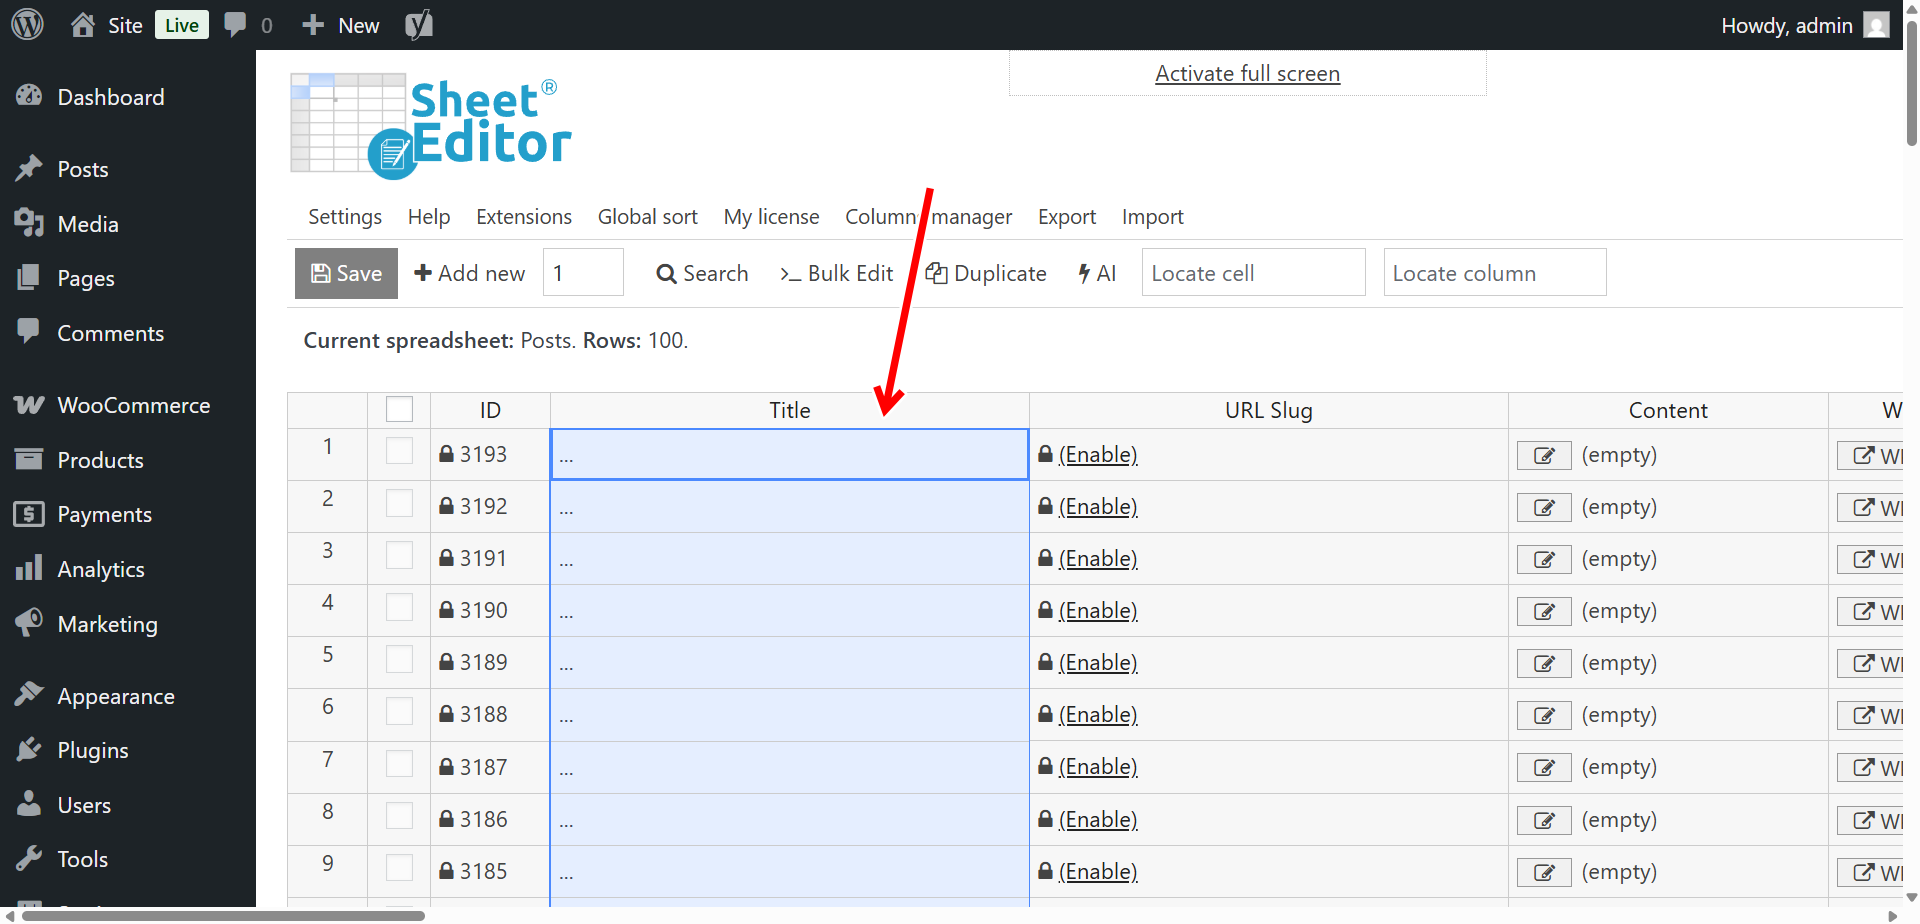
2.1 Create empty rows for your recipes
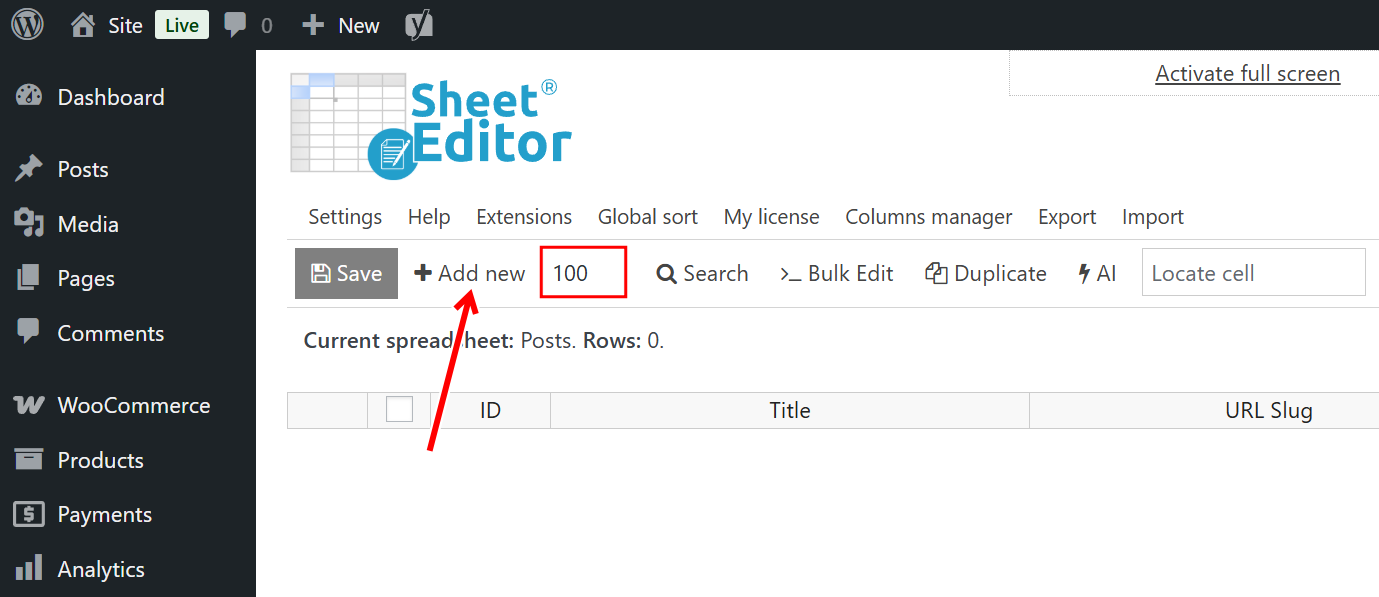
- Go to WP Sheet Editor > Edit Posts (or Edit Recipes if you use a custom post type for recipes).
- In the toolbar, enter the number of rows you want to add. In this example, we’ll create 100 rows to generate 100 recipes.
- Click Add new, and WP Sheet Editor will instantly add 100 empty rows to your spreadsheet.
At this point, you have blank rows ready to receive your recipe titles.
2.2 Fill in your recipe titles
- In the Title column, paste your recipe names, one per row. For example: “Classic Beef Lasagna,” “Vegan Lentil Curry,” “Blueberry Cheesecake.”
- If you don’t have a list yet, you can even use AI to generate a batch of recipe ideas, copy them, and paste them into the spreadsheet.
- Click Save to store your new draft posts in WordPress.
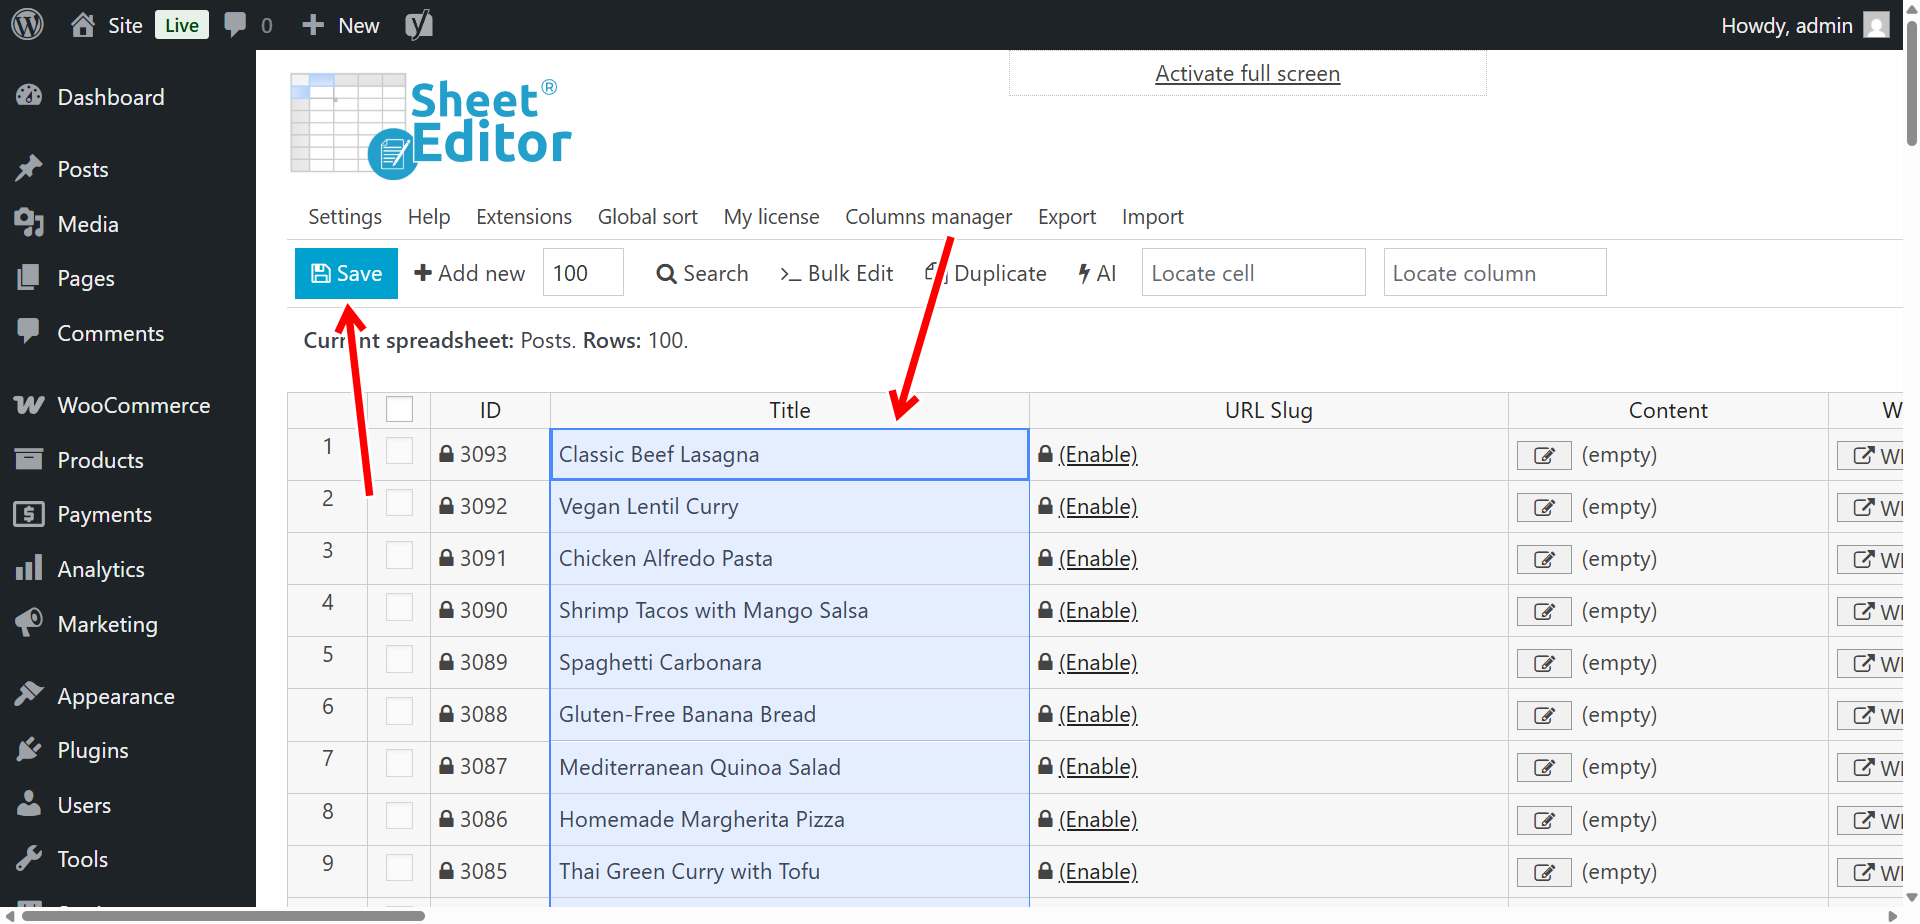
Now you have 100 draft posts in WordPress, each with a recipe title. In the next step, we’ll create a reusable recipe prompt so the AI knows exactly how to expand these titles into complete, high-quality posts.
Step 3. Set up the recipe generation prompt
Now that you have all your recipe titles in place, it’s time to teach the AI exactly how you want the recipes to be written. This is done using a prompt.
What is a prompt? A prompt is a set of instructions you give to the AI to tell it how to generate the content. Without clear instructions, the AI may produce inconsistent or low-quality results. By creating a reusable global prompt, you ensure that every recipe follows the same format, tone, and level of detail. No matter how many you generate.
WP Sheet Editor lets you save prompts as global commands. This means you only write the instructions once, and then you can reuse them across hundreds of posts with a simple shortcut. It’s faster, more consistent, and perfect for bulk recipe generation.
3.1 Create a global recipe prompt
- Go to WP Sheet Editor > AI > Settings > Prompts.
- Click Add new.
- Enter a name for your prompt, for example: Recipe.
- Paste the following prompt into the Prompt field:
You are a professional food blogger and recipe editor.

Write a complete recipe post for: "$Title$".

Include:
- A 2–3 sentence engaging introduction about the dish.
- Cooking and prep details (Prep time, Cook time, Total time, Servings) in a short paragraph.
- <h3>Ingredients</h3> section with a <ul><li> list of ingredients and quantities.
- <h3>Instructions</h3> section with an <ol><li> list of step-by-step cooking instructions.
- One short tip or variation idea.
- A concise closing line encouraging readers to try the recipe.

Formatting rules:
- Use only valid HTML tags: <h2>, <h3>, <p>, <ul>, <li>, <ol>.
- Don't start with h tags, start directly with the introductory paragraph.
- Keep the length around 400–500 words.
- Tone should be friendly, clear, and practical.

End with a call-to-action like: “Enjoy your homemade $Title$ and share it with friends or family!
You can customize this template further. For example, you can ask the AI to “add nutritional information” or “suggest wine pairings” if you want to enrich your blog content.
3.2 Save and reuse your prompt
- After pasting your prompt, click Save.
- WP Sheet Editor will generate a unique slug for your prompt. For example:
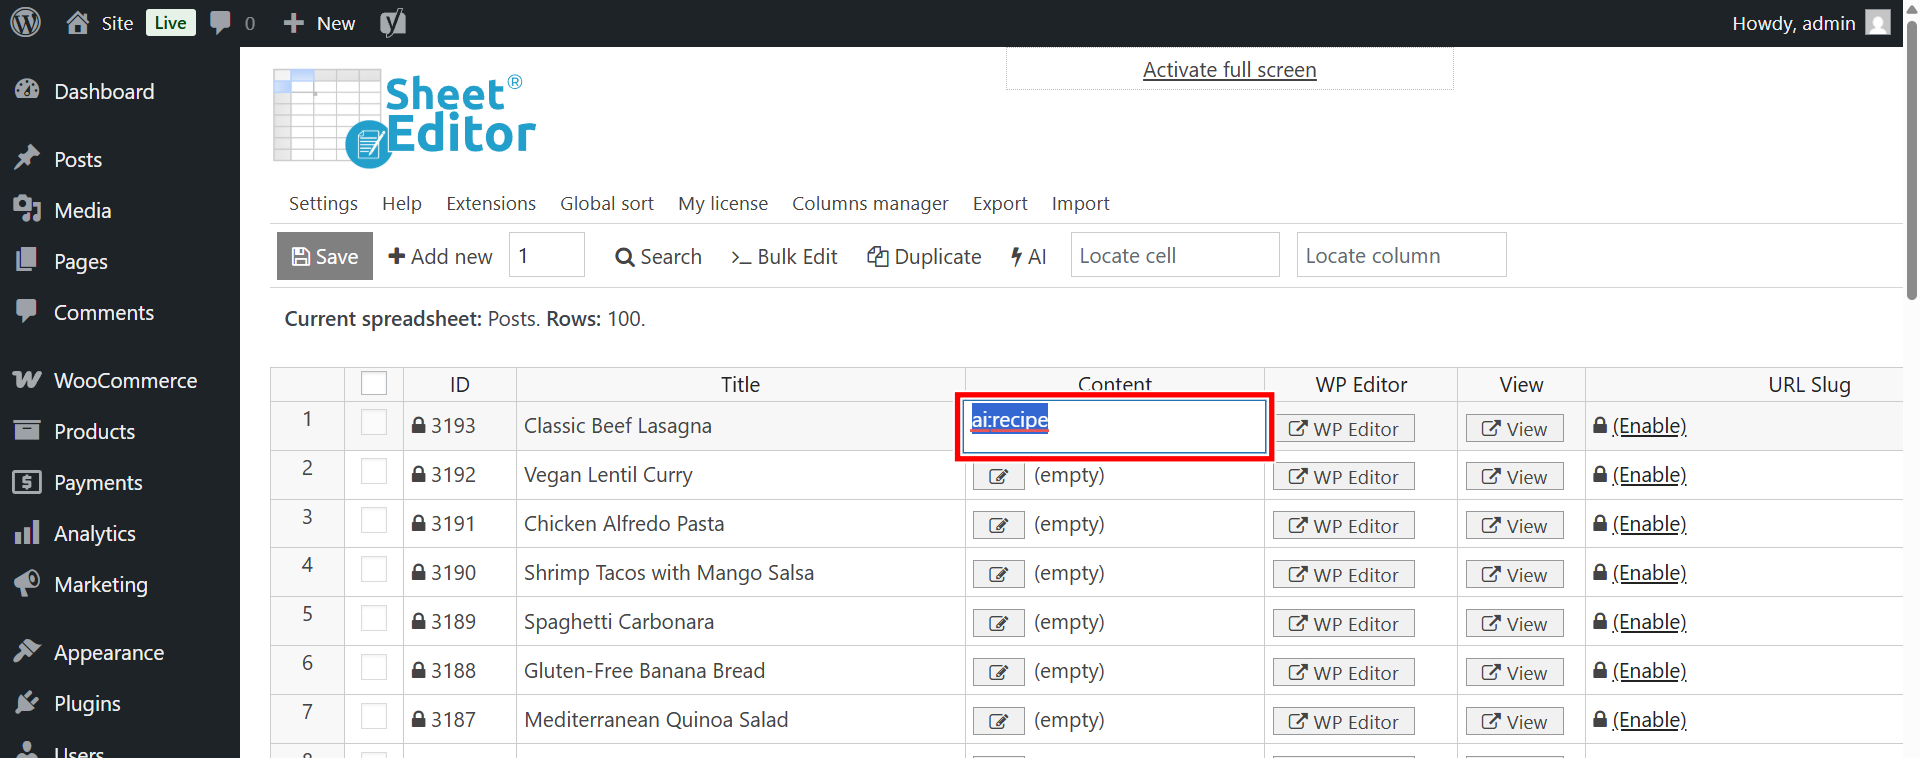
recipe. - Now you can run this command inside the spreadsheet simply by typing:
ai:recipe
into the Content column for any recipe row.
With this setup, you don’t have to copy and paste long instructions every time. Just use your global prompt shortcut, and the AI will instantly generate a consistent, high-quality recipe post for each title.
Step 4. Generate recipes with AI
Now that your recipe titles and global prompt are ready, it’s time to let the AI do its magic. With WP Sheet Editor, you can generate recipes directly in the spreadsheet, one by one, or in bulk across hundreds of rows. Both methods use the same prompt shortcut, so you can choose the workflow that best fits your needs.
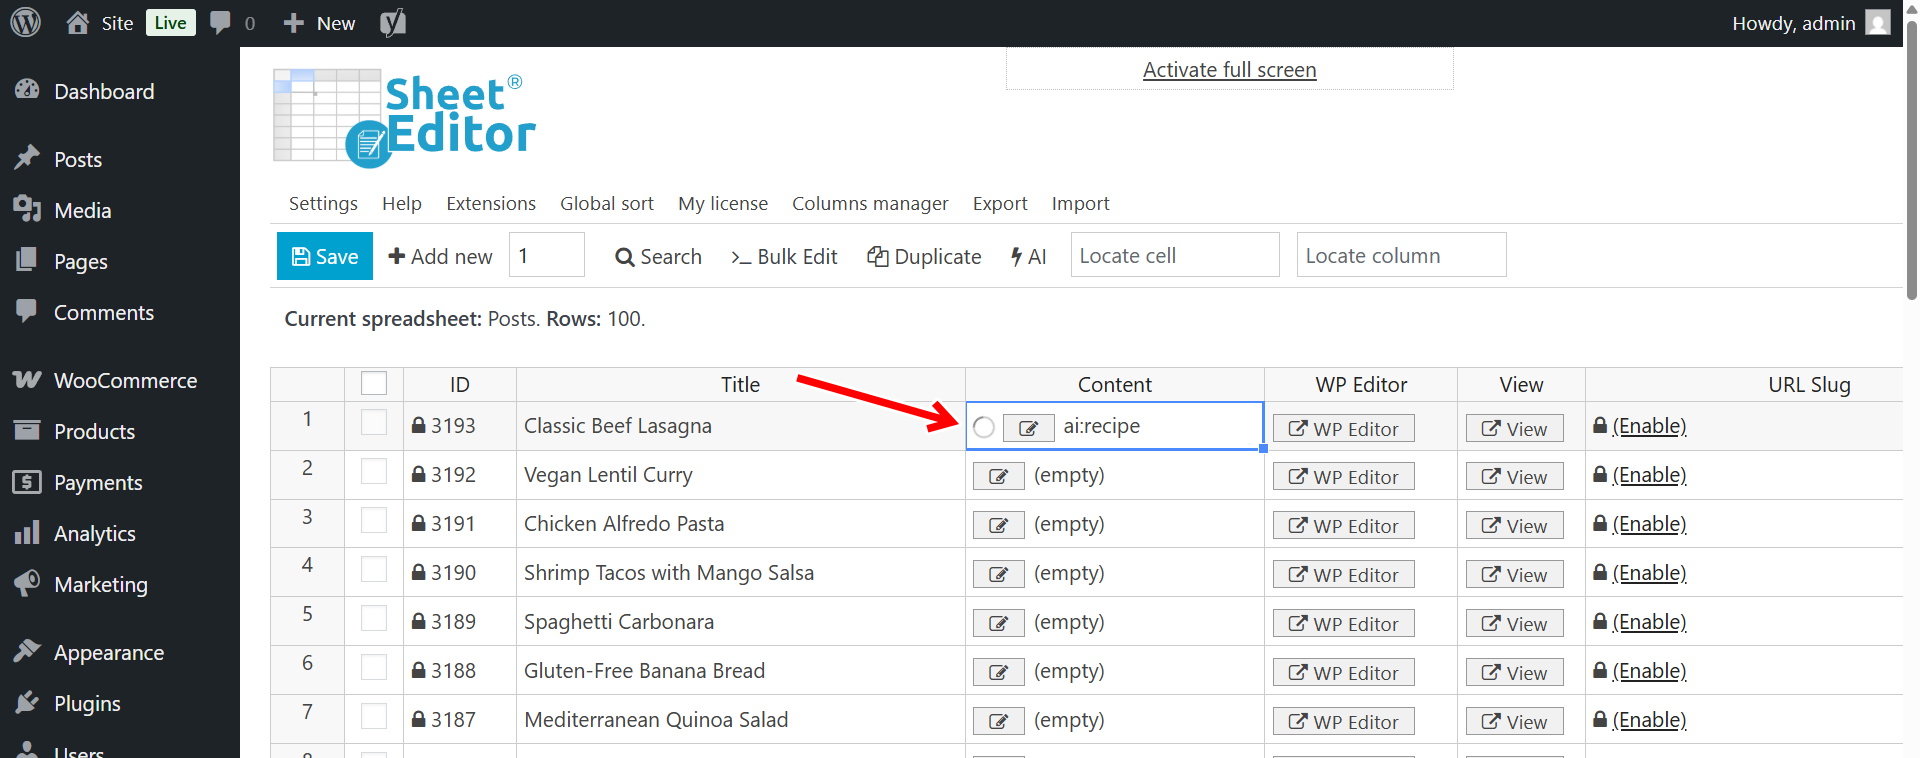
4.1 Generate recipes directly in the spreadsheet
- Go to WP Sheet Editor > Edit Posts (or your recipes post type).
- Locate the Content column in your spreadsheet.
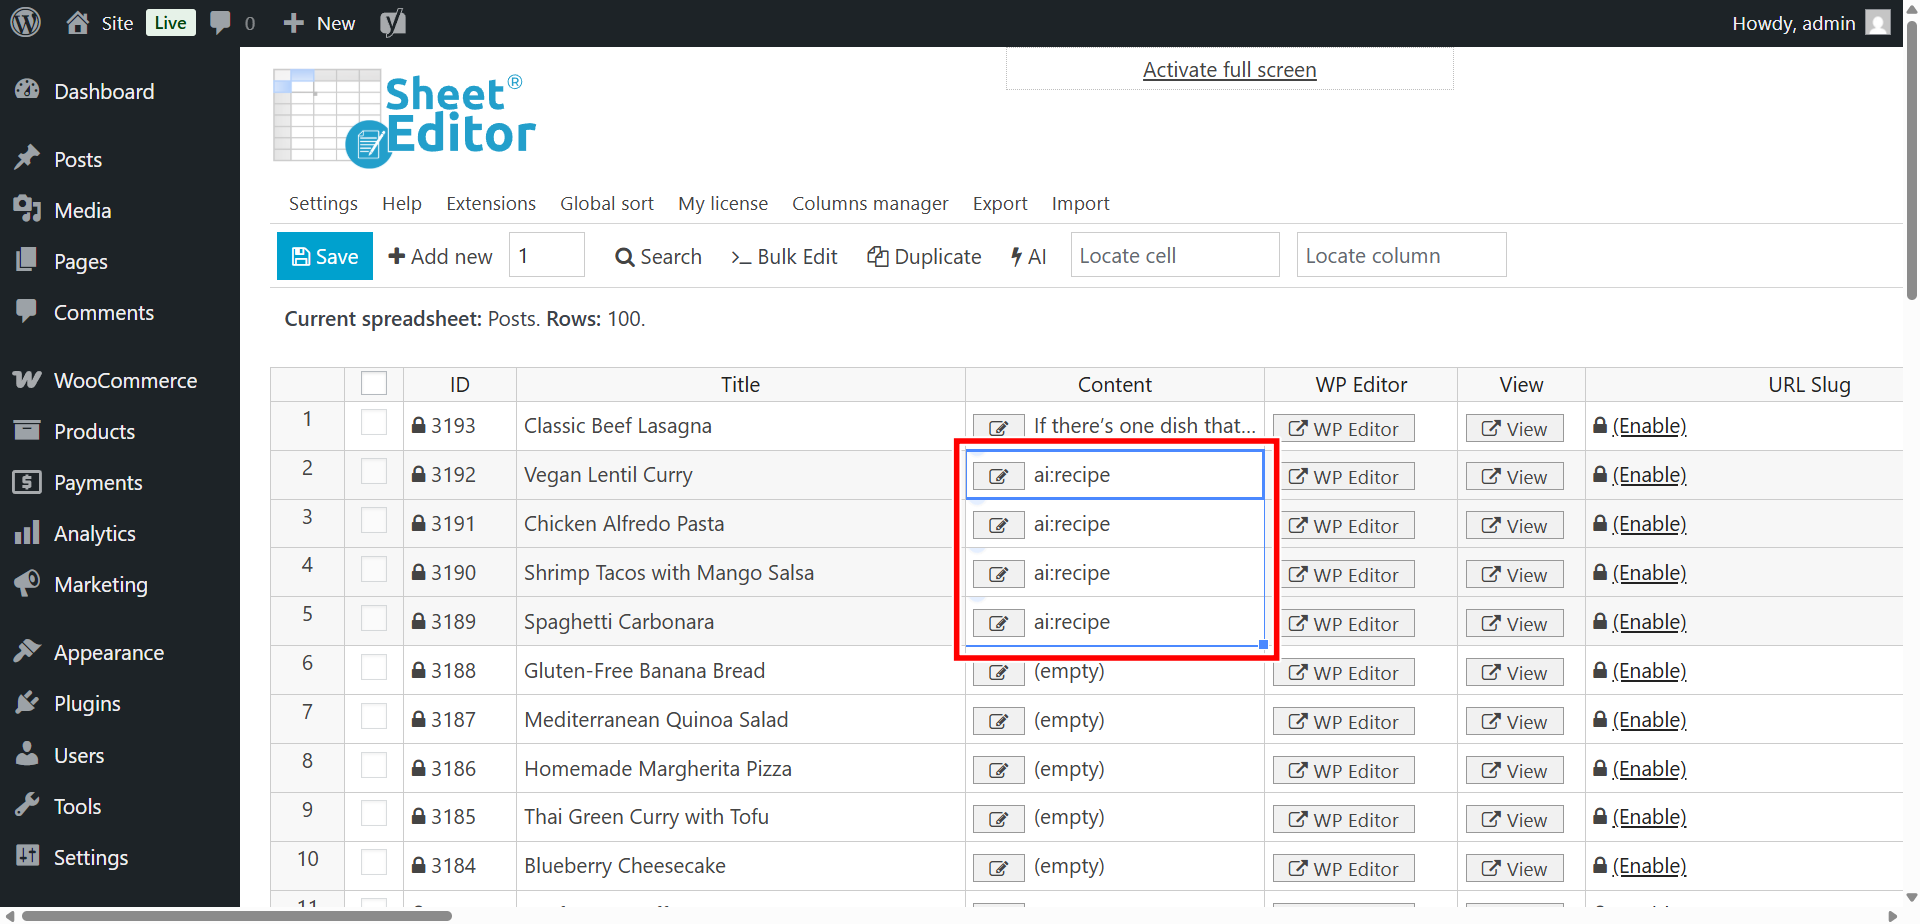
- In the cell of a recipe row, type your global prompt shortcut. For example:
ai:recipe
- Press Enter.
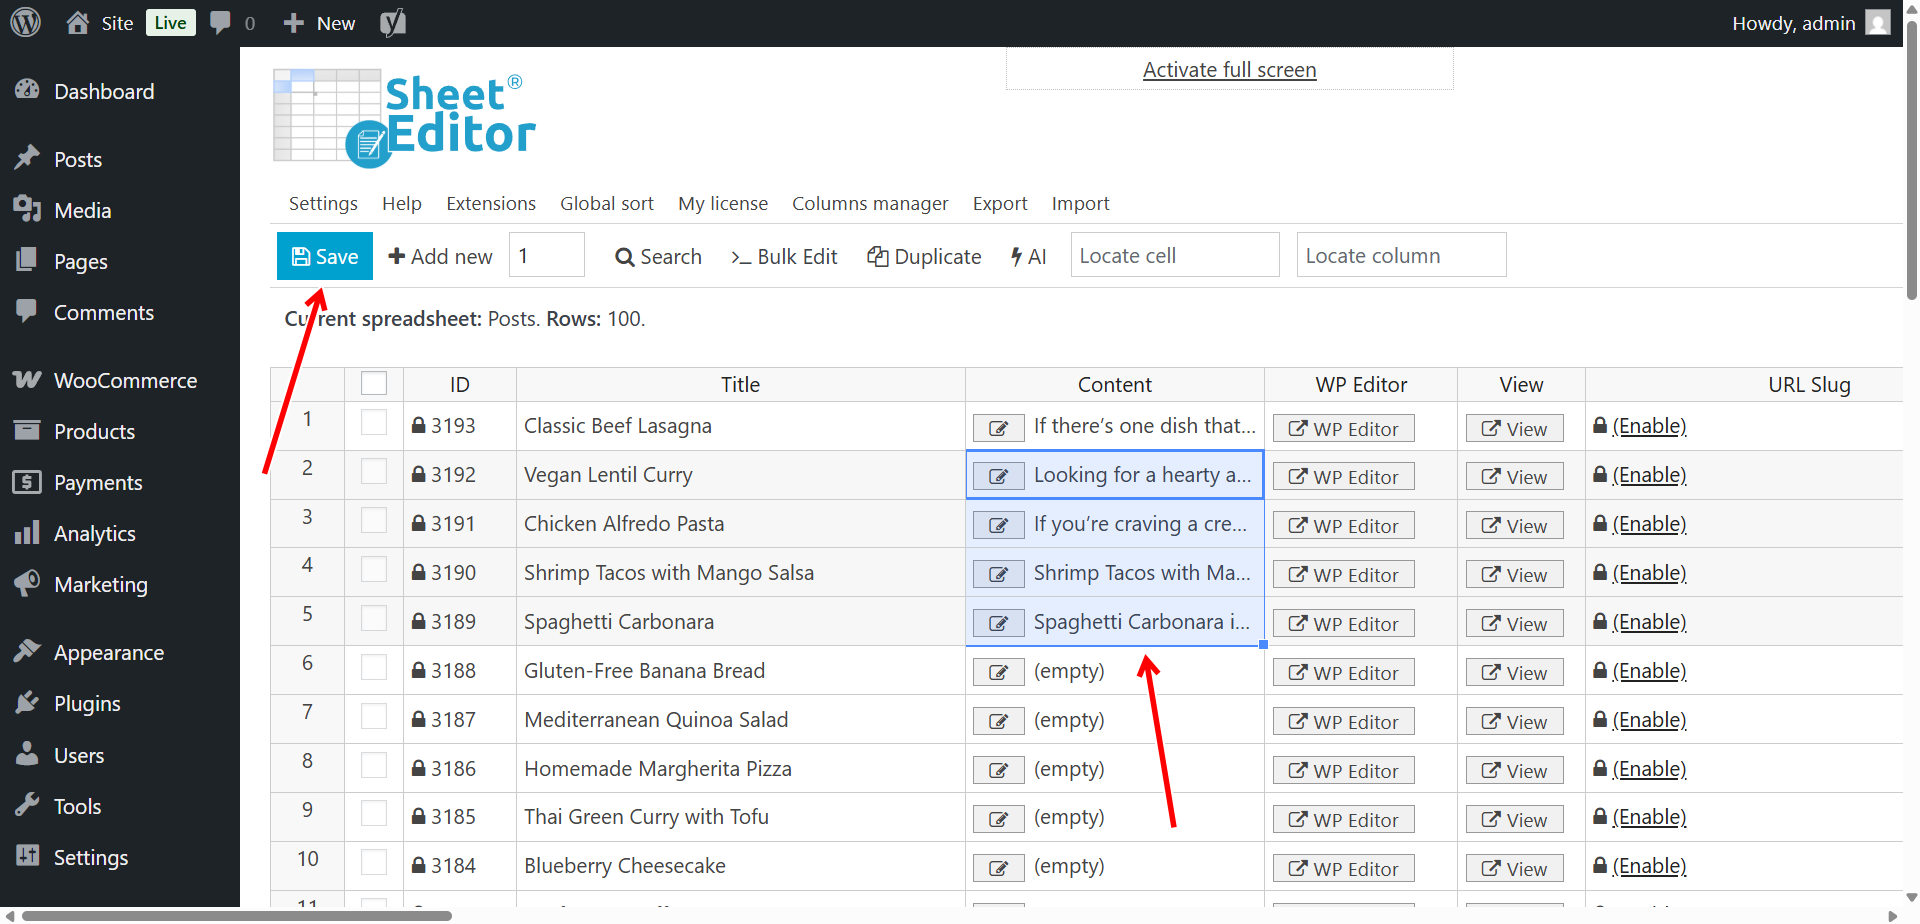
You’ll see a loading link in the spreadsheet while the AI generates your recipe.
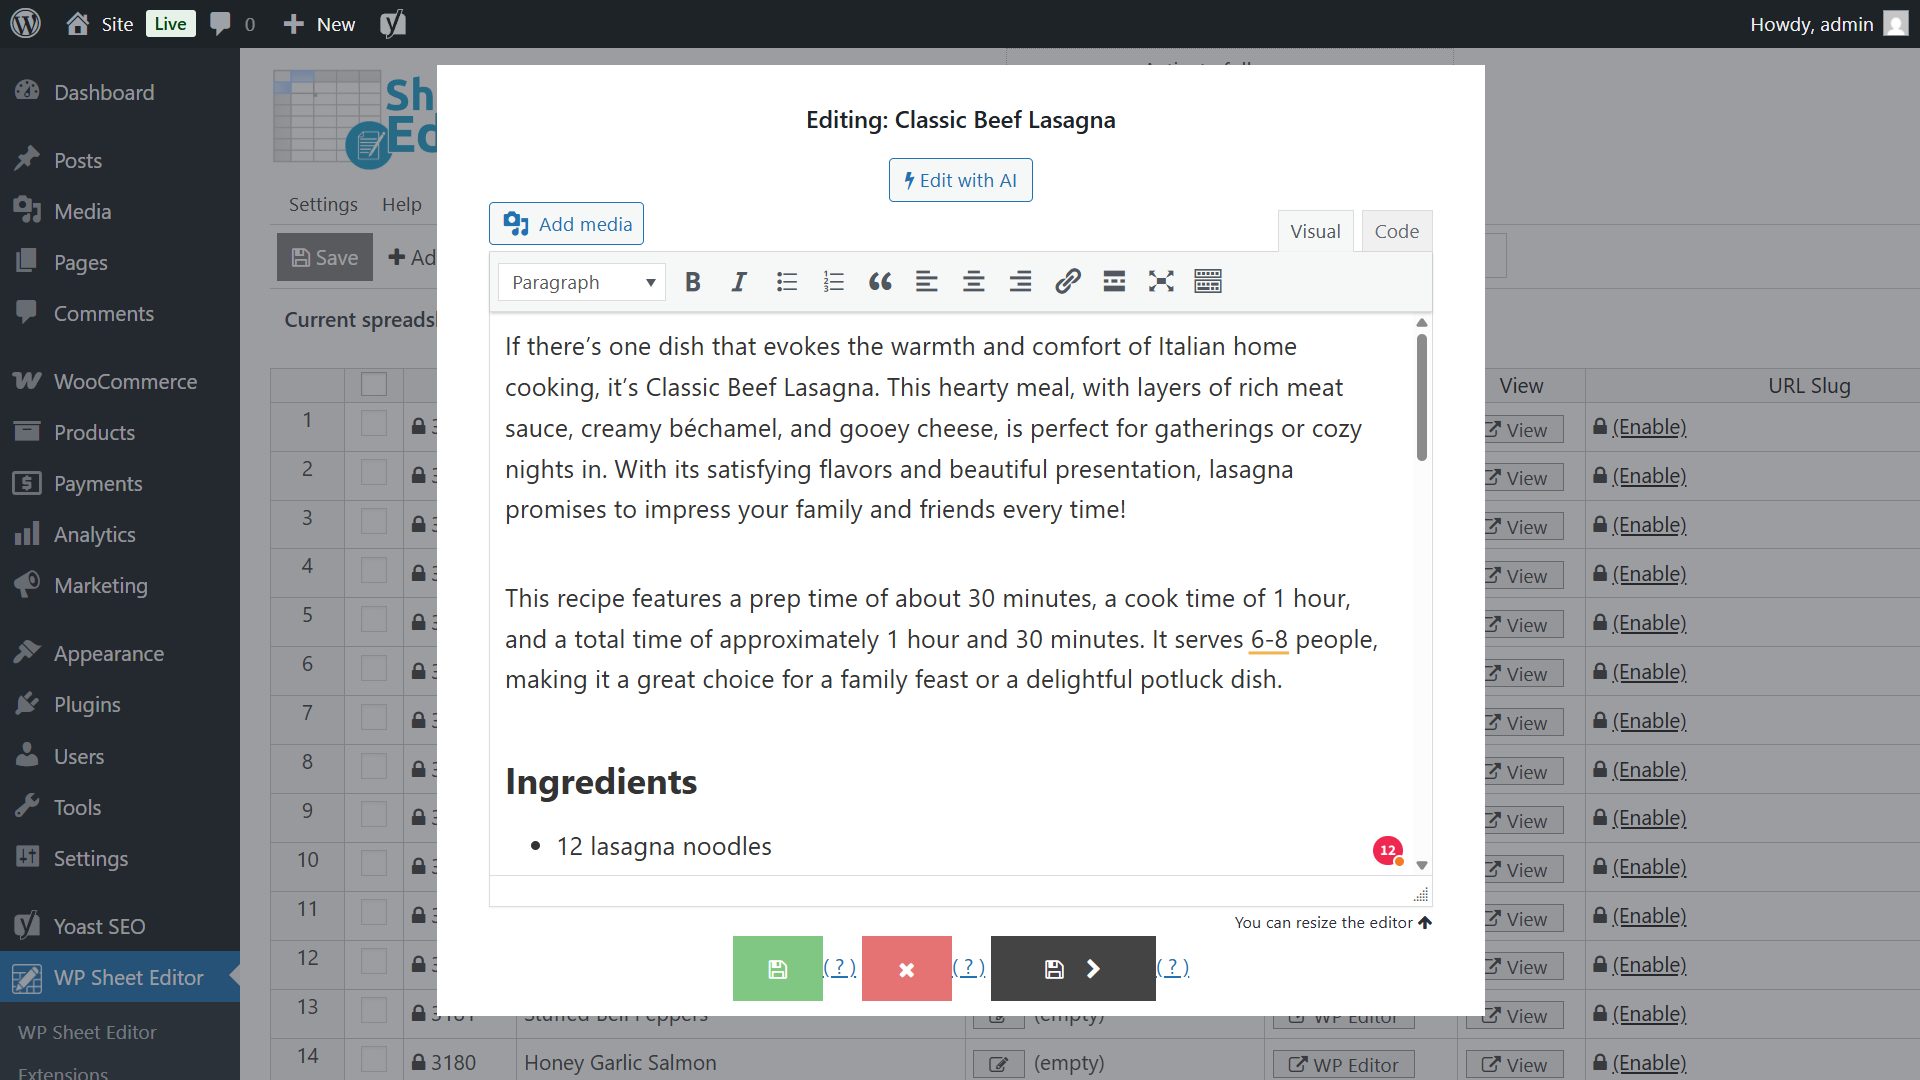
After a few seconds, the full recipe post will appear in the cell, formatted in HTML and ready to use.
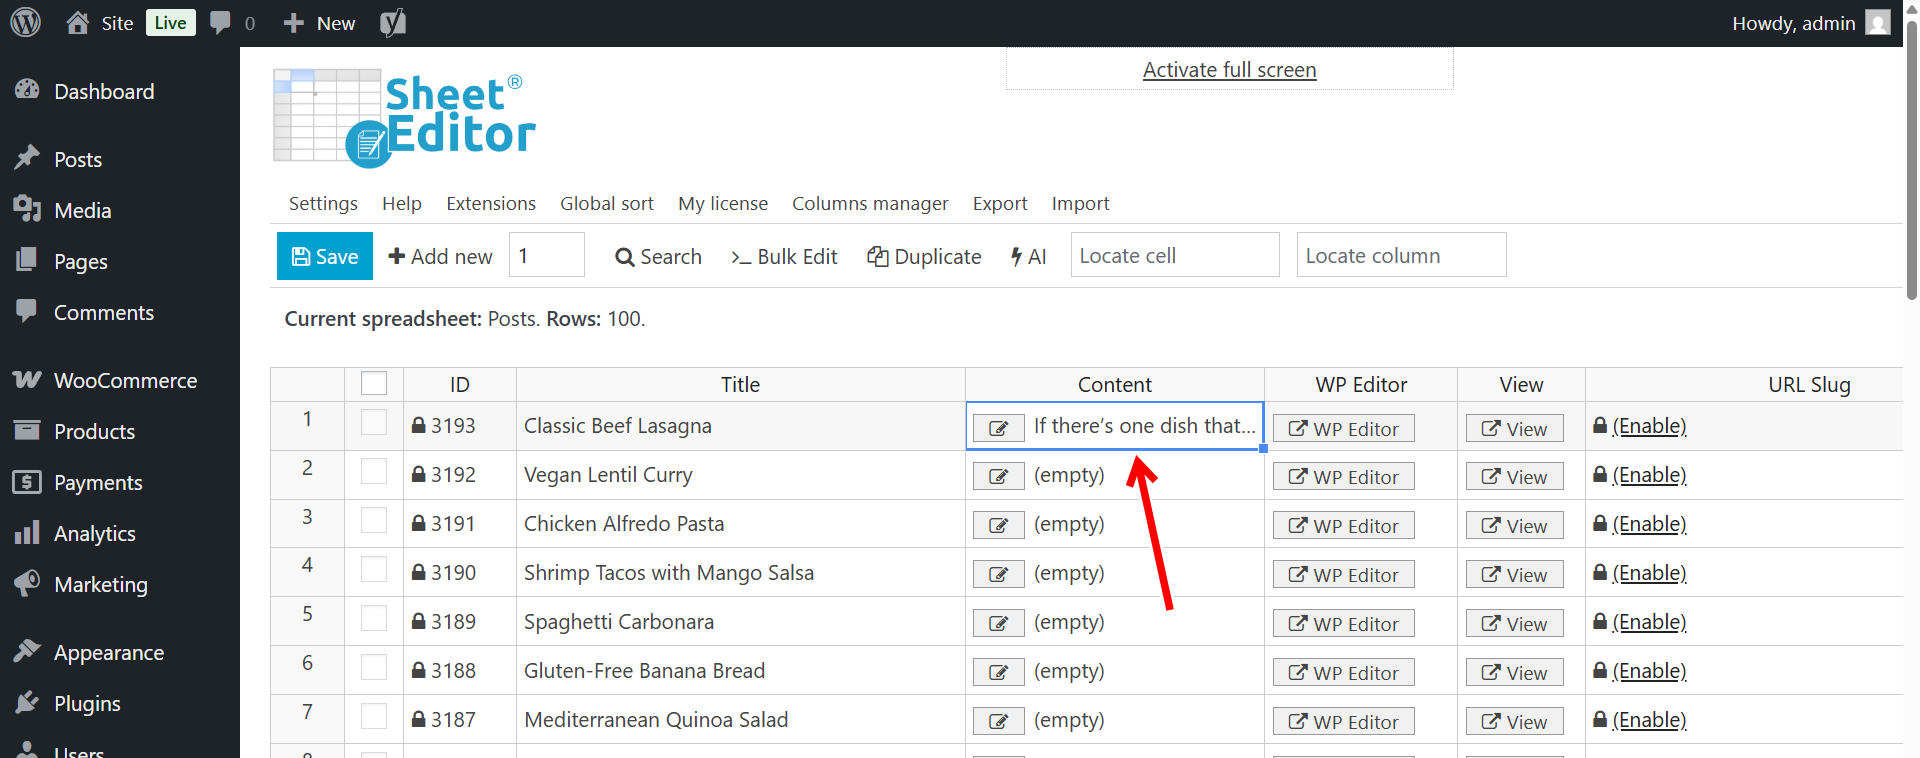
If you click on the Edit button in the cell, you’ll see the text editor as a popup and see the recipe the AI generated.
Pro tip: You can paste the ai:recipe command into multiple cells at once to generate several recipes in parallel.
Once you have generated content on all the recipes you want, you can click on Save.
4.2 Bulk generate recipes using the Bulk Edit tool
If you have dozens or hundreds of recipes to generate, the Bulk Edit tool is the fastest option. This way, you can apply your global prompt to all selected rows in one go.
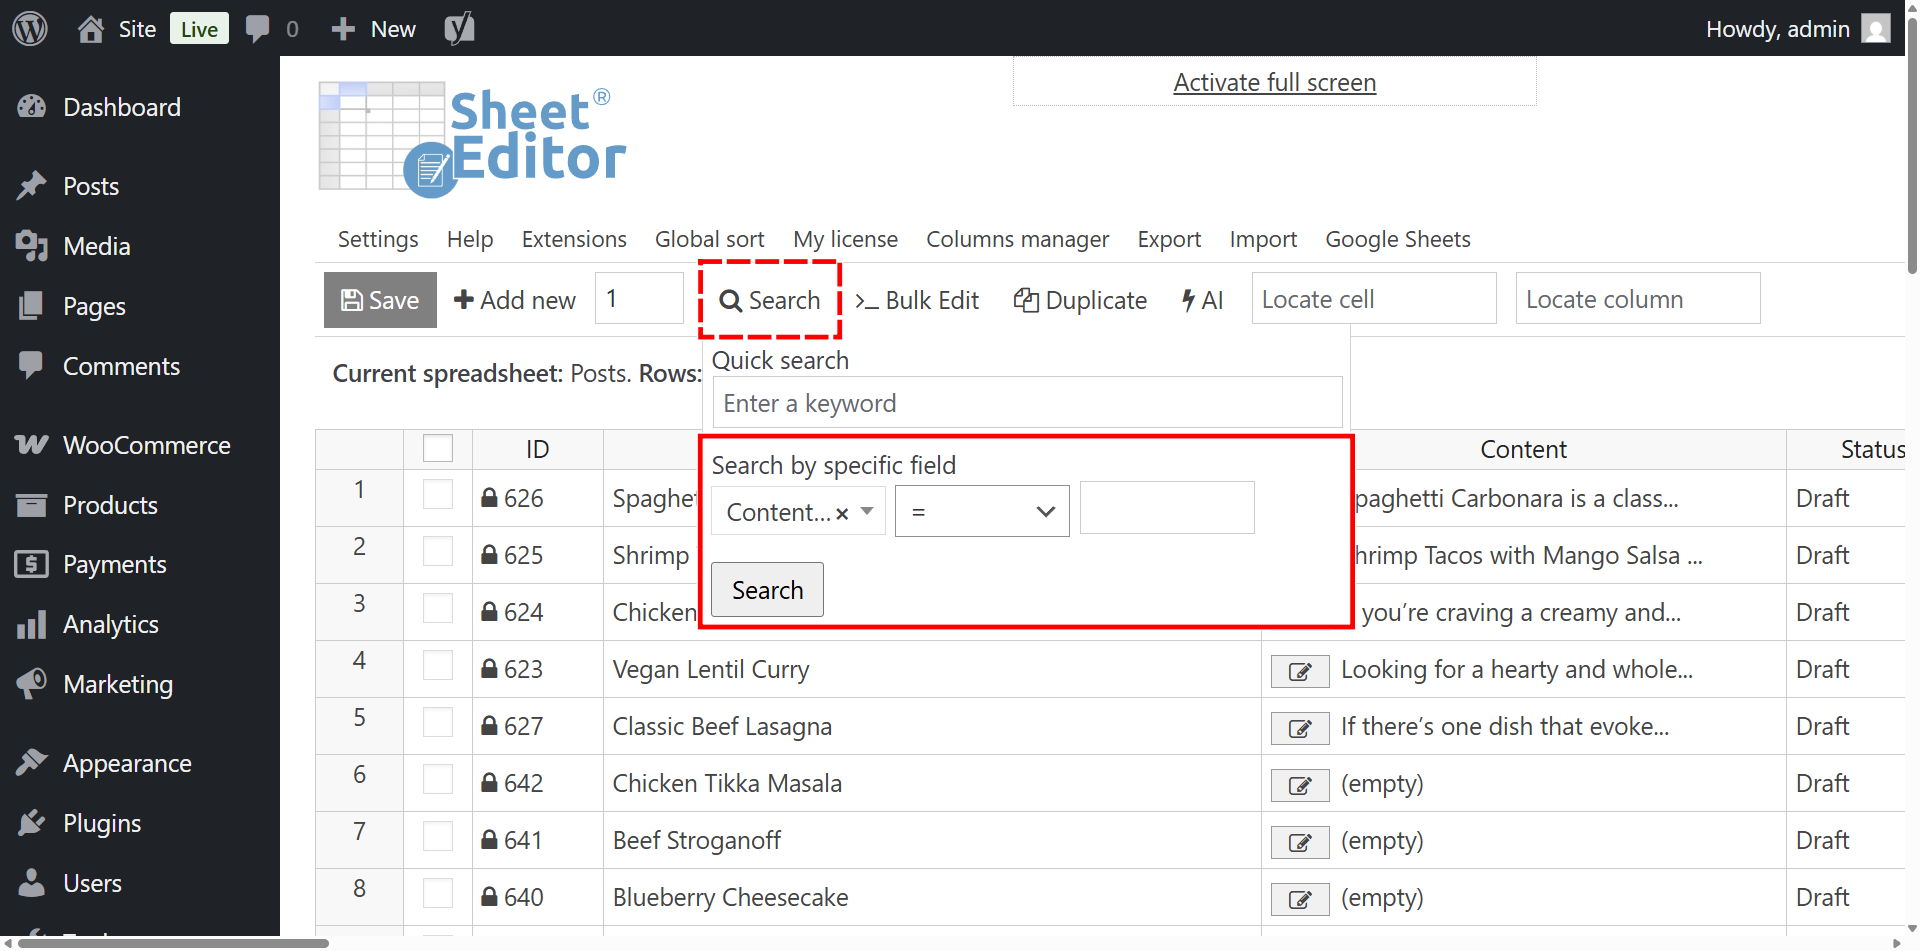
Let’s first search for all posts/recipes missing content; then let’s generate the recipe content for each empty recipe.
- From the spreadsheet, hover the mouse cursor over the Search tool.
- Select Content = (empty).
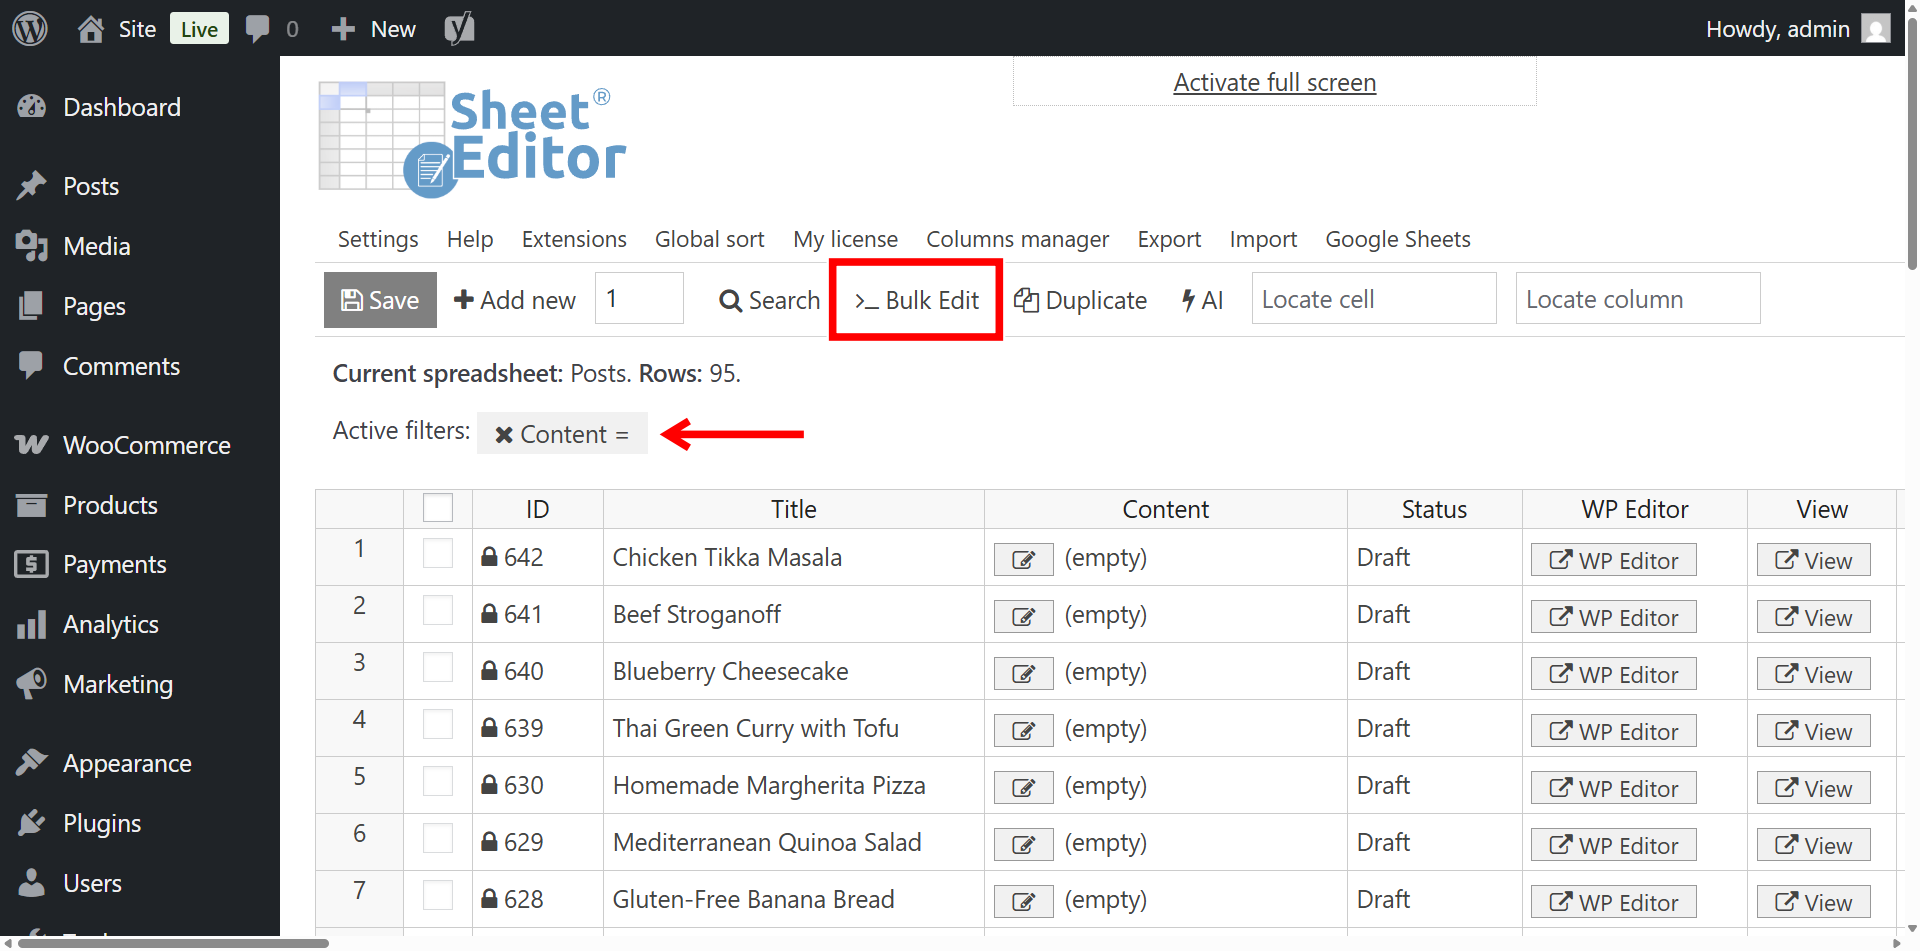
- Click Search to display only the rows missing any content.
You’ll see all the empty recipes, so you need to open the Bulk Edit tool from the toolbar.
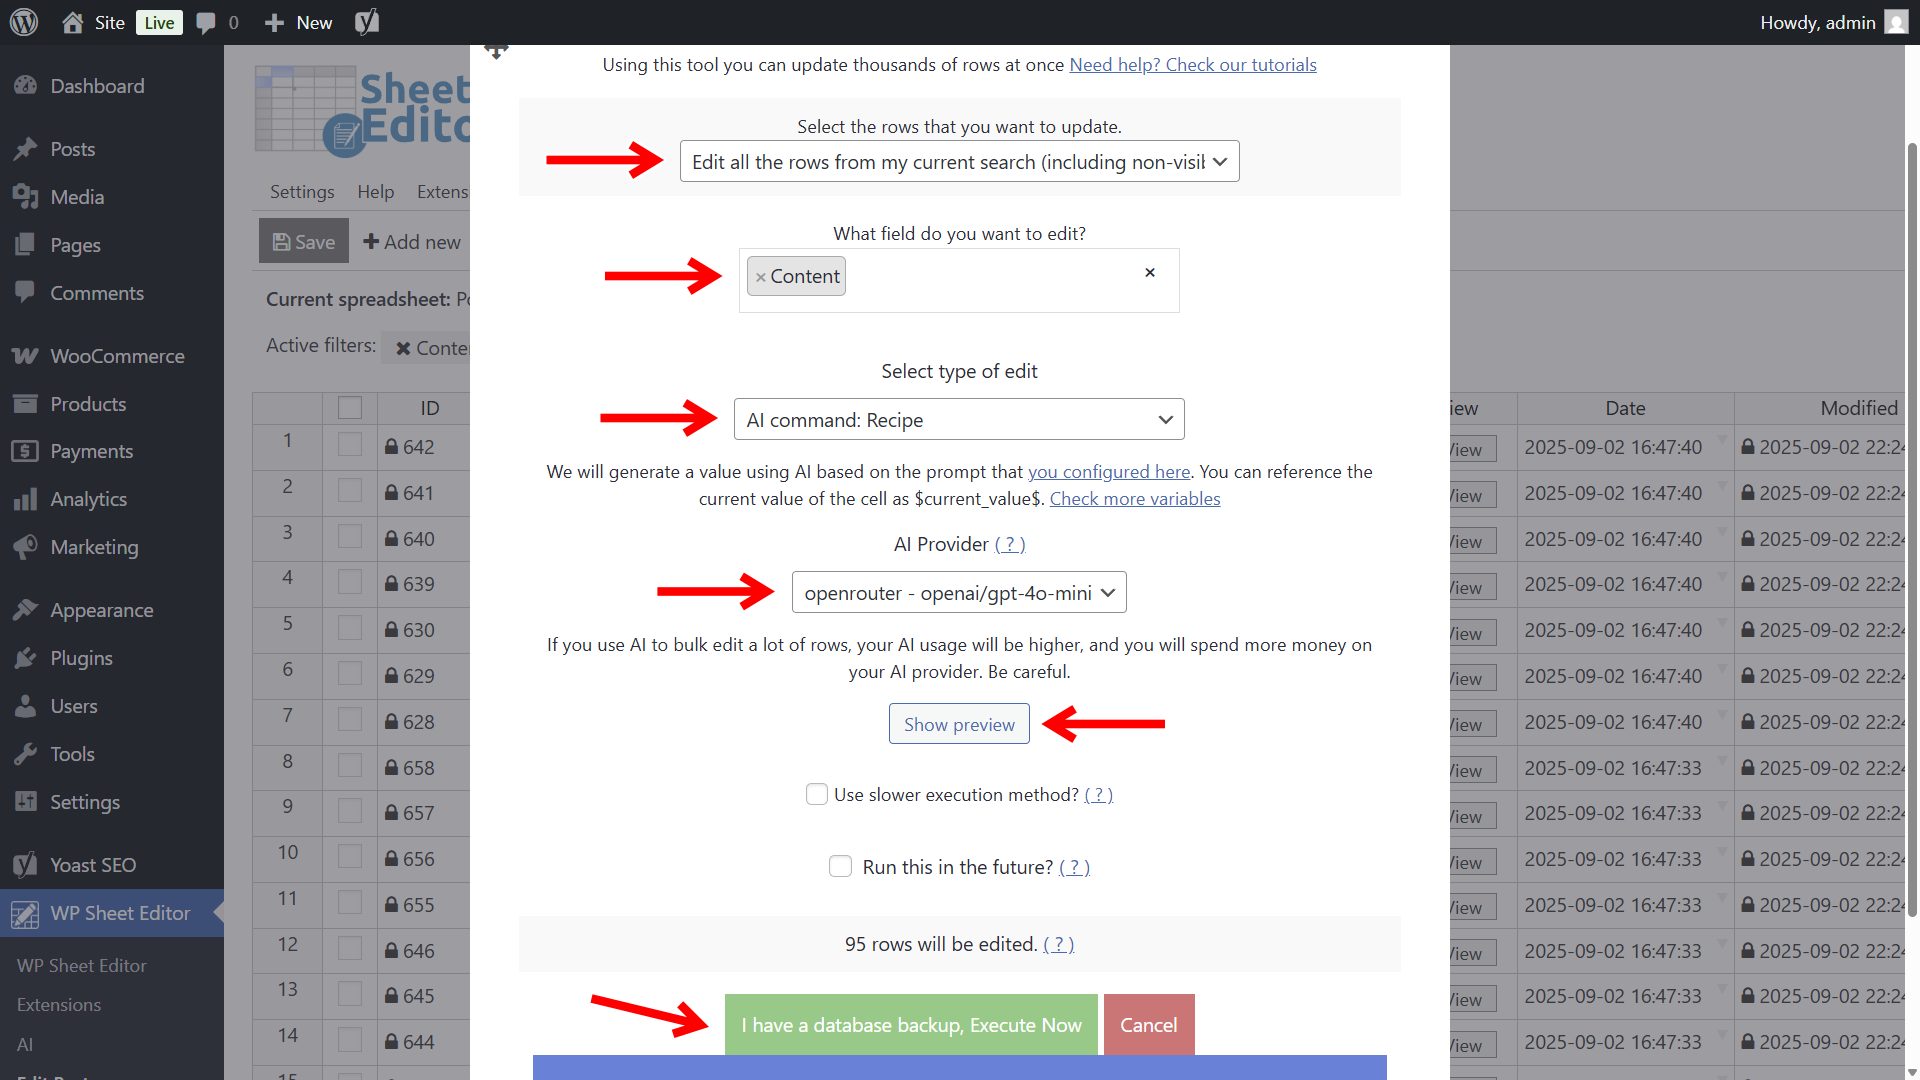
In the Bulk Edit tool, set up the following options:
- Select the rows you want to update: Edit all the rows from my current search.
- What field do you want to edit: Content.
- Select type of edit: AI command: Recipe.
- AI Provider: Select the model you configured earlier (e.g., GPT, Gemini, DeepSeek, Grok, etc.).
- Optional: Click on Show preview to test the command before executing.
- Click Execute Now.
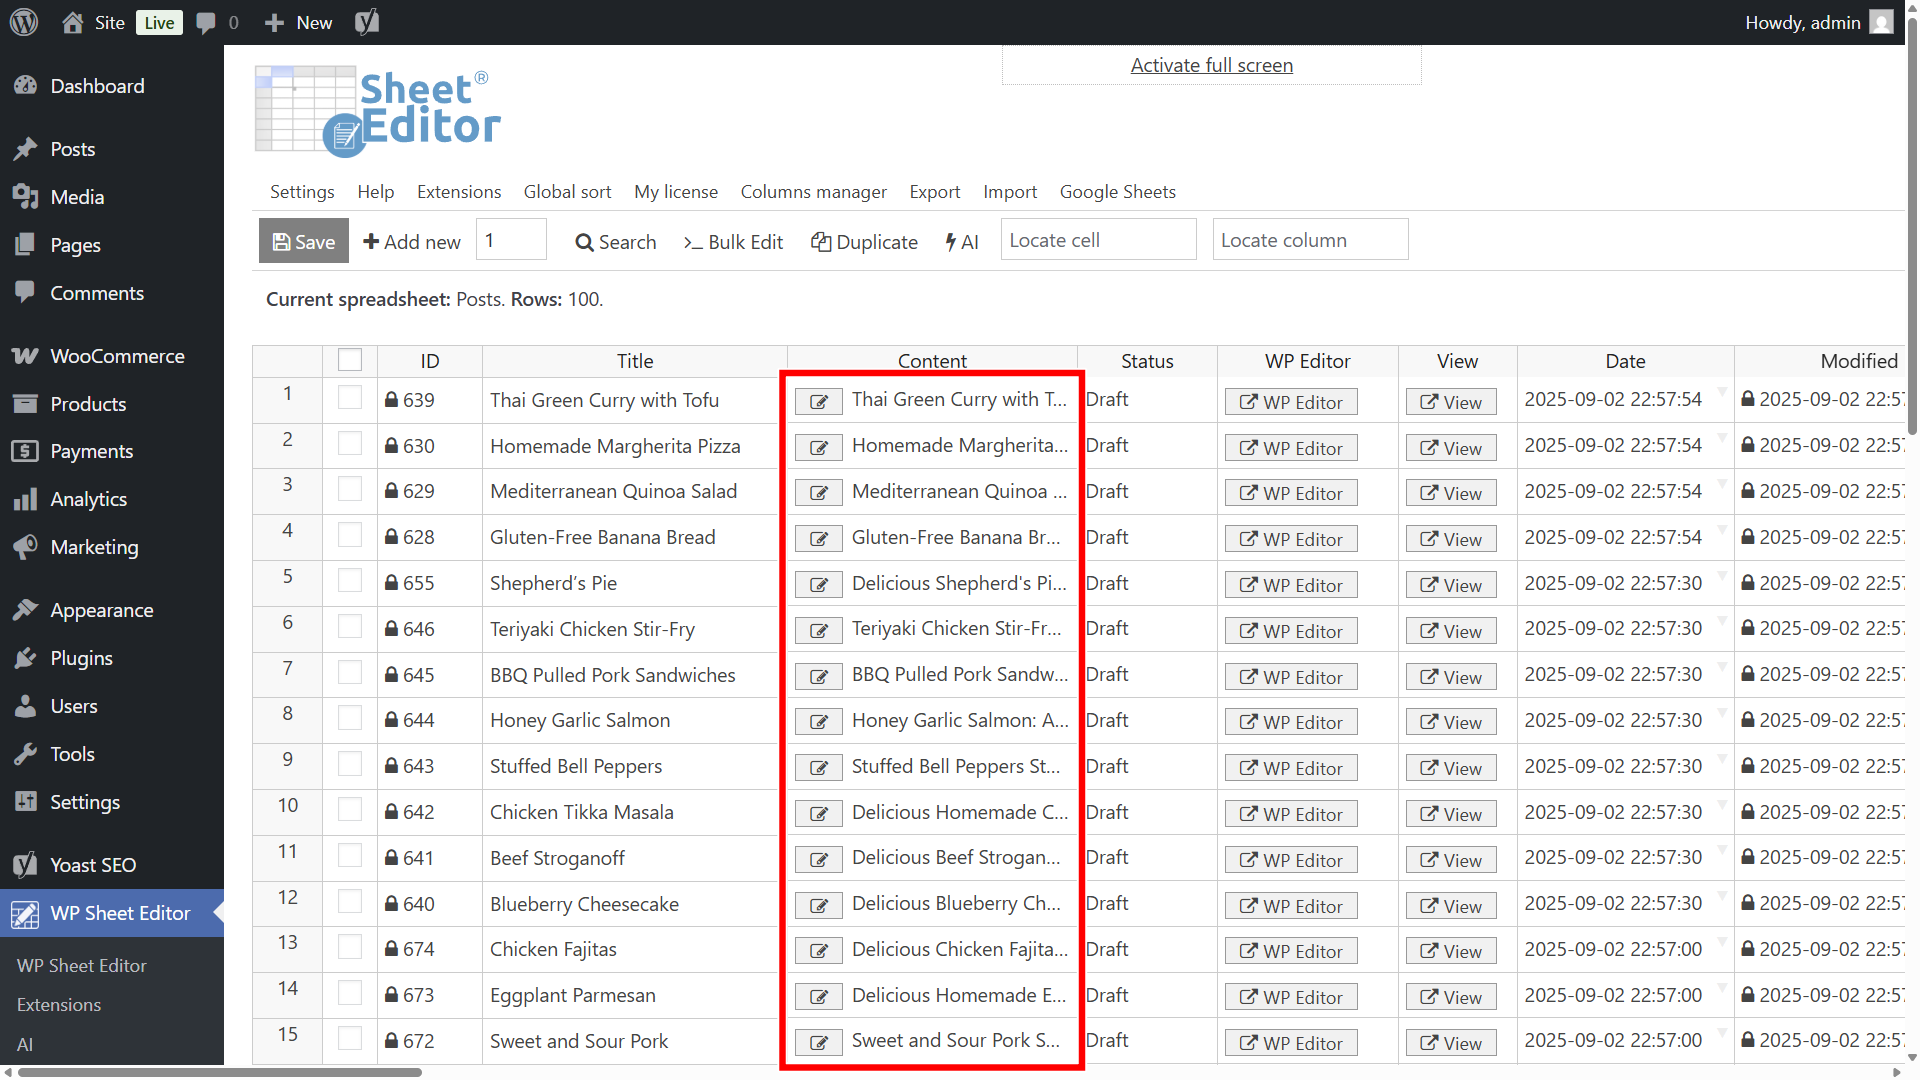
WP Sheet Editor will send your recipe titles and prompt to the AI model and populate each row with a complete recipe. In just a few minutes, you’ll have dozens or even hundreds of ready-to-publish recipe posts.
Next step: Once your text is generated, you can enrich your posts with images, categories, and tags to make your food blog even more engaging and SEO-friendly.
Step 5. Generate recipe images (featured image) with AI
No recipe blog is complete without mouthwatering photos. Great visuals make your posts more attractive, increase click-through rates on social media, and help your recipes stand out in Google’s image results. Instead of spending hours cooking and photographing each dish, you can use AI to generate professional-looking images automatically.
5.1 Set up your image generation prompt
Before generating images, you need to set up the image generation prompt in WP Sheet Editor’s settings. This ensures all images follow a consistent style and take the right context.
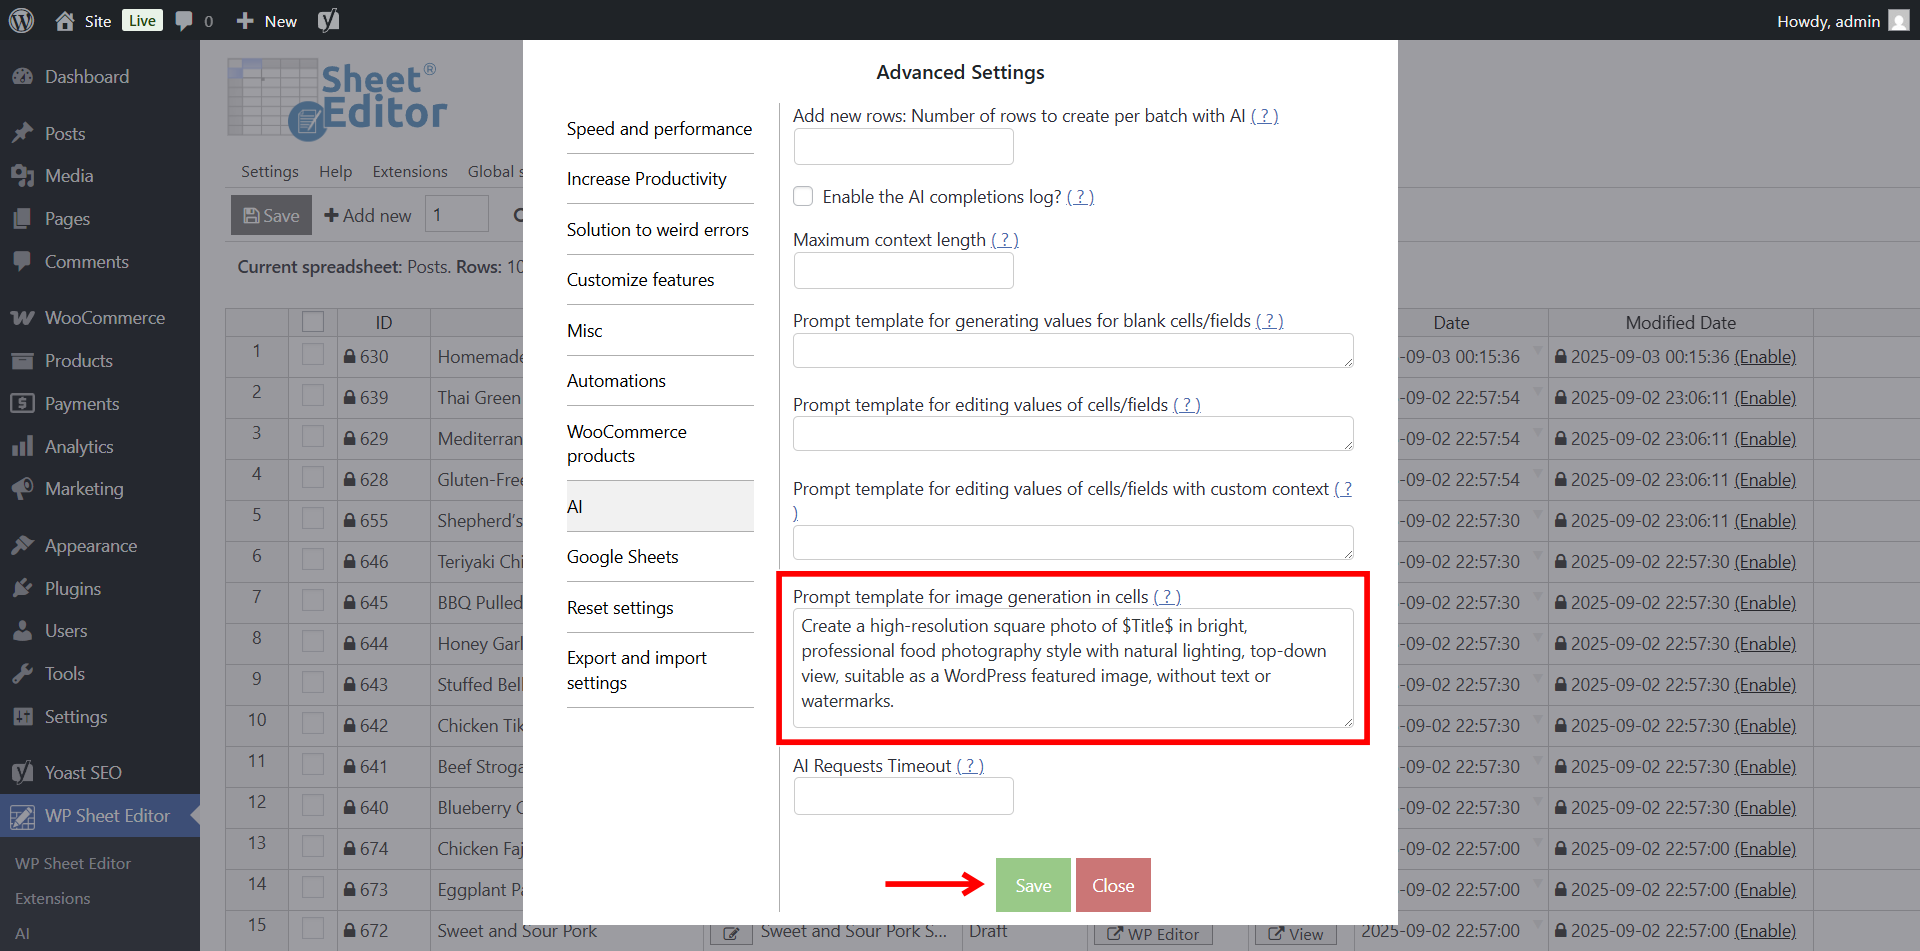
- Go to WP Sheet Editor > Advanced Settings > AI.
- In Prompt template for image generation in cells, add a prompt like this:
Create a high-resolution square photo of $Title$ in bright, professional food photography style with natural lighting, top-down view, suitable as a WordPress featured image, without text or watermarks.
- Click Save.
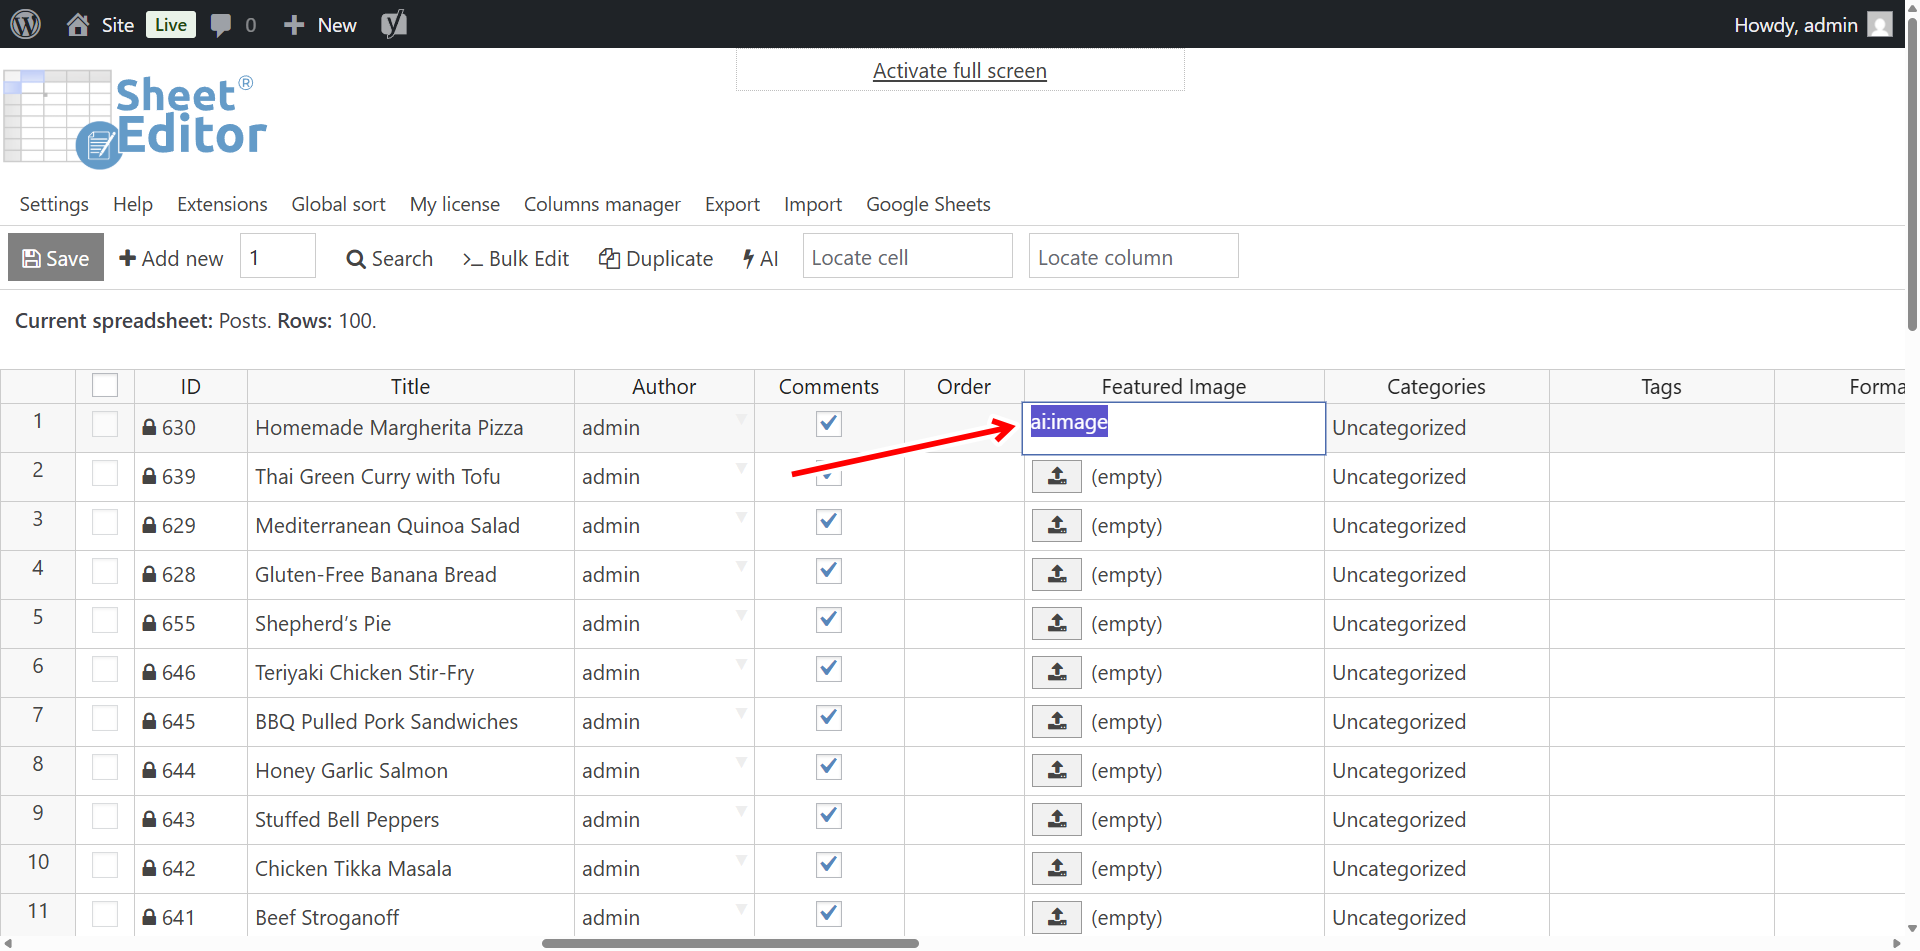
5.2 Generate images directly in spreadsheet cells
If you want to create images for individual recipes, you can do it right from the spreadsheet:
- Go to the Featured Image column in your posts/recipes spreadsheet.
- Type the following command into the cell:
ai:image
- Press Enter.
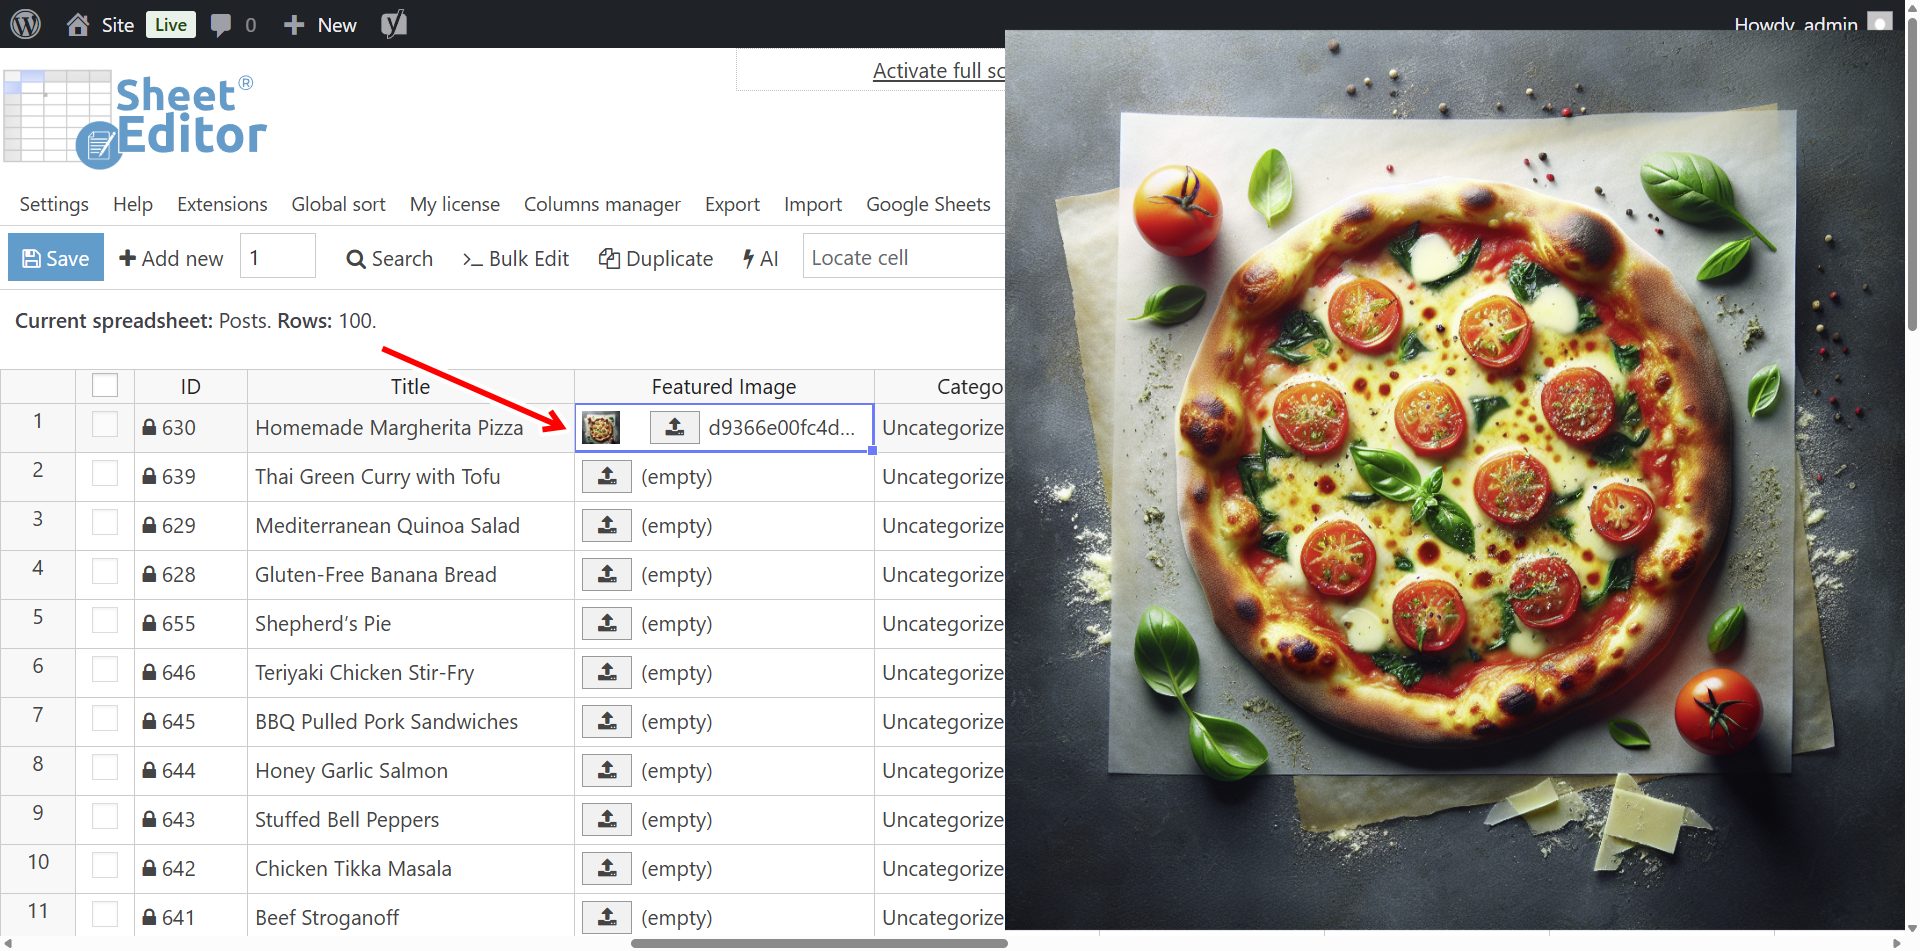
WP Sheet Editor will generate an AI image based on the recipe title and your saved prompt.
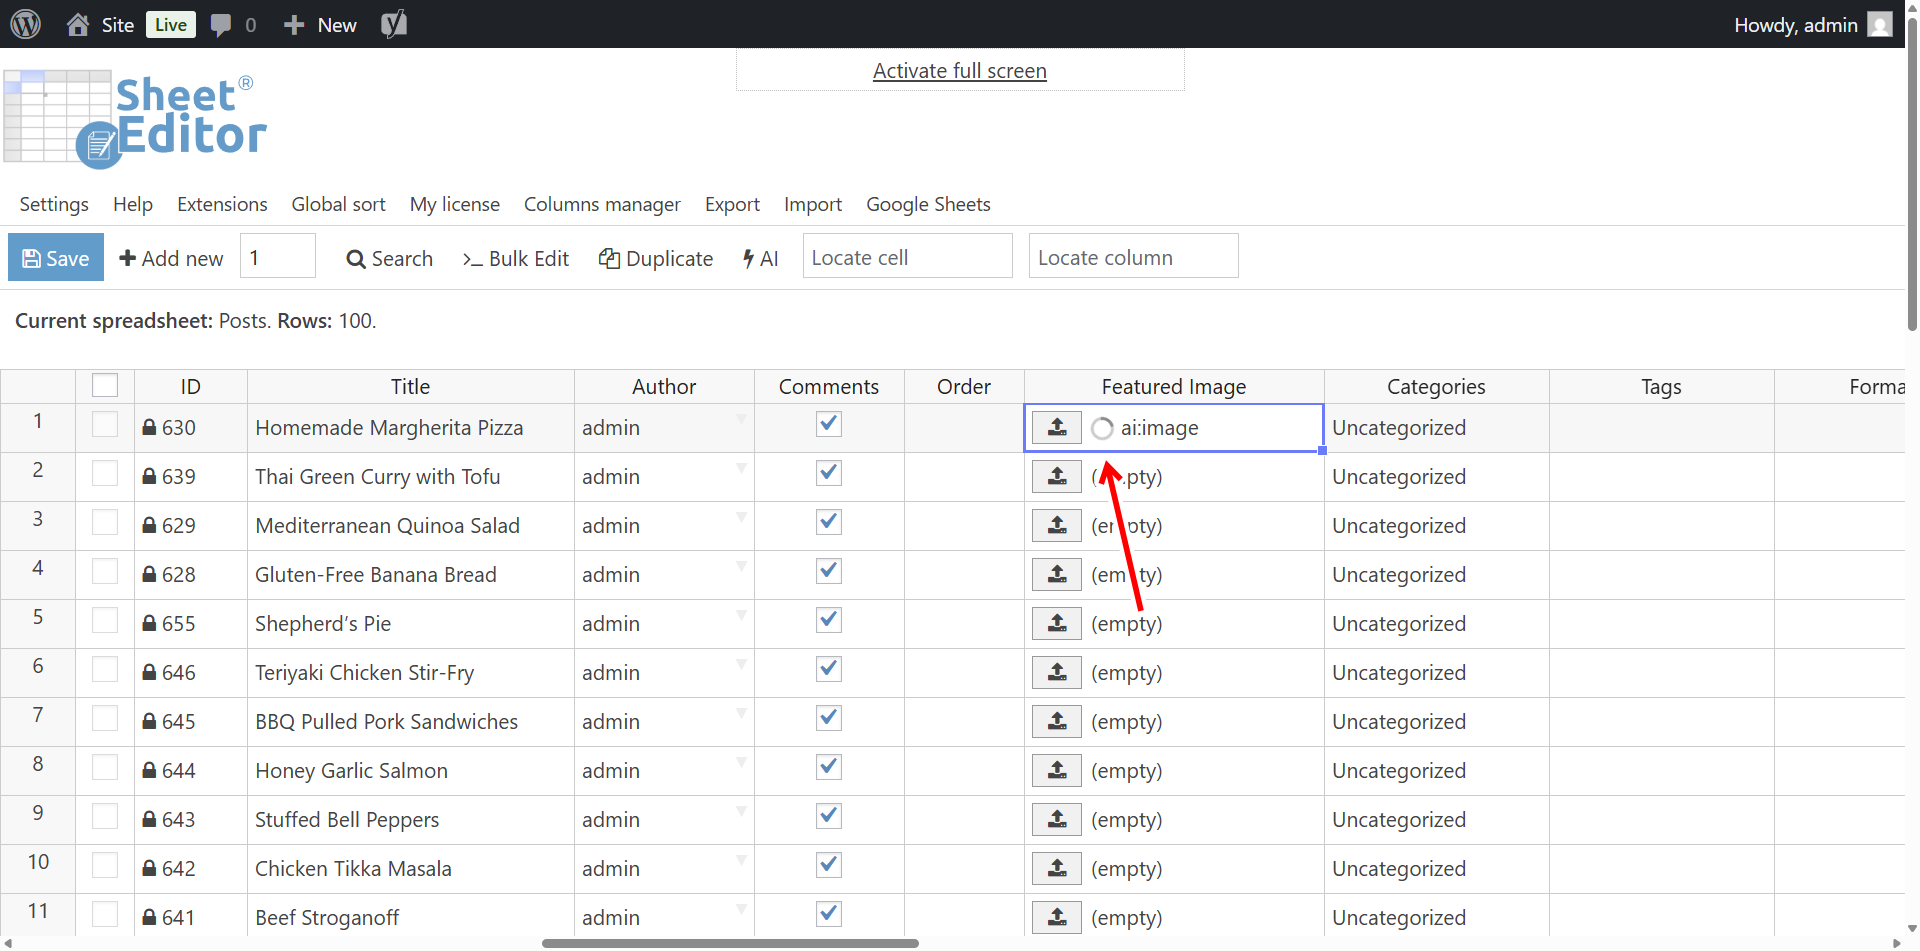
The generated image will be automatically uploaded to your WordPress Media Library and set as the recipe’s featured image. If you hover the mouse cursor over the image in the cell, you’ll see a preview of the image.
Pro tip: You can paste the ai:image command into multiple cells at once to generate several recipe images in parallel.
Once you’re done generating your images, click on Save.
5.3 Bulk generate recipe images
If you want to generate images for dozens of recipes at once, use the Bulk Edit tool:
You can search for all the recipes / posts where Featured image = Empty.
Click on the Bulk Edit button in the toolbar.
Set the following options:
- Select the rows you want to update: Edit all the rows from my current search.
- What field do you want to edit: Featured Image.
- Select type of edit: AI Image Generation.
- AI Provider: Select the image model you configured earlier (e.g., DALL·E 3).
- Prompt: You can use this prompt:
-
Create a high-resolution square photo of $Title$ in bright, professional food photography style with natural lighting, top-down view, suitable as a WordPress featured image, without text or watermarks.
- Click Execute Now.
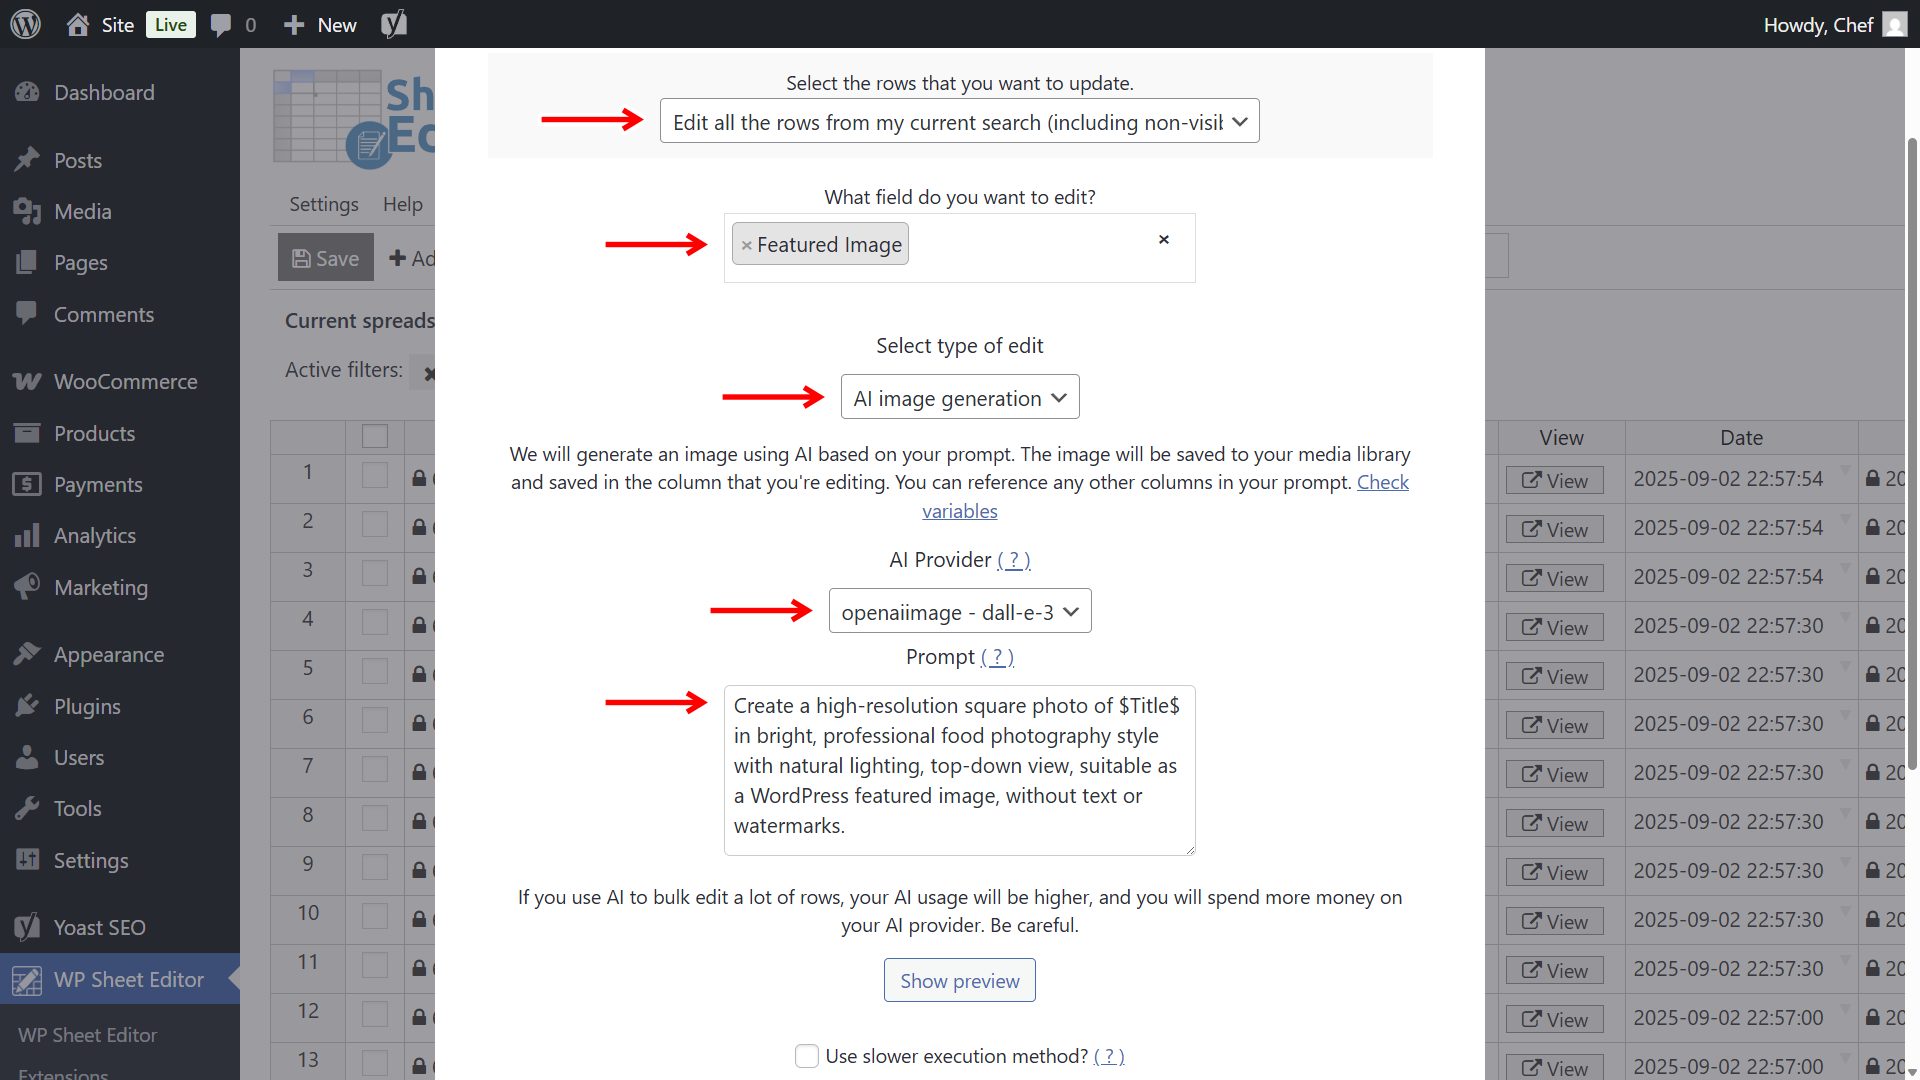
WP Sheet Editor will generate unique images for each recipe and assign them as featured images automatically. In just a few minutes, your recipe posts will not only have high-quality text but also stunning visuals ready to publish.
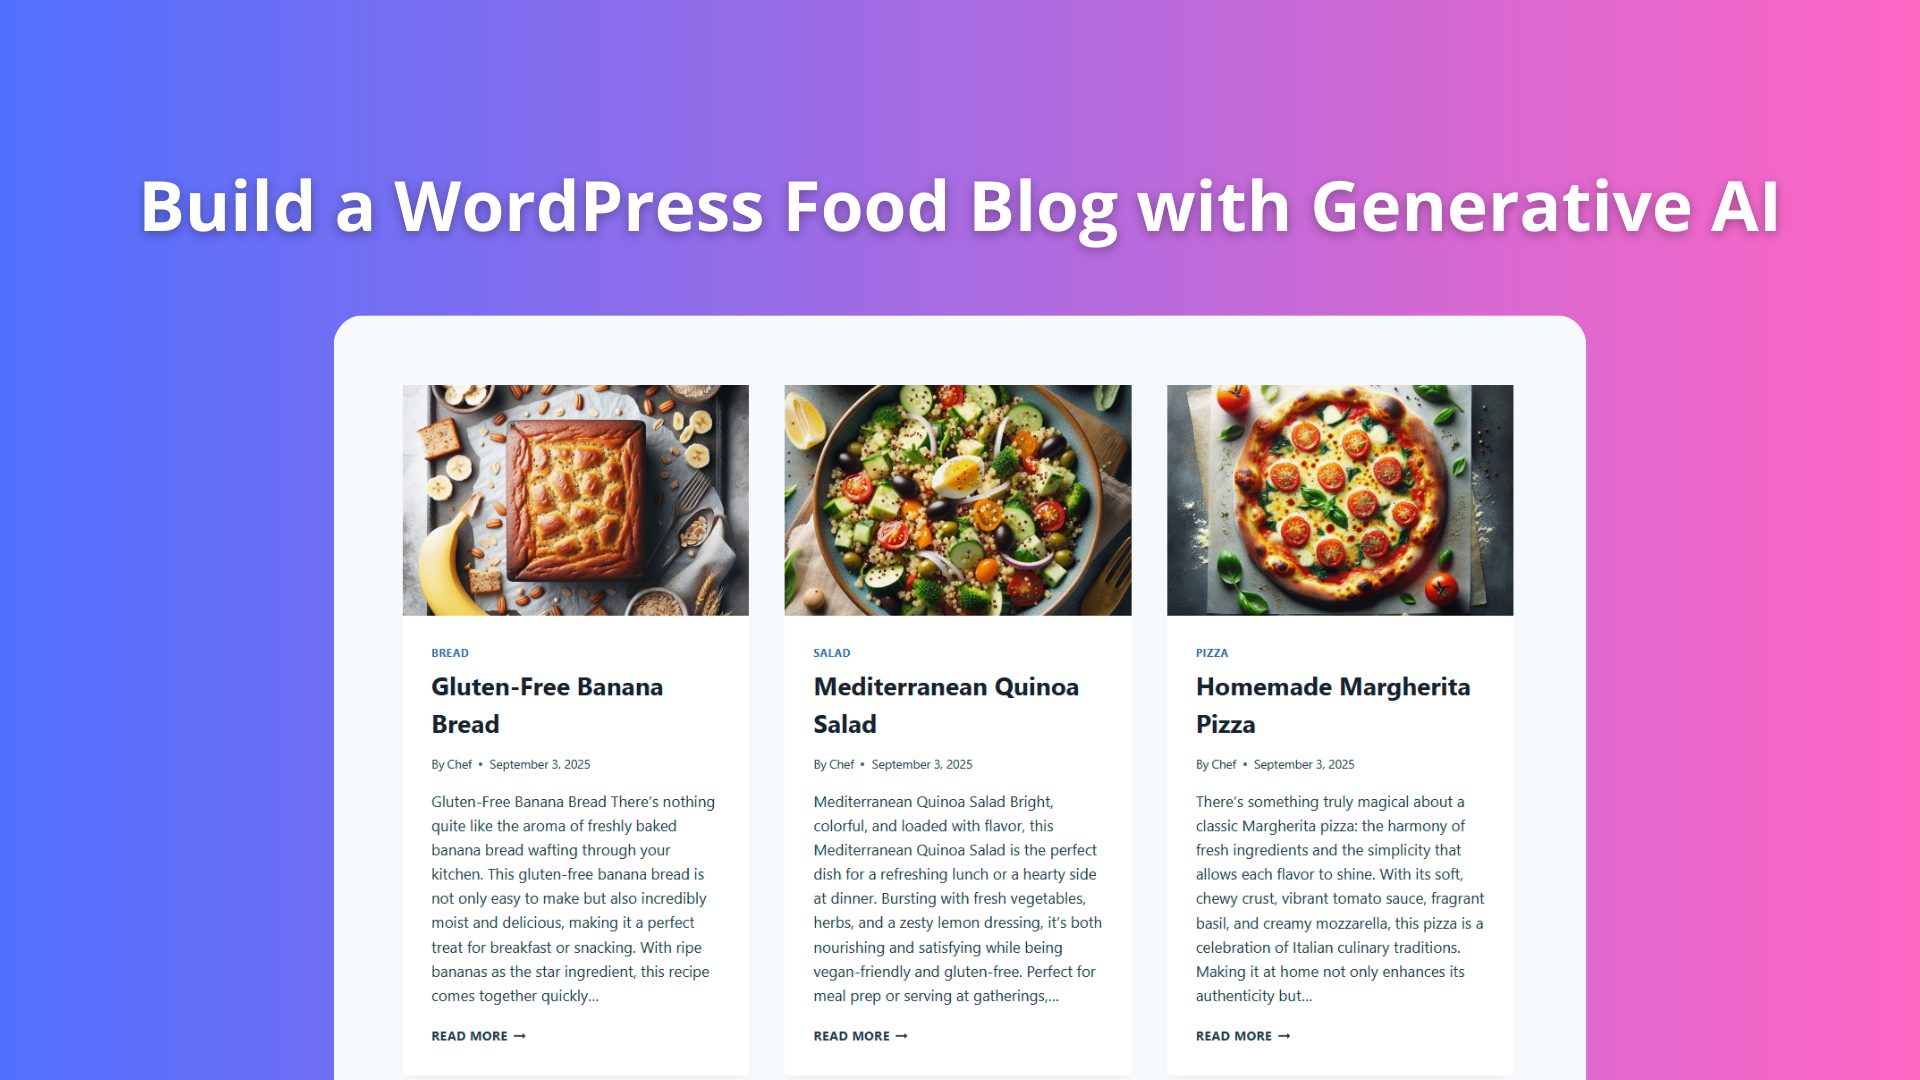
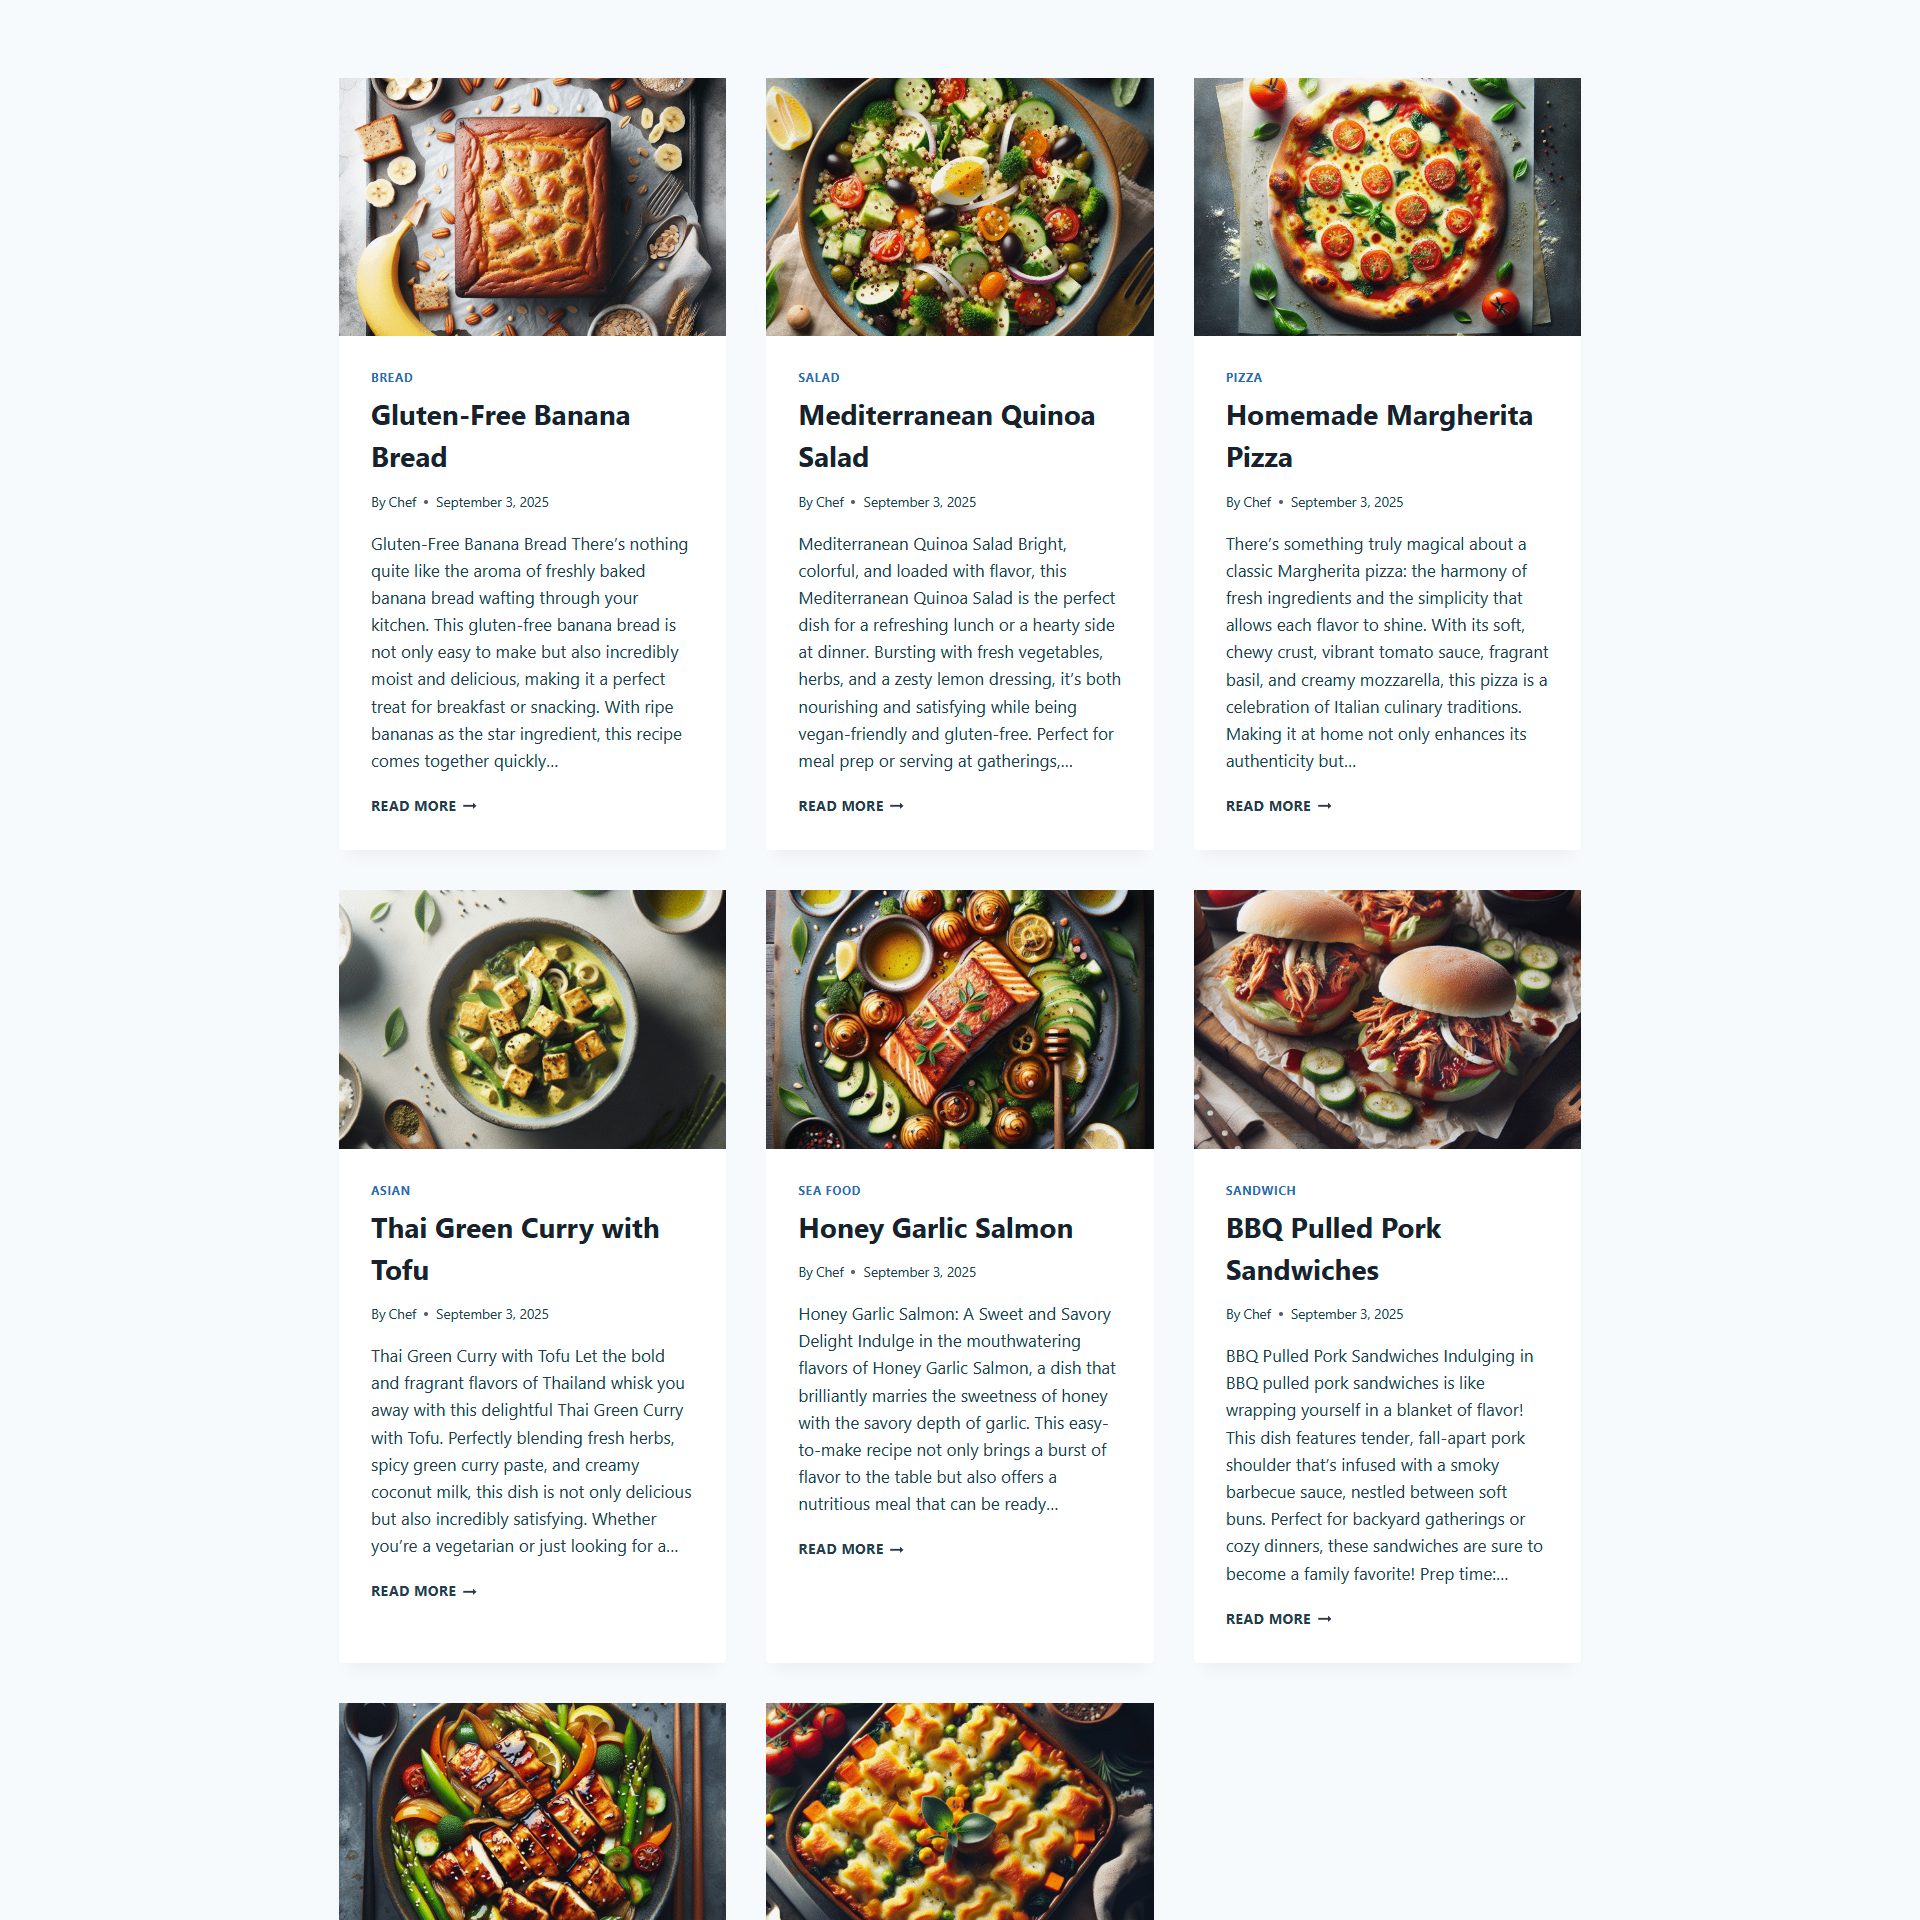
Once all your recipes are generated with AI text and images, your WordPress food blog will look like a fully polished site: complete with titles, detailed recipe posts, and mouth-watering featured images. Instead of empty drafts, you’ll now see a professional grid of recipe cards on your blog, ready for visitors to explore, cook, and share. Here’s an example of how your blog could look once everything is published:
Next step: With your text and images in place, you can optimize SEO, schedule posts, and let your recipe blog grow on autopilot.
Next steps: Take your recipe blog even further with AI
At this point, you already have a food blog filled with complete recipes and featured images.
But why stop there? WP Sheet Editor gives you even more ways to automate and optimize your blog, helping you attract more visitors and keep your publishing consistent. Here are some powerful next steps you can take:
- Generate SEO titles and descriptions: Use AI prompts to automatically create keyword-rich meta titles and descriptions for every recipe. This will help your posts rank higher in search engines and bring in more organic traffic. Read tutorials for Yoast SEO, SEOPress, Rank Math.
- Create post excerpts: Automatically generate short, engaging summaries that appear in archives, category pages, and search results. This makes your blog easier to browse and improves click-through rates. Read tutorial.
- Assign categories and tags: Use the spreadsheet to easily assign relevant categories and tags. This keeps your blog organized and user-friendly.
- Schedule recipe posts in bulk: WP Sheet Editor allows you to schedule multiple posts at once, so your recipes can be automatically published every day. This way, your blog grows steadily while you focus on cooking or promoting your content. Read tutorial.
By taking these next steps, you’ll transform your recipe blog into a fully automated publishing machine: optimized for SEO, organized for easy navigation, and consistent in delivering fresh content to your readers.
Frequently Asked Questions
1. Do I need any coding skills to create an AI-powered recipe blog?
No! WP Sheet Editor handles all the integration with WordPress and AI models via spreadsheets. You only need to add API keys and run commands in the spreadsheet. No coding required.
2. Can I generate recipes in bulk?
Yes! Thanks to our Bulk AI API , you can add hundreds of recipe titles to the spreadsheet and use the AI global prompt to generate full recipes in bulk, including ingredients, instructions, and cooking tips.
3. How do I create images for my recipes?
WP Sheet Editor lets you generate AI images directly in your spreadsheet using OpenAI’s DALL·E models. You can generate images individually or in bulk, and they are automatically added as featured images in WordPress.
4. Can I customize the recipe format?
Absolutely! You can edit the global prompt to include nutritional info, cooking tips, wine pairings, or any other content you want. The AI will follow your instructions consistently across all posts.
5. What AI providers can I use?
For text generation, WP Sheet Editor supports OpenRouter (with access to GPT, Gemini, Grok, Claude, DeepSeek, etc.), OpenAI, and any other provider using the same API format as OpenAI. For images, you can use OpenAI’s DALL·E 2 or 3. You just need valid API keys for each provider.
6. Can I schedule recipes to publish automatically?
Yes! You can schedule multiple recipes at once. This allows your blog to grow daily without manual publishing.
7. Will the AI content be SEO-friendly?
Yes! You can generate SEO titles, descriptions, and excerpts using AI. WP Sheet Editor can also integrate with popular SEO plugins like Yoast SEO, SEOPress, or Rank Math.
8. Is it possible to update or edit AI-generated content later?
Definitely. All generated posts remain fully editable in WordPress. You can refine text, add new images, or update recipes at any time using AI.
9. Is this approach suitable for any type of food blog?
Yes! Whether you focus on desserts, vegan dishes, international cuisine, or healthy recipes, AI can generate content and images tailored to your niche.