
To bulk edit WooCommerce product variations across multiple products at once, view your variations as spreadsheet rows using WP Sheet Editor. This allows you to manage variation data in a single view instead of opening individual product pages. This includes stock status, SKUs, images, custom attributes, and prices.
WooCommerce does not natively support bulk editing child variations across different variable products. The reason is that WordPress bulk actions only apply to parent products, forcing store managers to open each variable product, expand individual variation accordions, and save updates one by one.
With WP Sheet Editor – WooCommerce Products, you can filter and edit every child variation in your catalog simultaneously. Whether you need to replace variation images by attribute, update inventory quantities, assign new SKUs, or run batch price adjustments, all variation fields are editable in the sheet, through batch rules, or via CSV import.
You can download the plugin here:
Download WooCommerce Products Spreadsheet Plugin - or - Check the features
Table of Contents
Why Native WooCommerce Makes Variation Editing Difficult
By default, WooCommerce doesn’t allow you to bulk edit variations from the main product screen because of how it stores product data in WordPress. In WooCommerce, a variable product is a parent container with the post type product, while each individual variation is stored as a separate child post with the post type product_variation.
Since standard WordPress bulk actions only interact with top-level parent posts, they completely bypass the child records where your variation prices, stock numbers, and weights are stored.
The Core Limitation of Default Bulk Actions
When you go to Products > All Products, select multiple variable products, and open Bulk Actions > Edit, WooCommerce loads the native quick-edit panel.
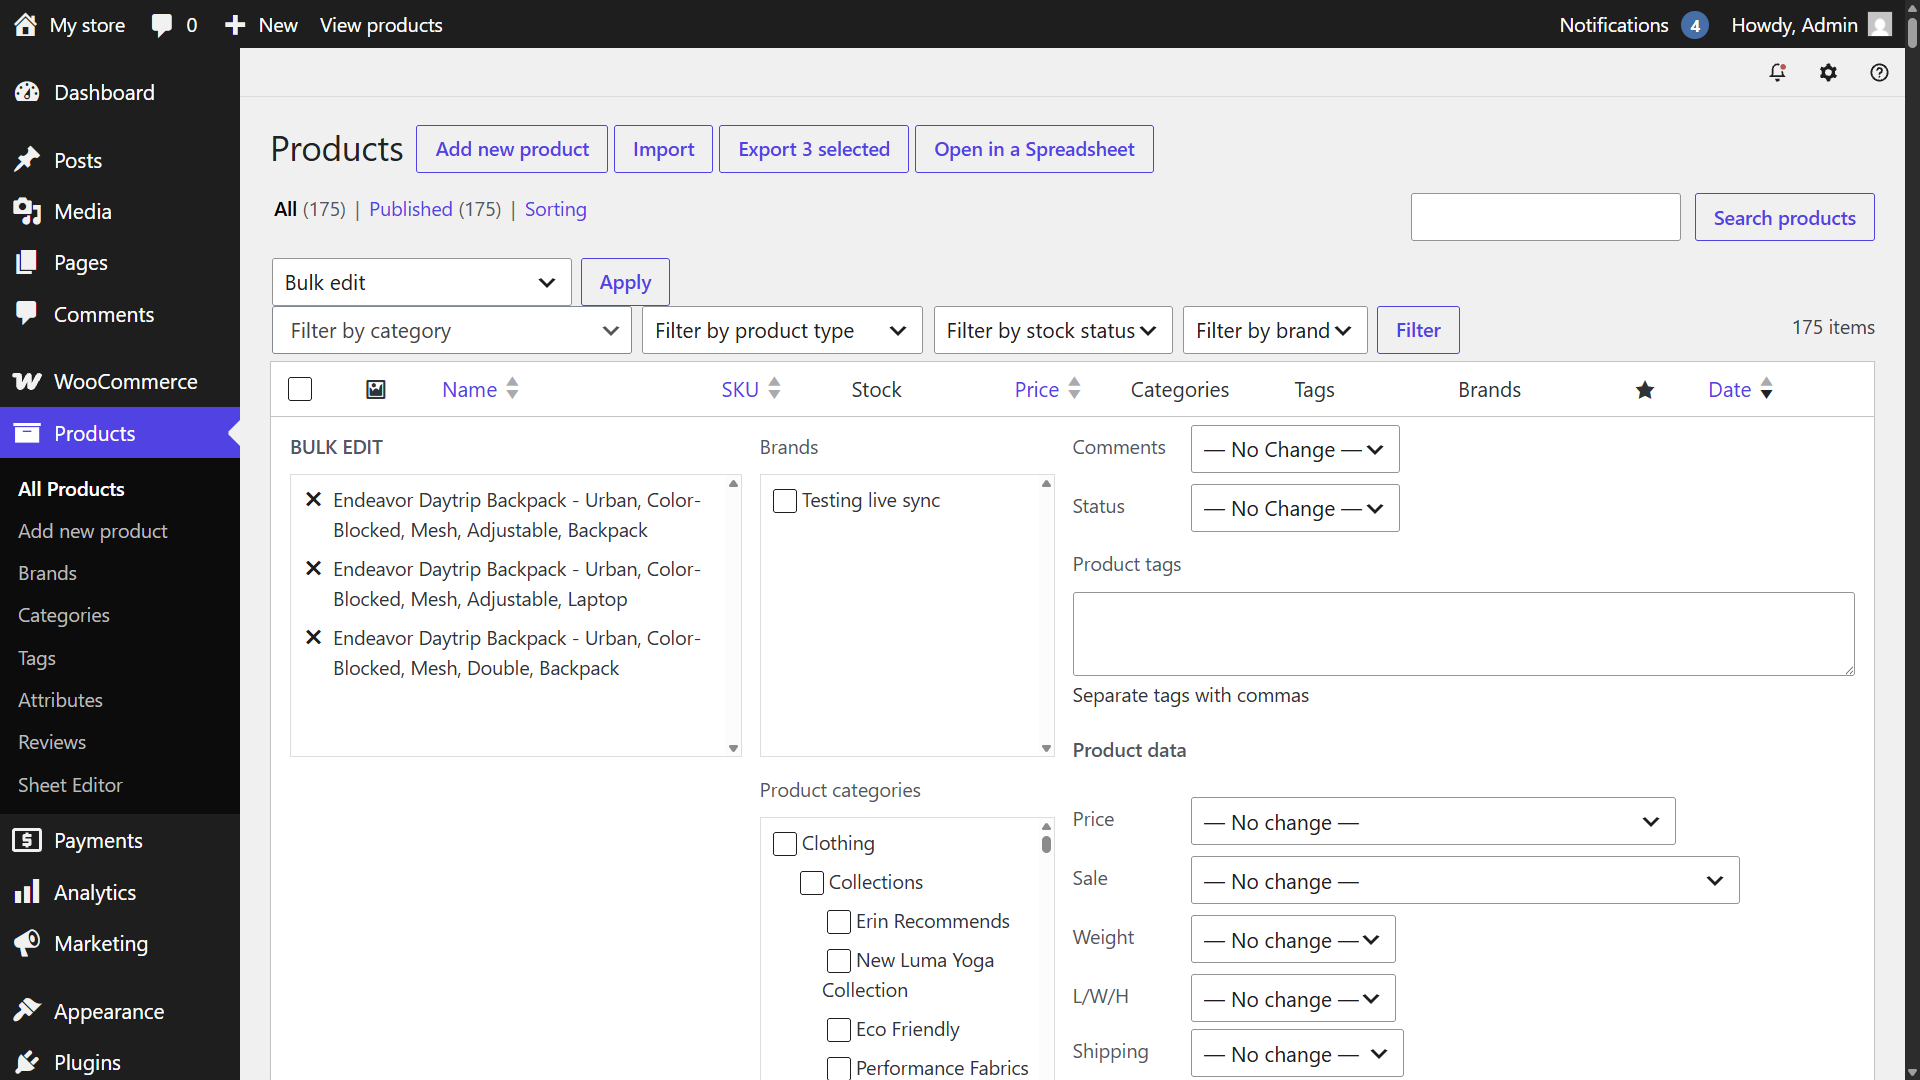
While this panel works for simple products, it fails when managing variations across multiple items:
- Price fields do not update variations: Entering a new price in the bulk edit menu modifies the parent container’s meta field, but leaves every child variation’s
_regular_priceand_sale_priceuntouched. - No attribute-level stock control: You cannot bulk change variation stock or toggle “Manage stock” for specific sizes or colors across multiple products at the same time.
- Single-product bottleneck: Core WooCommerce only offers batch editing inside individual product pages under the Variations tab. If you need to update 50 variable products, you have to open and edit each product page one by one.
Setting Up the WooCommerce Variations Spreadsheet
To bulk edit your variations, you first need to open the spreadsheet and set up the layout to show variation data clearly. Configuring your display modes and columns ensures you only view the data you need to edit.
Opening the Products Spreadsheet
You can access the spreadsheet interface directly from your WordPress dashboard in two steps:
- Log in to your WordPress admin panel.
- Navigate to WP Sheet Editor > Edit Products.
When the spreadsheet loads, it pulls all published, draft, and private products from the database, displaying both simple products and variable products in an editable grid.
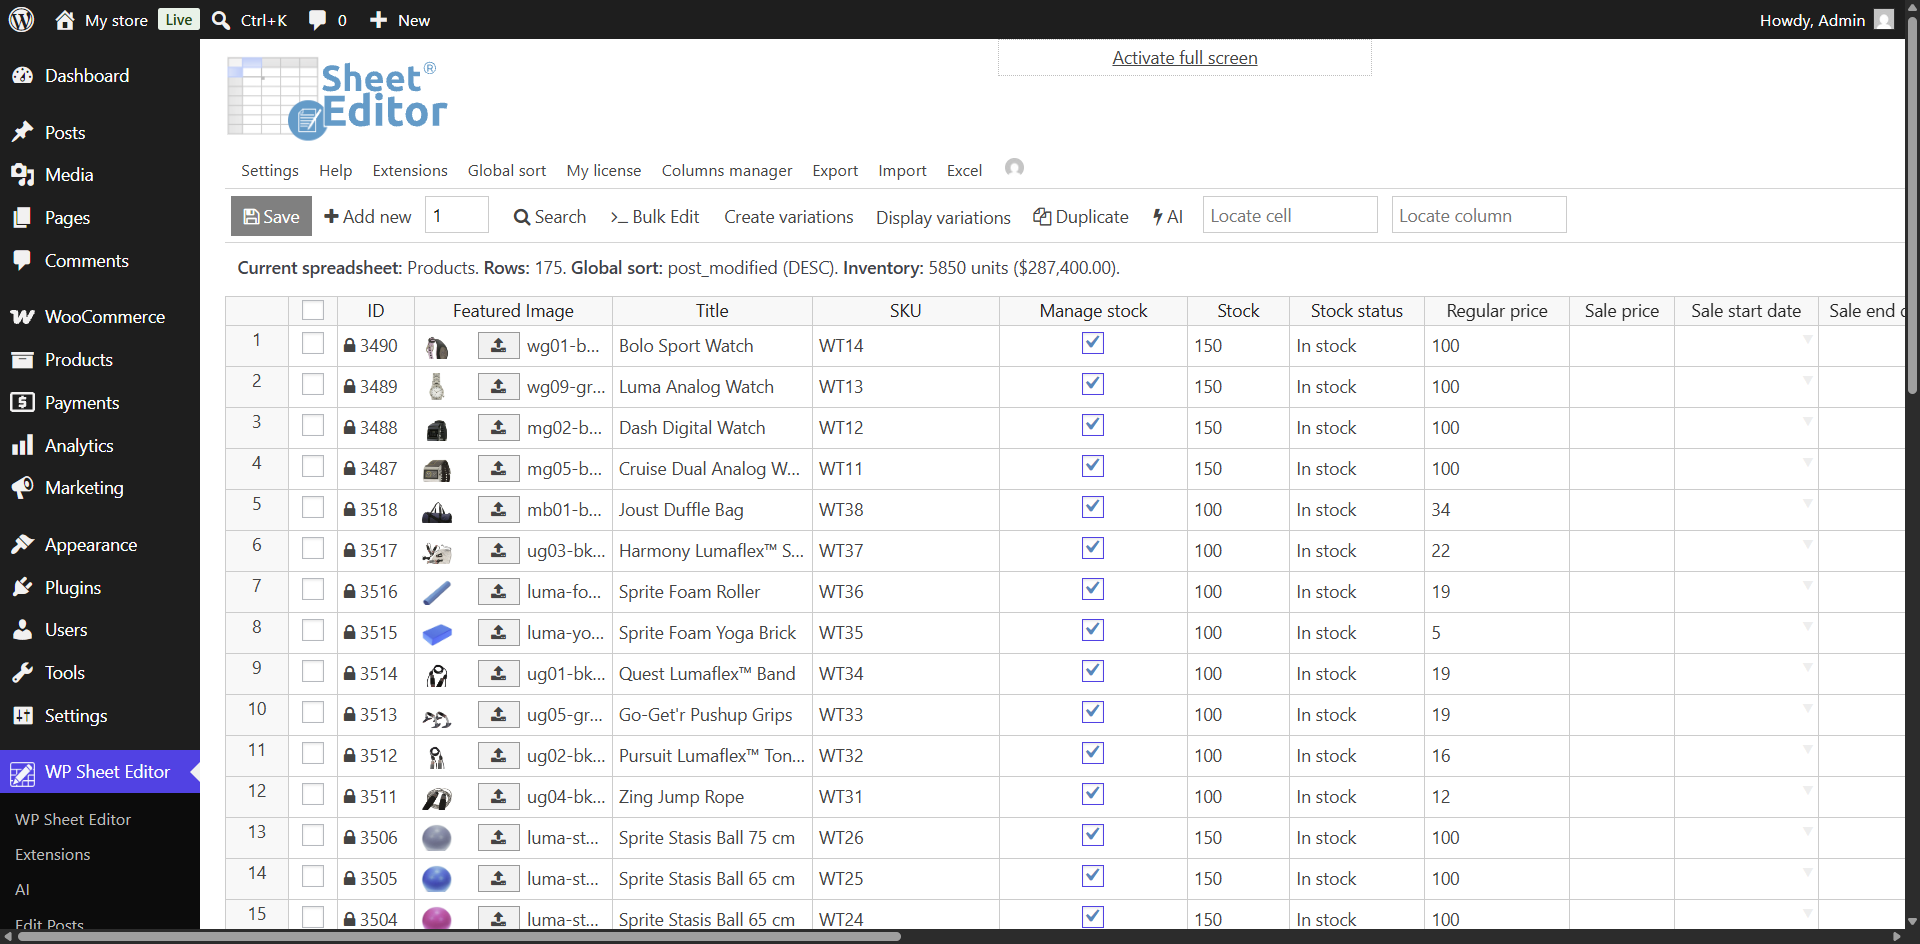
Viewing Variations in the Spreadsheet
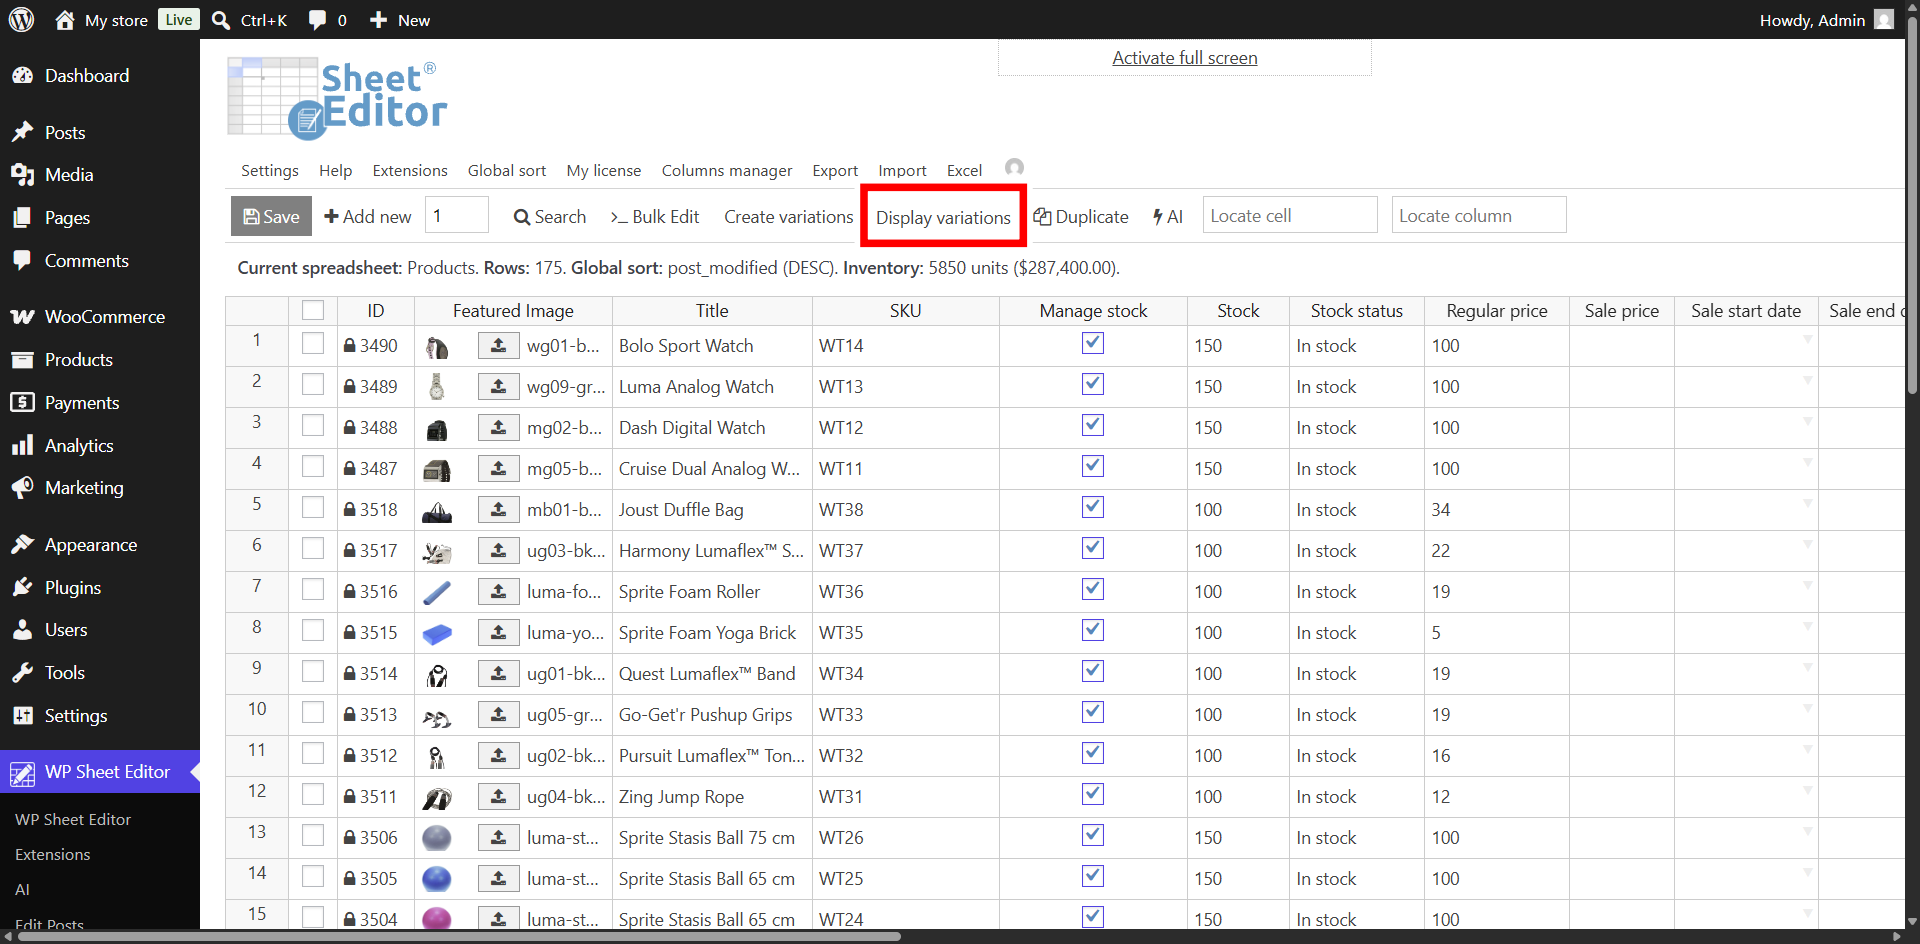
WP Sheet Editor lets you display child variations next to their parent products in the spreadsheet.
Click the Display variations toggle to show or hide child items as needed.
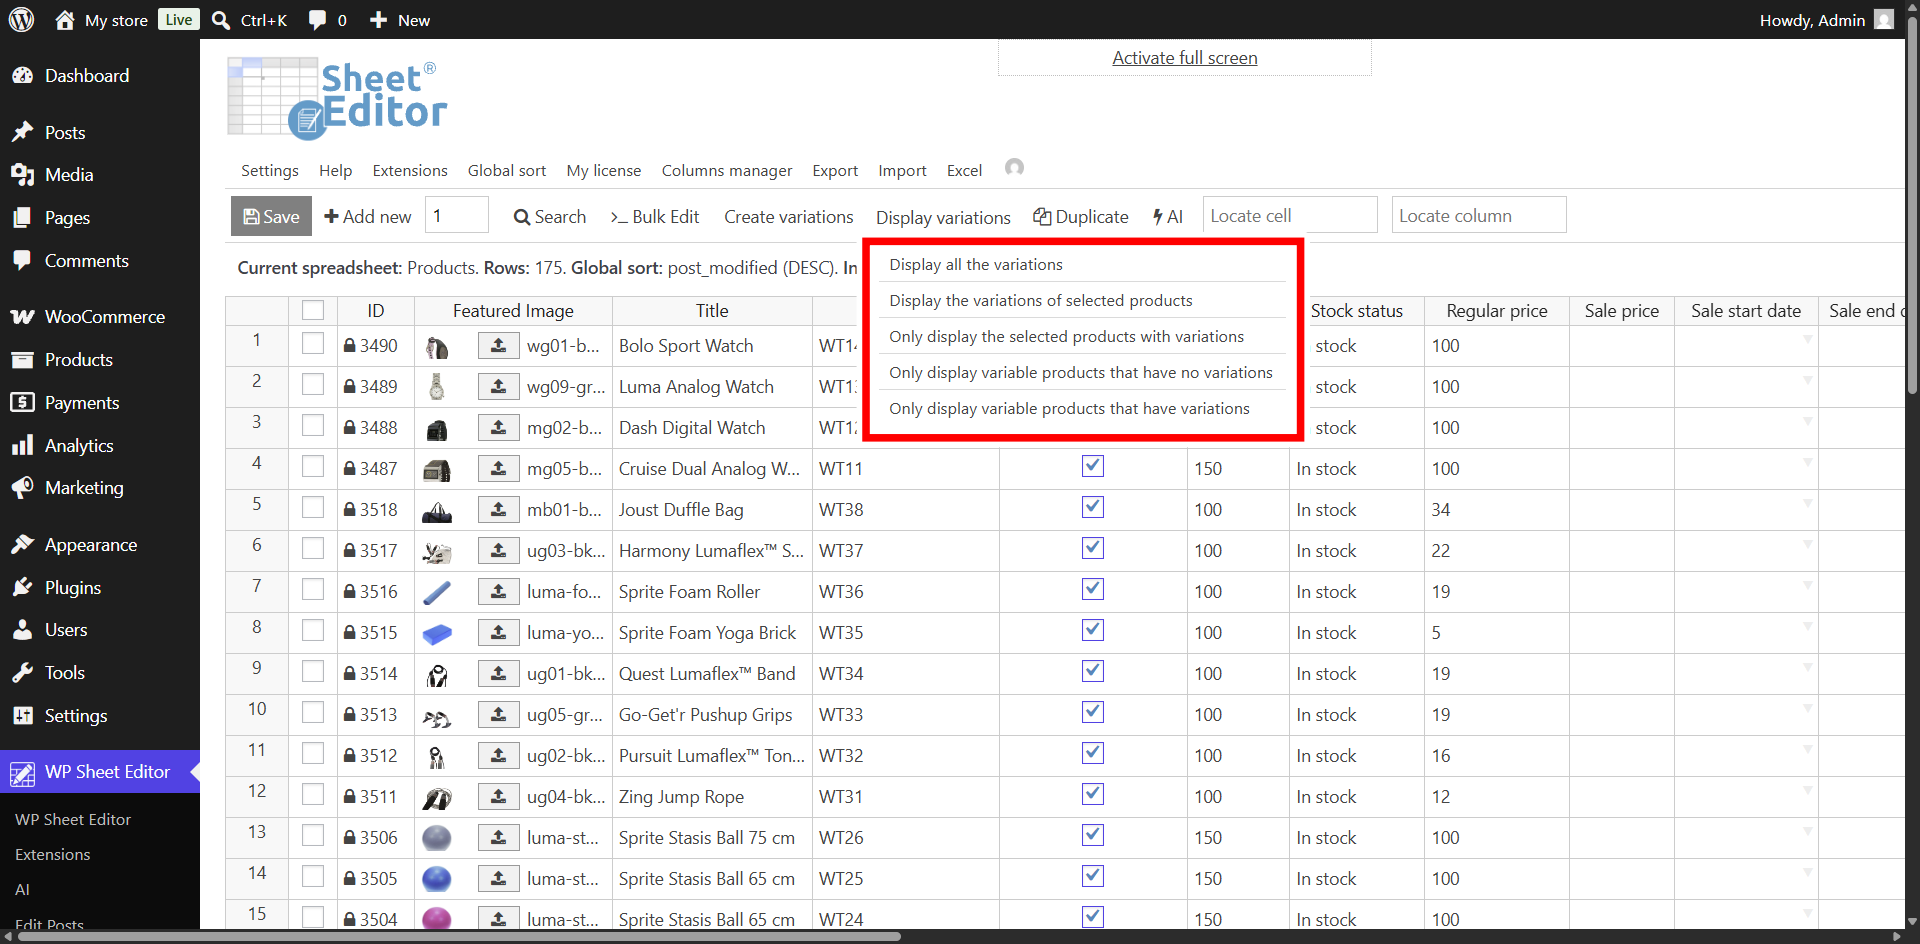
With the Display variations tool, you can view:
- All the variations
- Variations of selected products only
- Selected products with variations
- Variable products that have no variations
- Variable products that have variations
Customizing Visible Columns for Variations
By default, WooCommerce products contain dozens of metadata fields, but you can only edit these fields for variations:
- Image
- Variation enabled
- Downloadable
- Downloadable files: Name & File
- Download limit
- Download expiry
- Virtual
- Manage stock
- Stock quantity
- Allow backorders
- Low stock threshold
- SKU
- GTIN, UPC, FAN, or ISBN
- Regular price
- Sale price
- Sale price dates
- Weight
- Length
- Width
- Height
- Shipping class
- Variation description
- Attributes: Color, Size, or any other attribute you create in WooCommerce
You can use the Columns Manager to hide unneeded columns and keep your workspace focused on variation data.
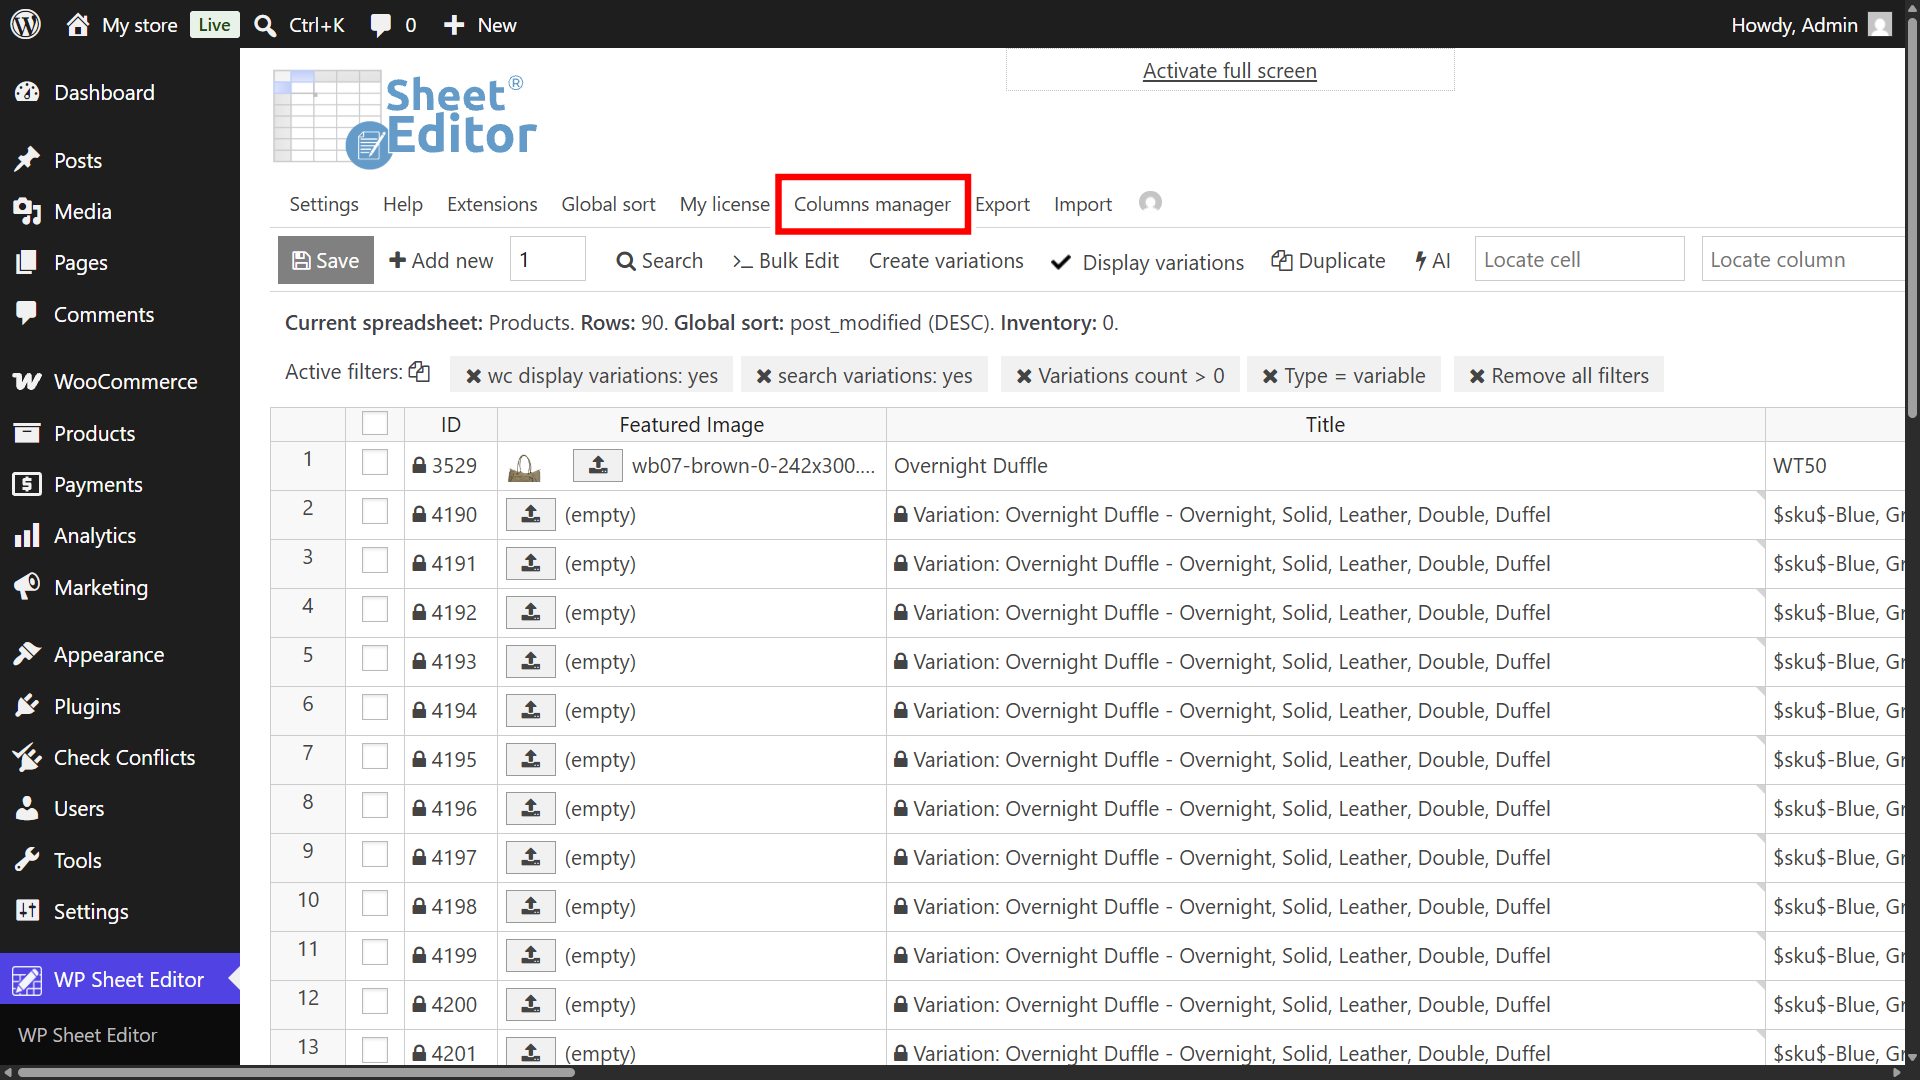
To configure your columns:
- In the Enabled column, keep the primary fields you need to edit.
- Move unused fields (like post password, ping status, menu order or other fields only available for parent products) to the Disabled column.
- Click Save Settings to reload the spreadsheet with your customized layout. Note. You can save this column setup for future sessions so you don’t have to set up the columns every time you want to work with variations.
Bulk Search for WooCommerce Variations
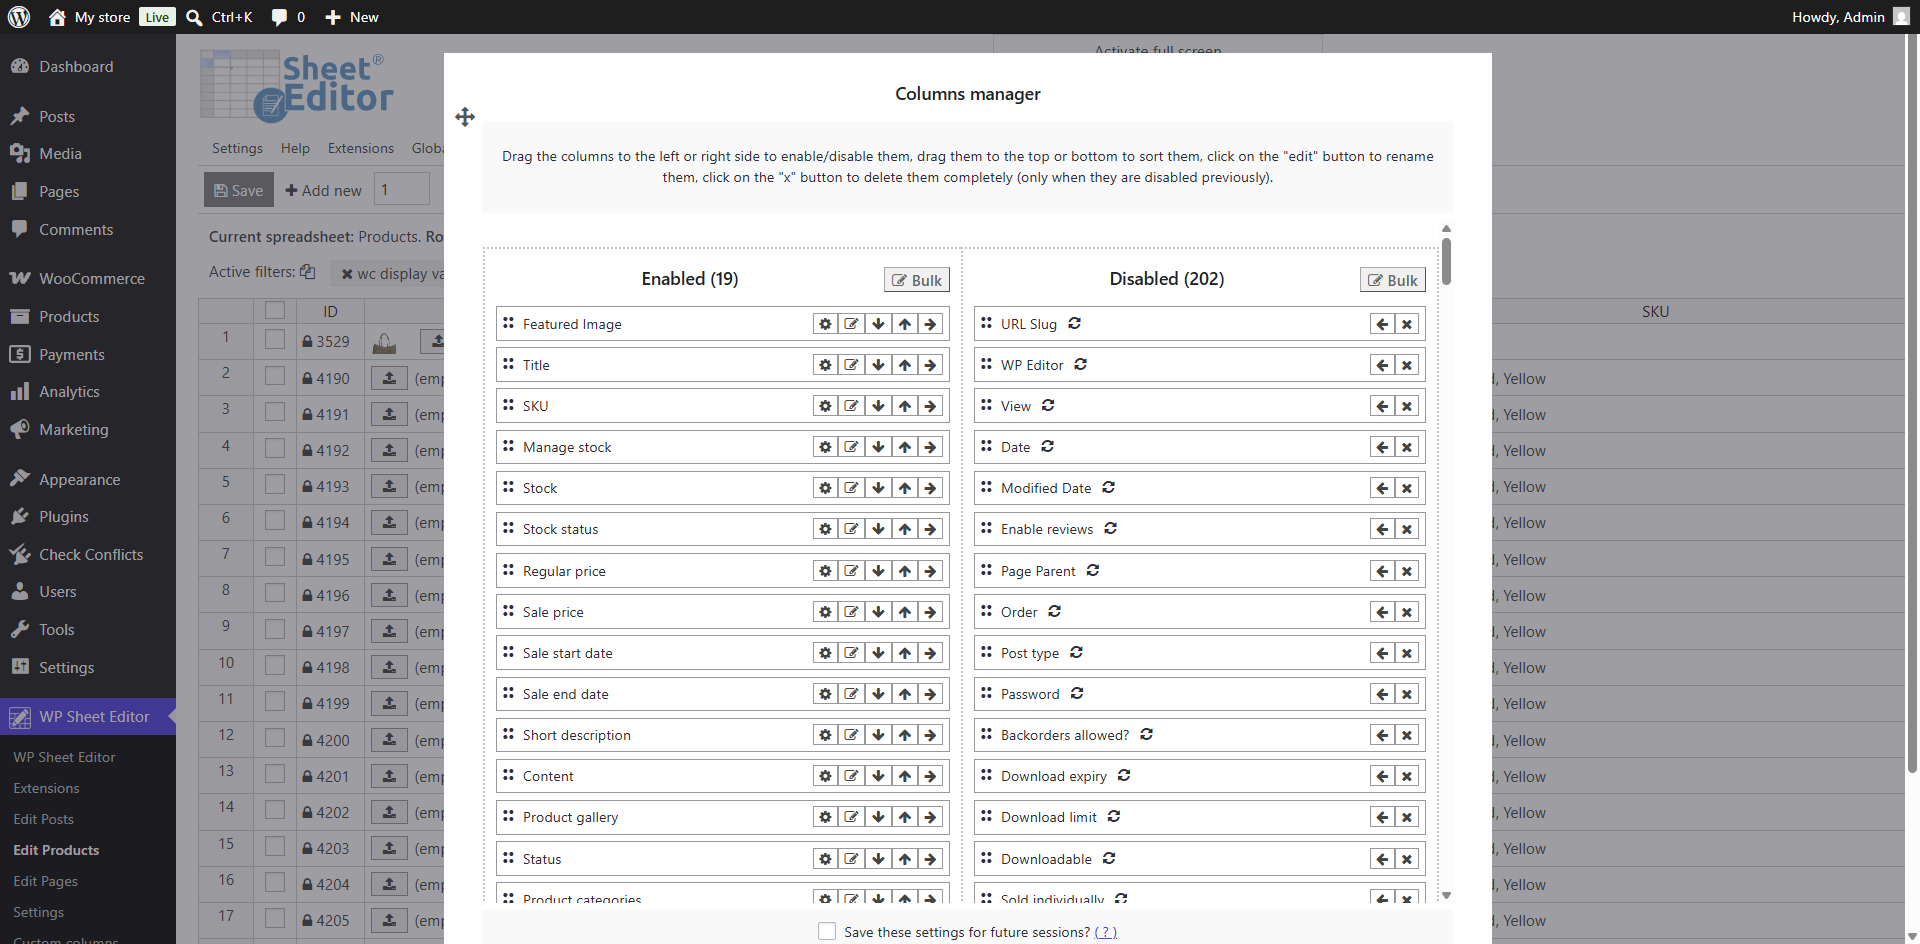
Before making changes, you need to isolate the exact variations you want to modify. The Search tool in WP Sheet Editor allows you to filter both parent product taxonomies and variation-level metadata so you only update the intended items.
Filter Variations by Parent Data
Since variations inherit taxonomy assignments from their parent containers, you can target child variations based on parent data like product categories and product tags:
- Click the Search button.
- Enter your target category in the Enter Category field (for example, Dresses).
- Ensure the Search on variations checkbox is enabled.
- Click Run search to display only the child variations that belong to products within that category.

Filter Variations by Attribute
To filter WooCommerce variations by attribute, you can use the advanced search filters to match specific color, size, or material combinations across your catalog.
WooCommerce handles variation attributes in two distinct ways:
- Global Taxonomy Attributes: Attributes registered under
Products > Attributes. In the database and Search tool, these appear with the prefixattribute_pa_(such asattribute_pa_colororattribute_pa_size). - Custom Local Attributes: Attributes created directly inside a single product’s data panel. These appear with the prefix
attribute_followed by the custom name (such asattribute_color).
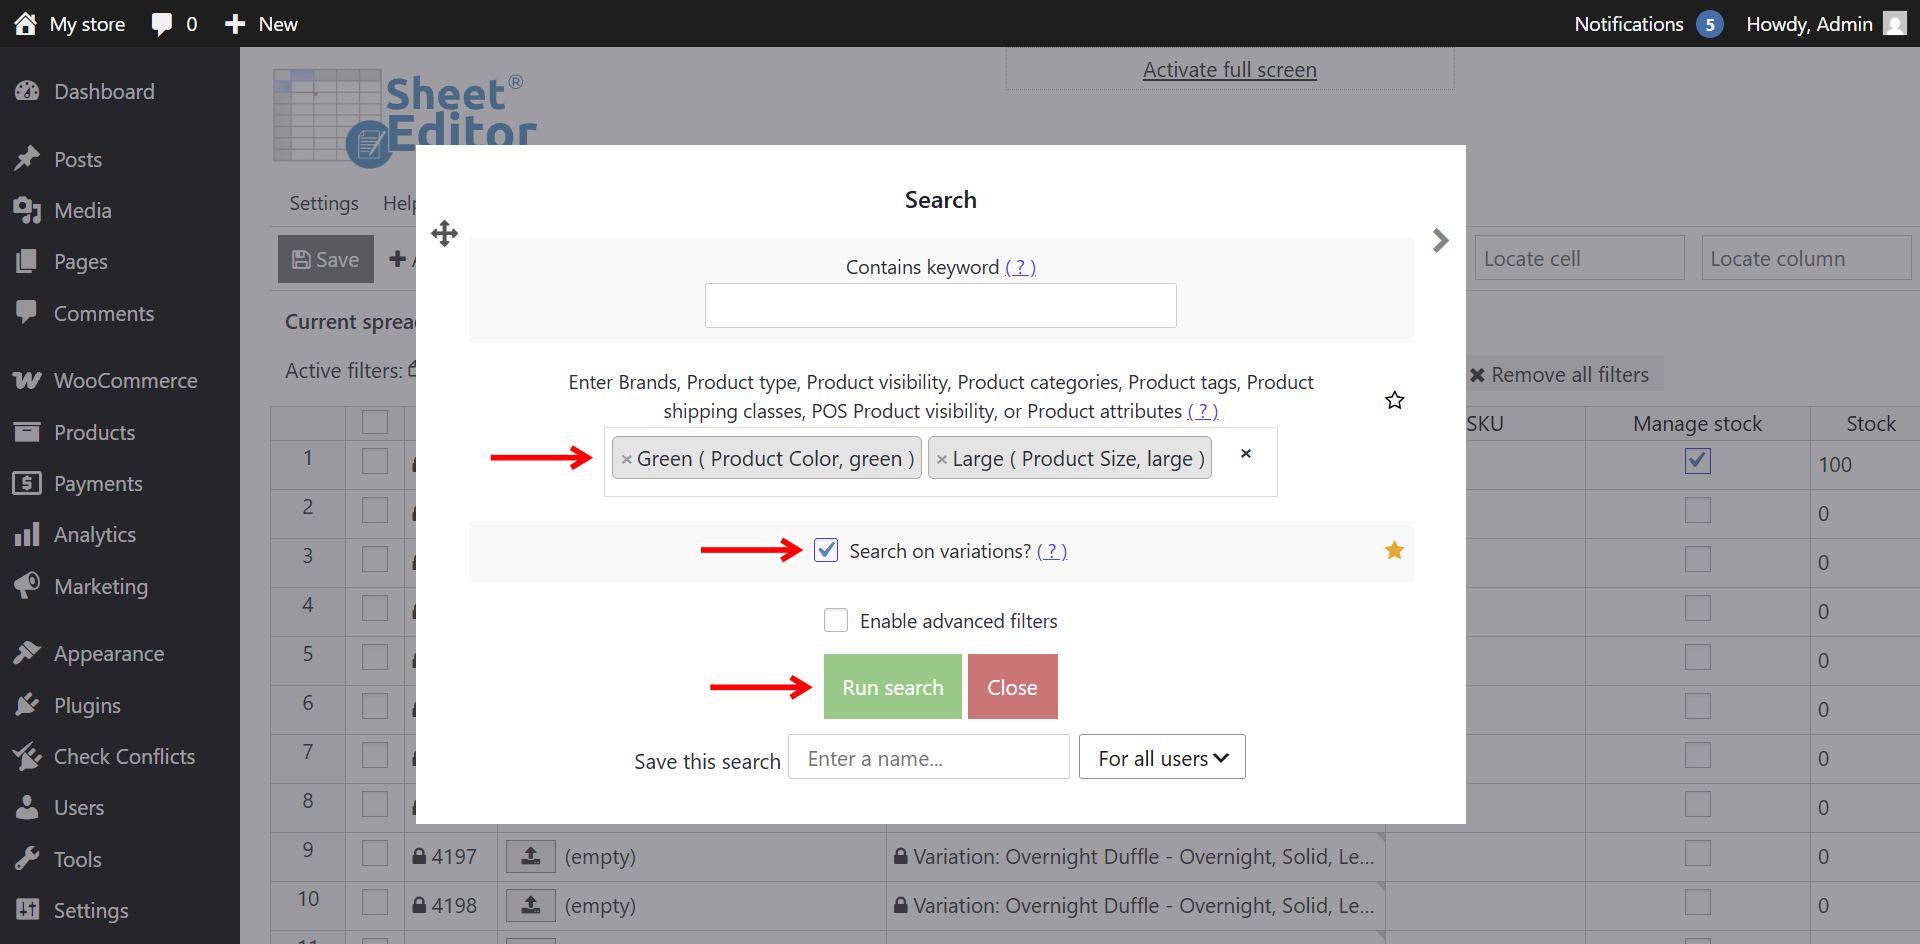
To search for specific attribute combinations (for example, all variations that are both Navy and XL):
- Open the Search tool and check the Enable advanced filters box.
- Enter the attributes in the Enter Brands… field, which works for categories, tags, brands, attributes, shipping classes, etc.
- Tick the Search on variations checkbox.
- Click on Run search to display only the variations that contain the selected attributes.
Method 1: Using the Spreadsheet View
Since the spreadsheet shows variation fields as cells, you can change values to bulk update variation images, stock, prices, SKU, descriptions, dimensions, sale prices, and more.
Use this method when you want to edit a handful of variations at once without opening each product page one by one.
Once you finish editing, click Save to apply the changes.

Method 2: Using the “Bulk Edit” Tool
The Bulk Edit tool allows you to update fields across hundreds of WooCommerce variations simultaneously.
You need to follow two main steps to bulk update variations:
- Select or filter the variations you want to change.
- Apply a bulk edit to the selected variations.
Step 1. Select the variations to update
You have three options to select the variations you will update:
- Edit all your product variations at once: You do not need to filter or select anything. Just go straight to Step 2.
- Update only specific variations (manual selection): Select specific rows by checking the boxes on the left side of the spreadsheet.
- Edit variations by keyword, attribute, stock status, SKU, price, etc.: Use the Search tool, which lets you use any field as a search filter. Note: If you choose this option, make sure to always enable the Search on variations checkbox so the tool searches inside variable products and finds variations only.
Step 2. Bulk edit all the selected variations at once
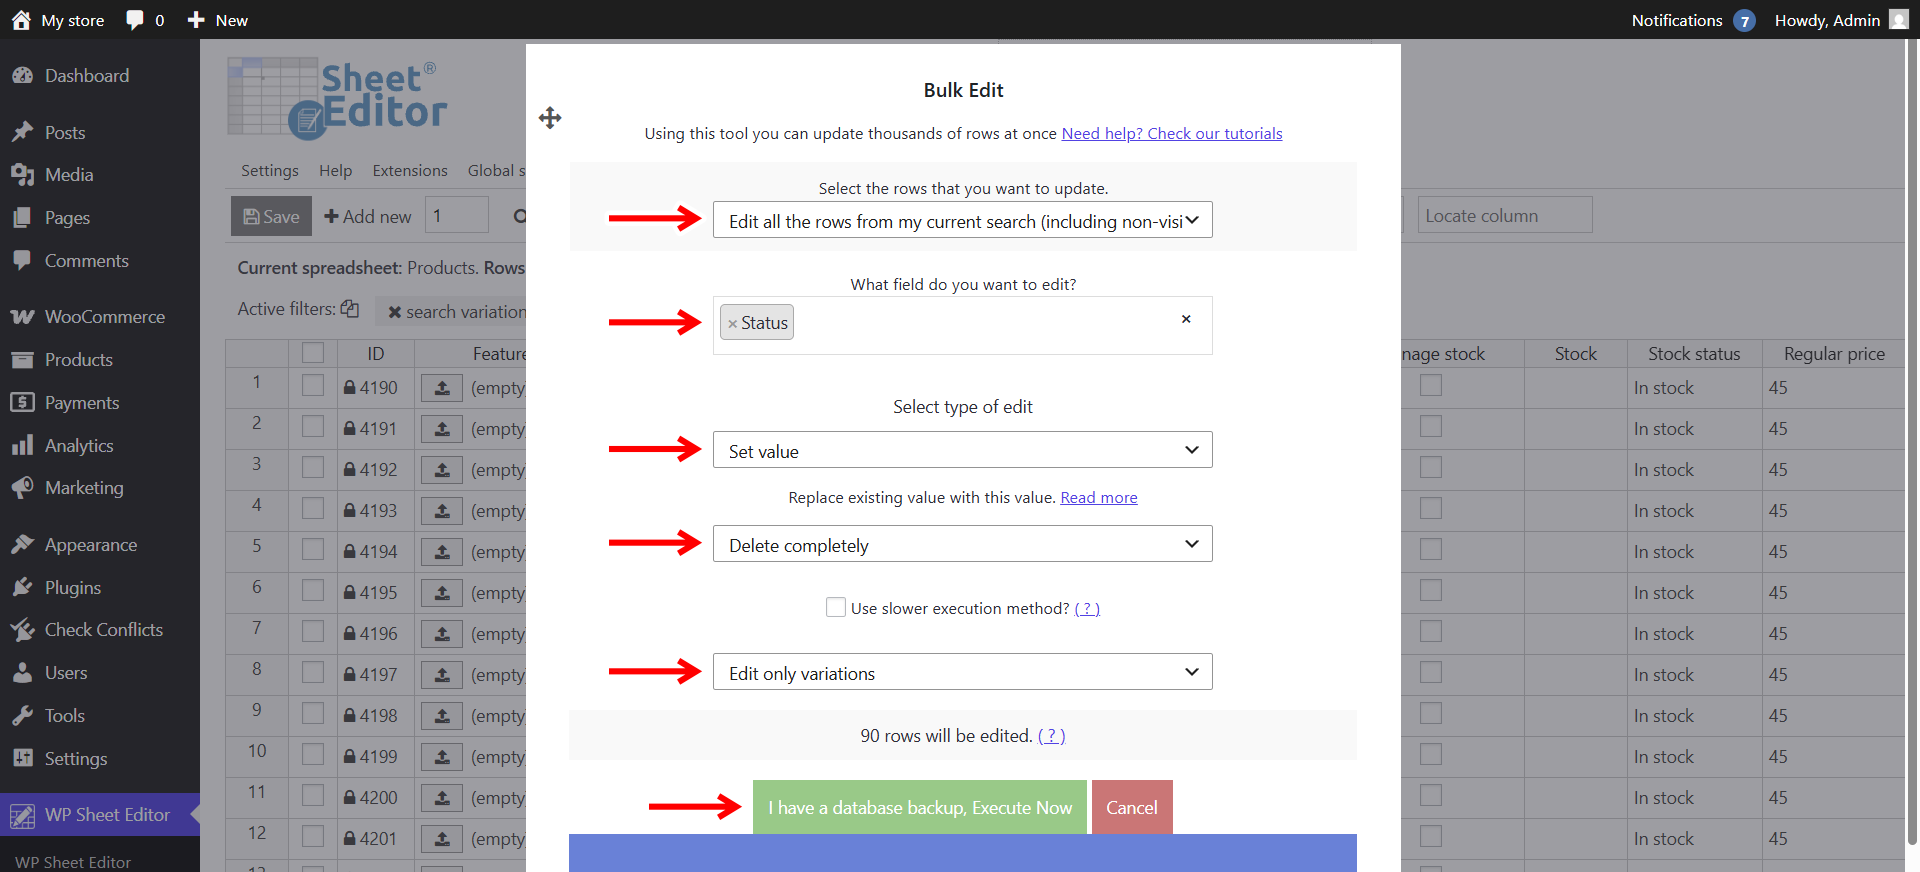
After filtering the variations you want to edit, click Bulk Edit on the toolbar.
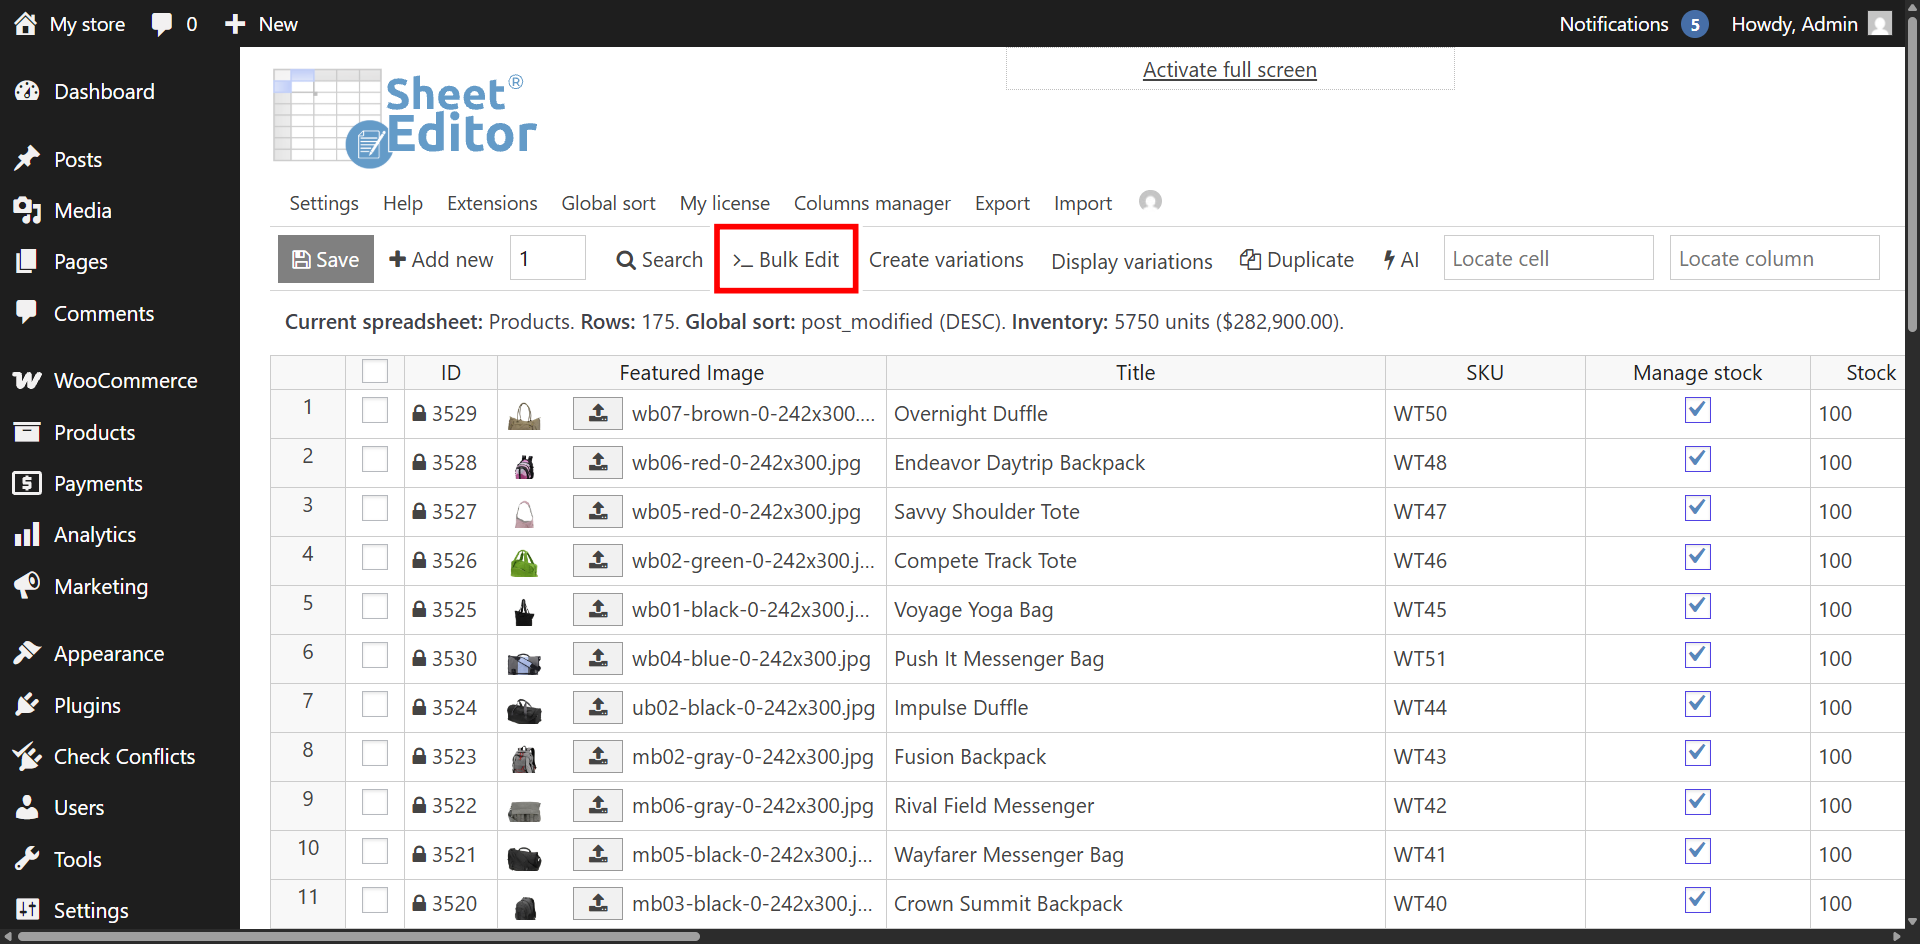
Configure the Bulk Edit tool using the following core fields:
- Select the rows that you want to edit: Choose between:
- Edit all the rows from my current search: Applies changes to every variation returned by your search filters.
- Edit all the rows that I selected manually in the spreadsheet: Applies changes only to rows with checked boxes in the sheet.
- What field do you want to edit: Select the WooCommerce variation field you need to update (such as Regular Price, Stock, SKU, or Status).
- Select type of edit: Choose how the data should be processed:
- Set value: Replaces existing values with a fixed new value.
- Clear values: Deletes all data from the selected field across target rows.
- Replace: Searches for specific text/numbers and replaces them with a new value.
- Copy from other columns: Copies values from an existing column into the target column.
- Set random value: Assigns values randomly from a list you provide.
- Increase by percentage / Decrease by percentage: Adjusts numeric and pricing fields up or down.
- Custom formula: Runs math or string expressions. See the formula documentation for syntax.
- PHP function: Runs a custom PHP function on each cell. The function accepts two parameters:
$current_data(current cell string) and$row_id(variation ID), and must return the modified string. See PHP function usage for examples.
- Edit only variations: Always select this option when updating variation data so modifications do not alter the parent product rows.
- Click Execute Now to apply the changes.
Here are some examples of how to bulk edit WooCommerce product variations:
Bulk updating variation regular price
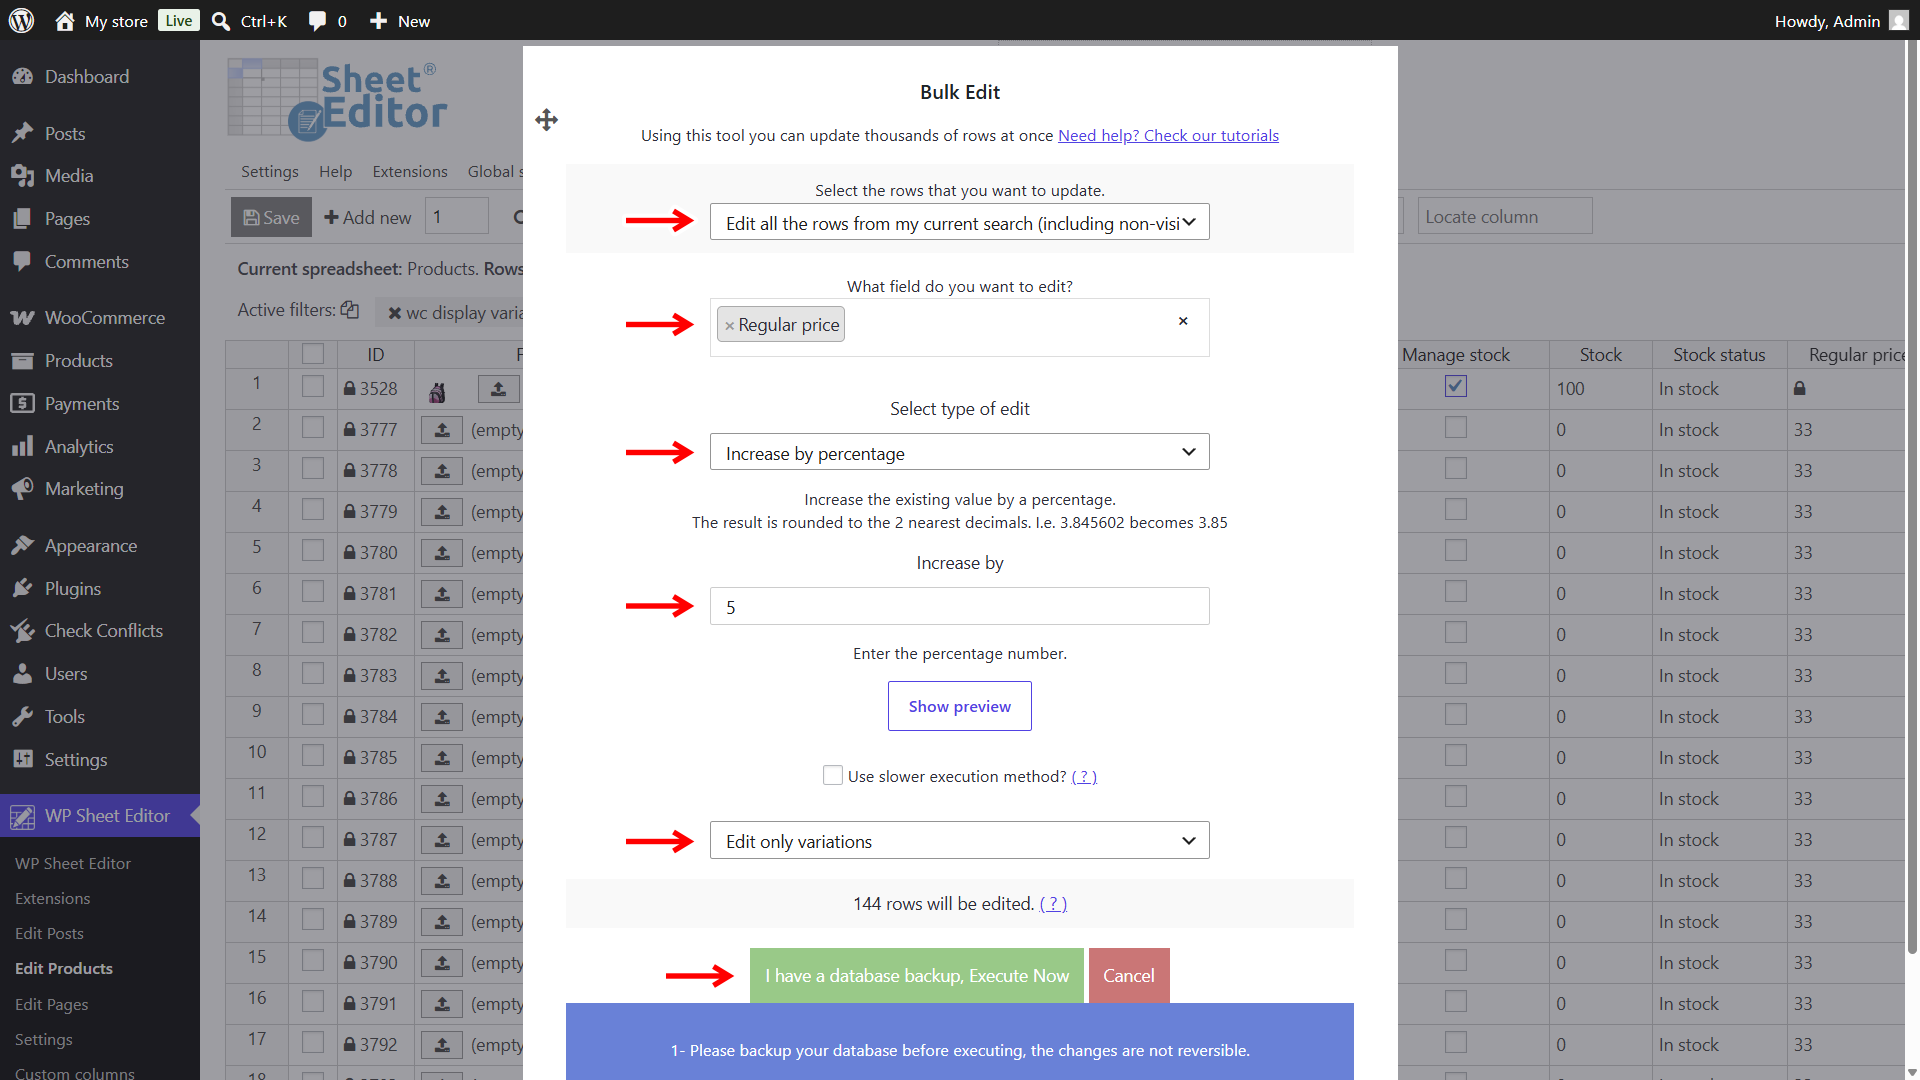
There are several ways to bulk update the regular prices of your variations. For example, if you want to increase the price of your variations by a certain percentage:
Regular price + Increase by percentage + Enter the percentage value + Edit only variations + Execute Now
Scheduling variation sale prices
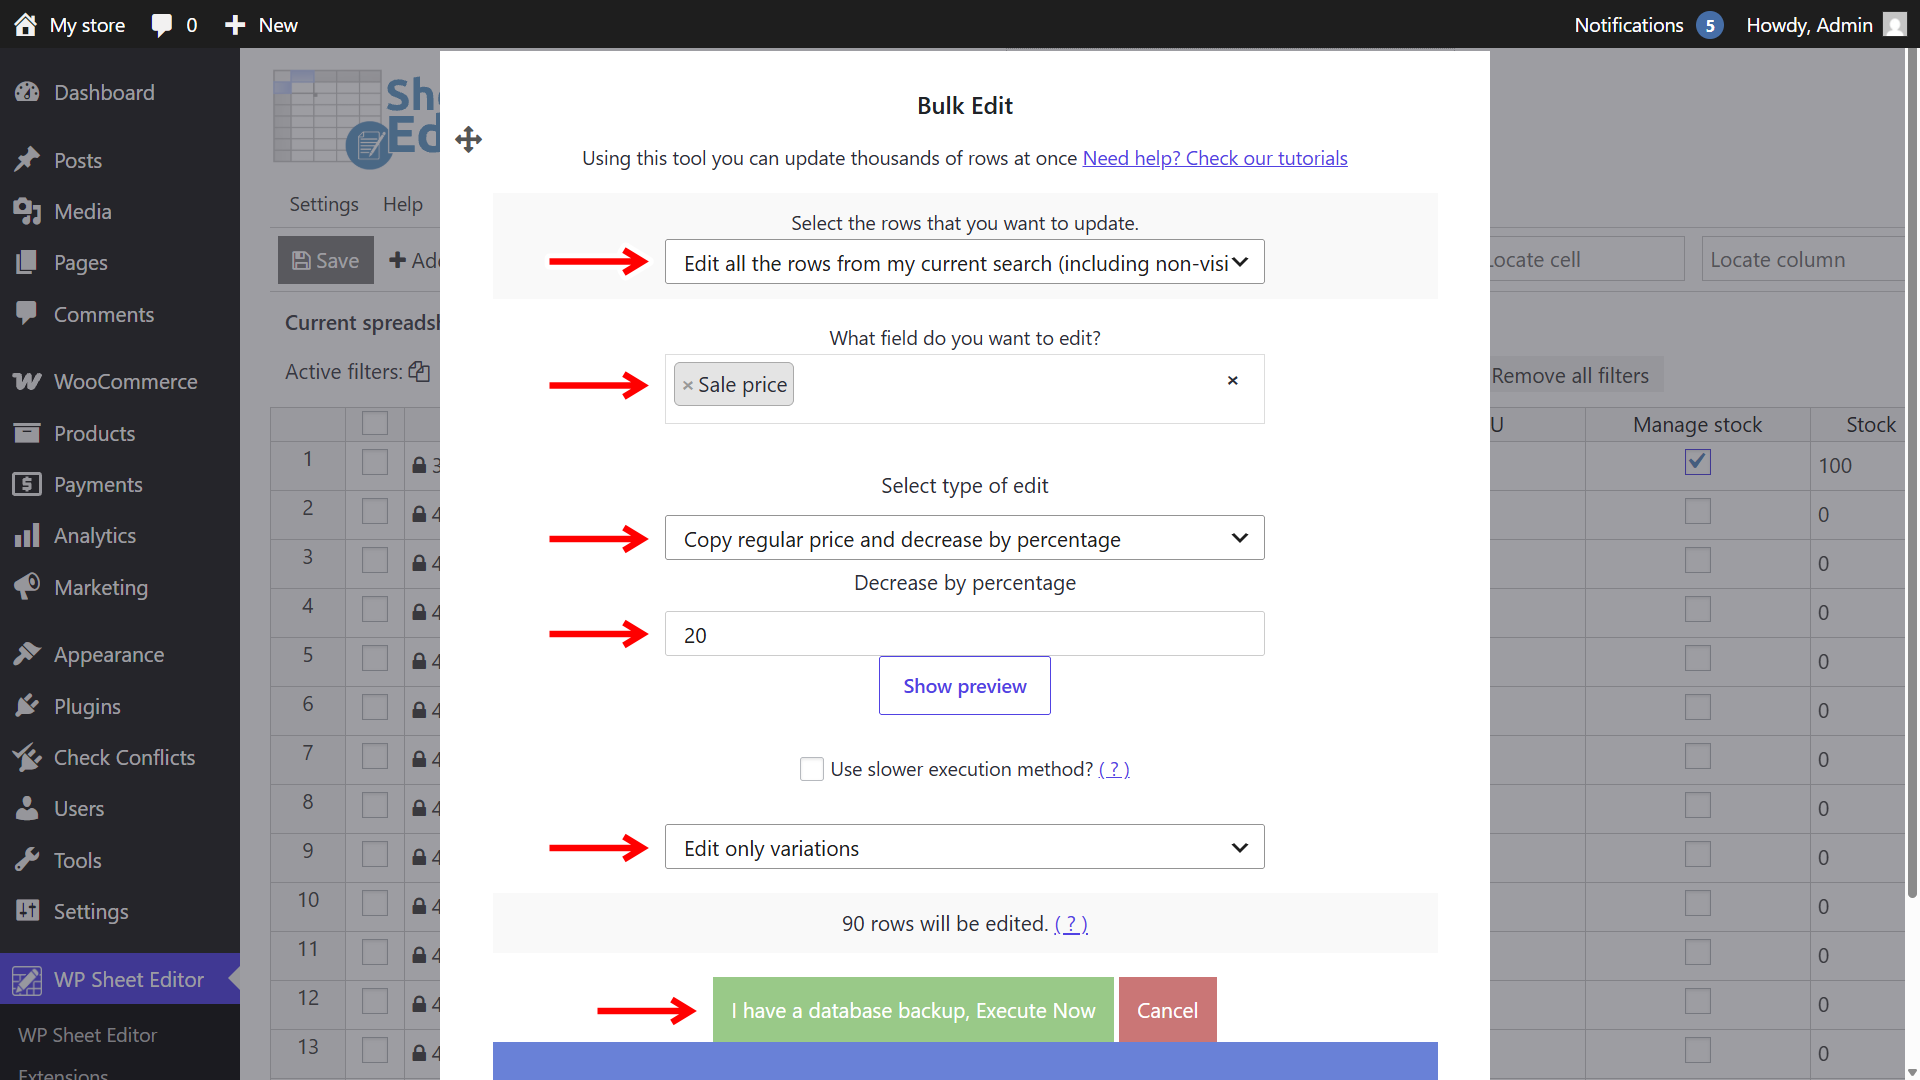
If you need to add sale prices and edit the dates to schedule promotions and special offers, you can do so with just a few clicks. For example, you can set a new sale price in bulk based on the regular price:
Sale price + Copy regular price and decrease by percentage + Enter the percentage value + Edit only variations + Execute Now
Enabling variation stock management
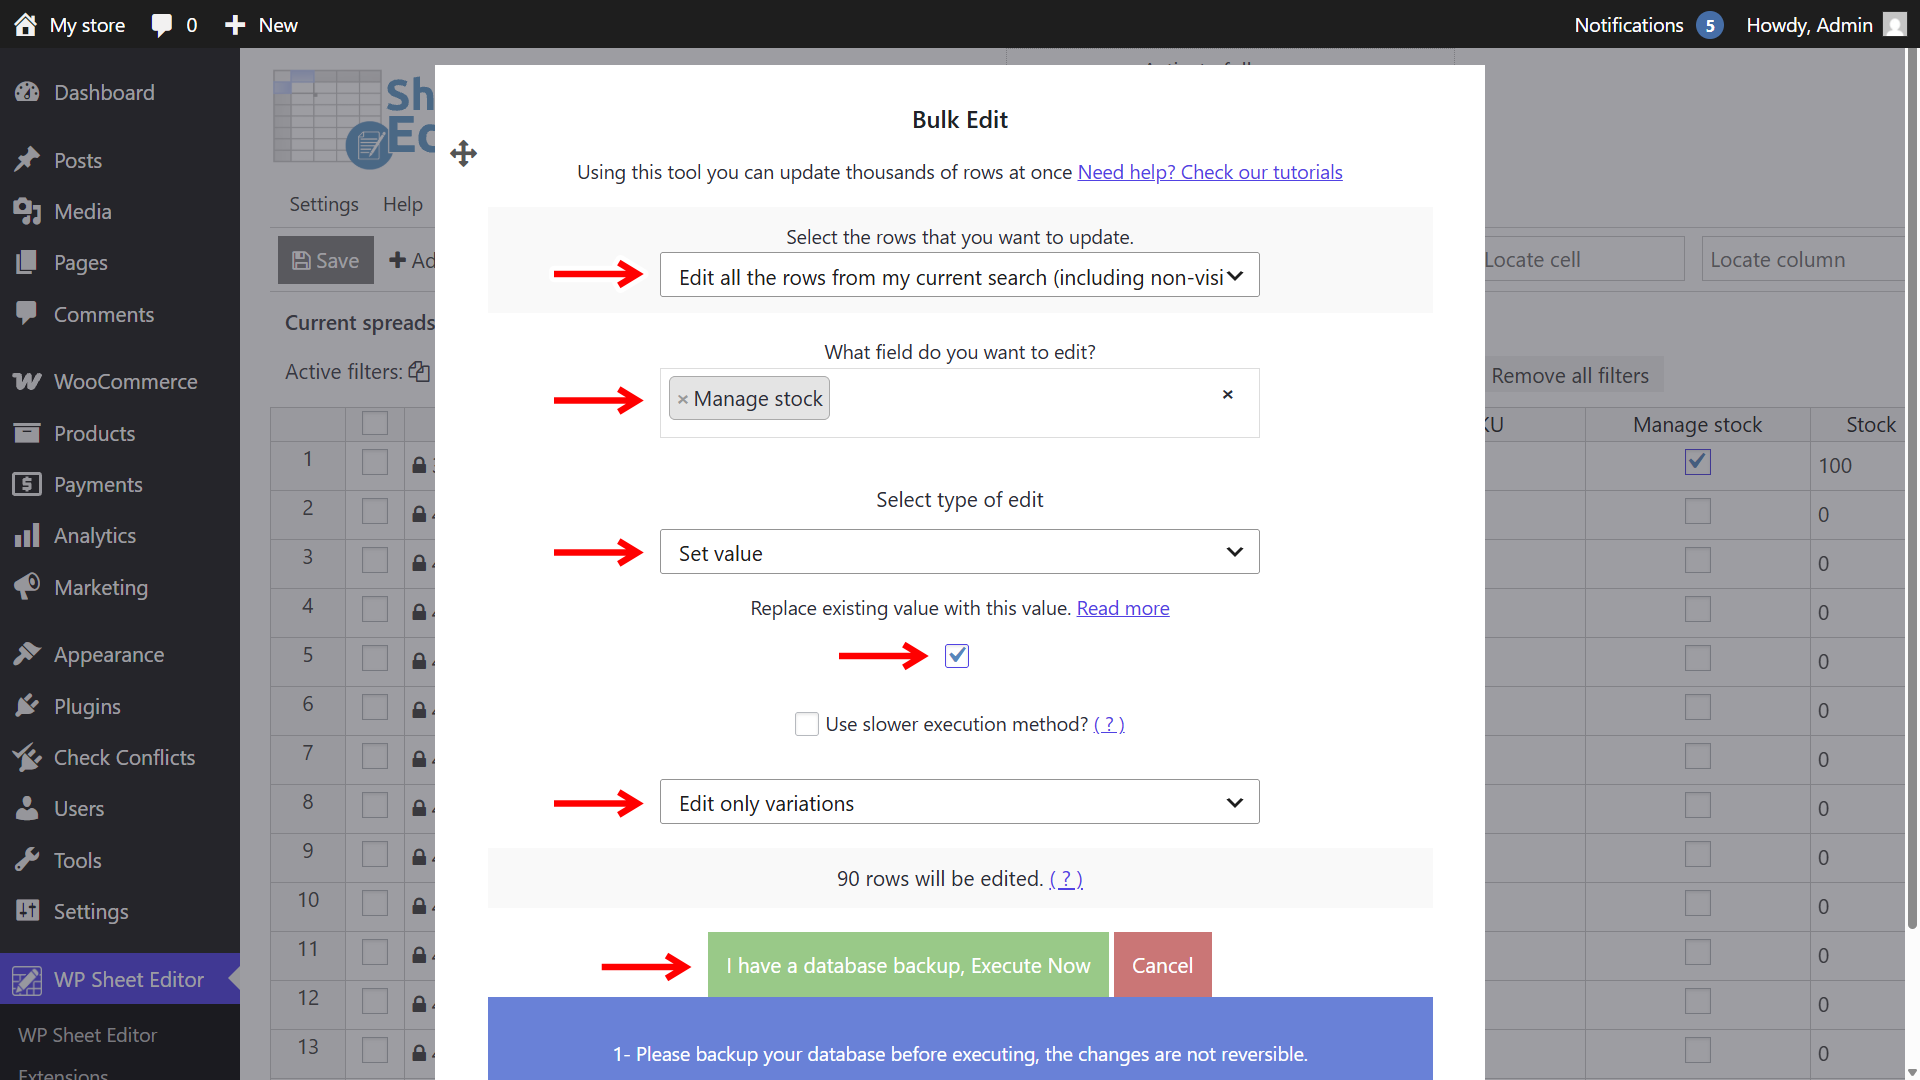
To enable inventory management for your variations, you don’t have to edit them one by one; instead, you can do it in one go.
Manage stock + Set value + Tick the value checkbox + Edit only variations + Execute Now
Disabling or enabling variations in bulk
Sometimes you don’t want to delete the variations; you just want to hide them so they don’t appear on the product page. WP Sheet Editor allows you to bulk enable or disable variations, as well as filtering by stock status to disable out-of-stock variations.
Status + Set value + Disable the checkbox (or enable it if you want to do the opossite) + Edit only variations + Execute Now

Uploading variation images
To bulk upload variation images, you can read this detailed guide. If you want to set the same image for your selected or filtered variations:
Featured Image + Set value + Upload the image or paste the image URL + Edit only variations + Execute Now

Bulk updating stock quantity
Want to change variation stock in bulk? You can select these values:
Stock + Set value + Enter new stock quantity + Edit only variations + Execute Now

Changing stock status
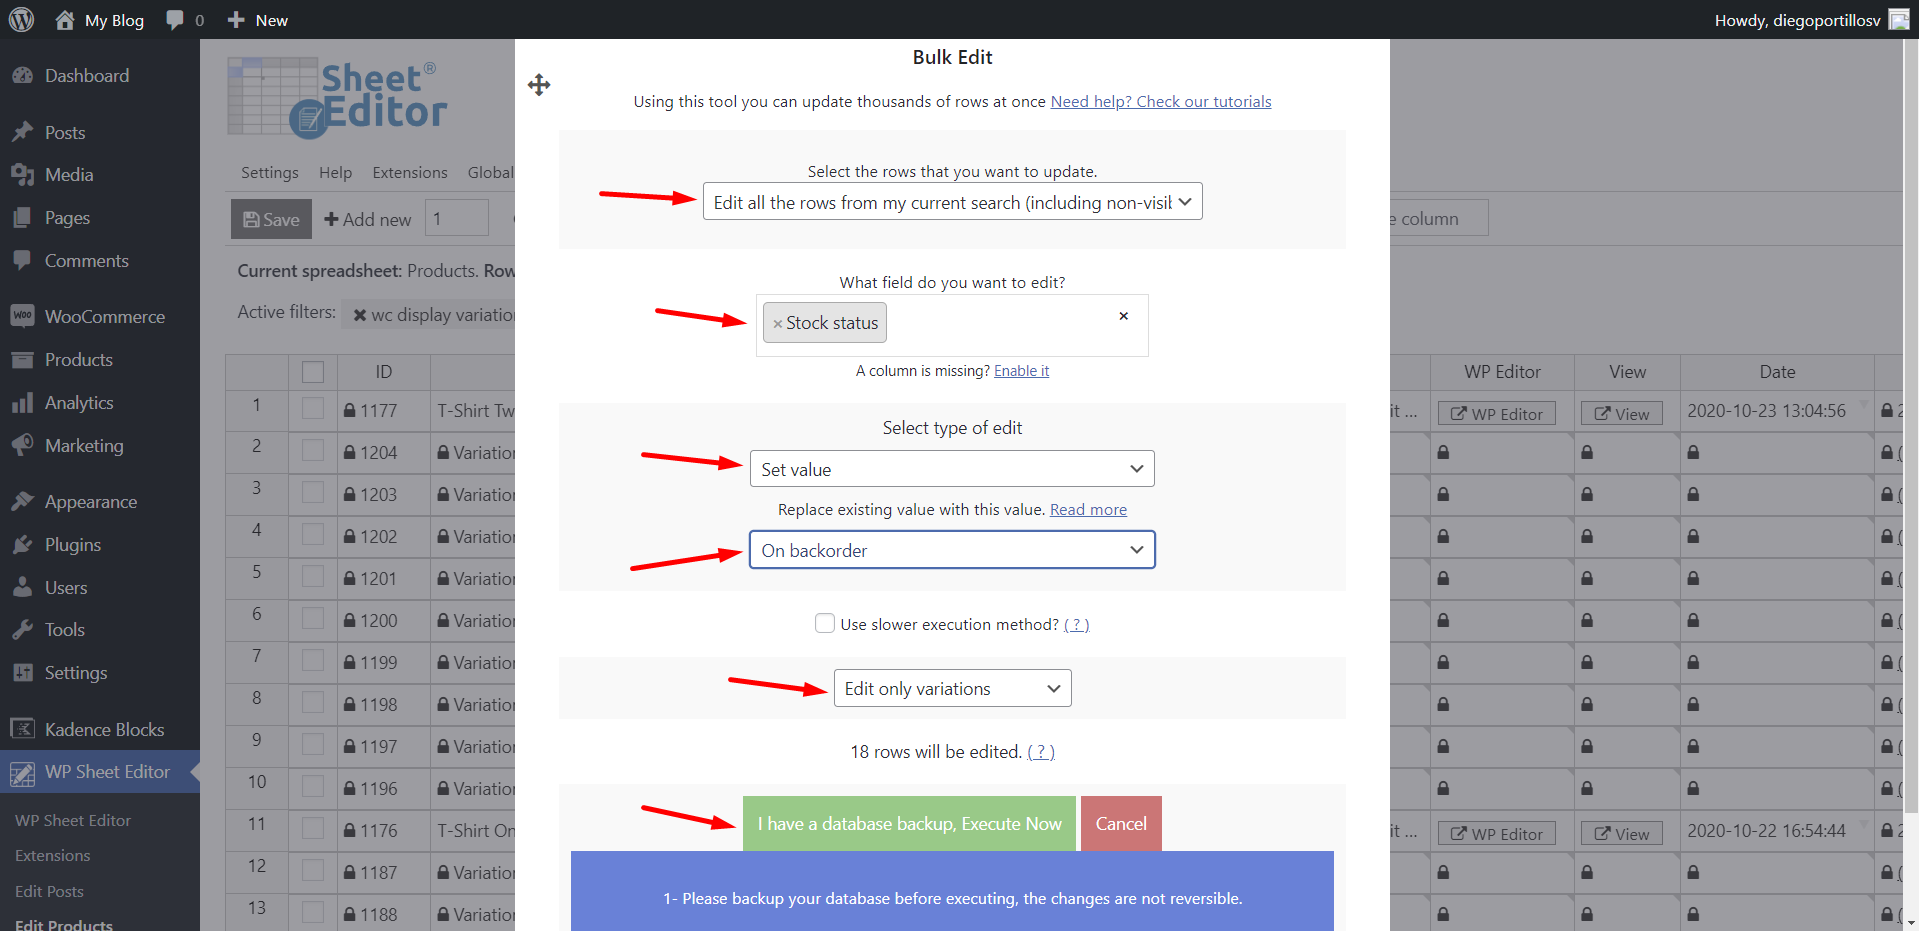
Moving variations from in stock to out of stock? Select these values in the variation bulk editor:
Stock status + Set value + Out of stock | In stock | On backorder + Edit only variations + Execute Now
Bulk deleting variations
After filtering or selecting the variaitons you want to remove, select these values to bulk delete them:
Status + Set value + Delete completely + Edit only variations + Execute Now.
Other bulk updates you can apply to your WooCommerce variations
With the Bulk Edit tool, you can also:
- Bulk edit variation descriptions
- Remove SKU from product variations
- Import variable products with variations from CSV
- Convert variations into main products
- Remove default attributes from variations
- Delete duplicate variations
How many WooCommerce variations can I bulk edit at once?
There is no hard limit. With WP Sheet Editor, you can bulk edit hundreds or thousands of variations in a single operation, whether you filter them with the Search tool first or select all the variations currently loaded in the spreadsheet.
Method 3: Using CSV Import and Export
To bulk edit variations via CSV files, you need to export variation data to CSV, edit in Excel or Google Sheets, and import the CSV file back to WooCommerce.
To export and manage the variations in the CSV file:
- Search/display variations in the spreadsheet.
- Open the Export tool in WP Sheet Editor.
- Configure the columns and rows you want to include in the CSV file.
- Make all the changes you want in the CSV.

Once you have made all the changes you need, you can bulk import the product variations back to WooCommerce using WP Sheet Editor:
Open the Import tool.

Select the CSV file you want to import.

Map the columns in the CSV to the fields in WP Sheet Editor (they will map automatically if the CSV was exported with WP Sheet Editor).

Match the existing rows in the CSV with the rows in WP Sheet Editor using the variation ID or SKU.
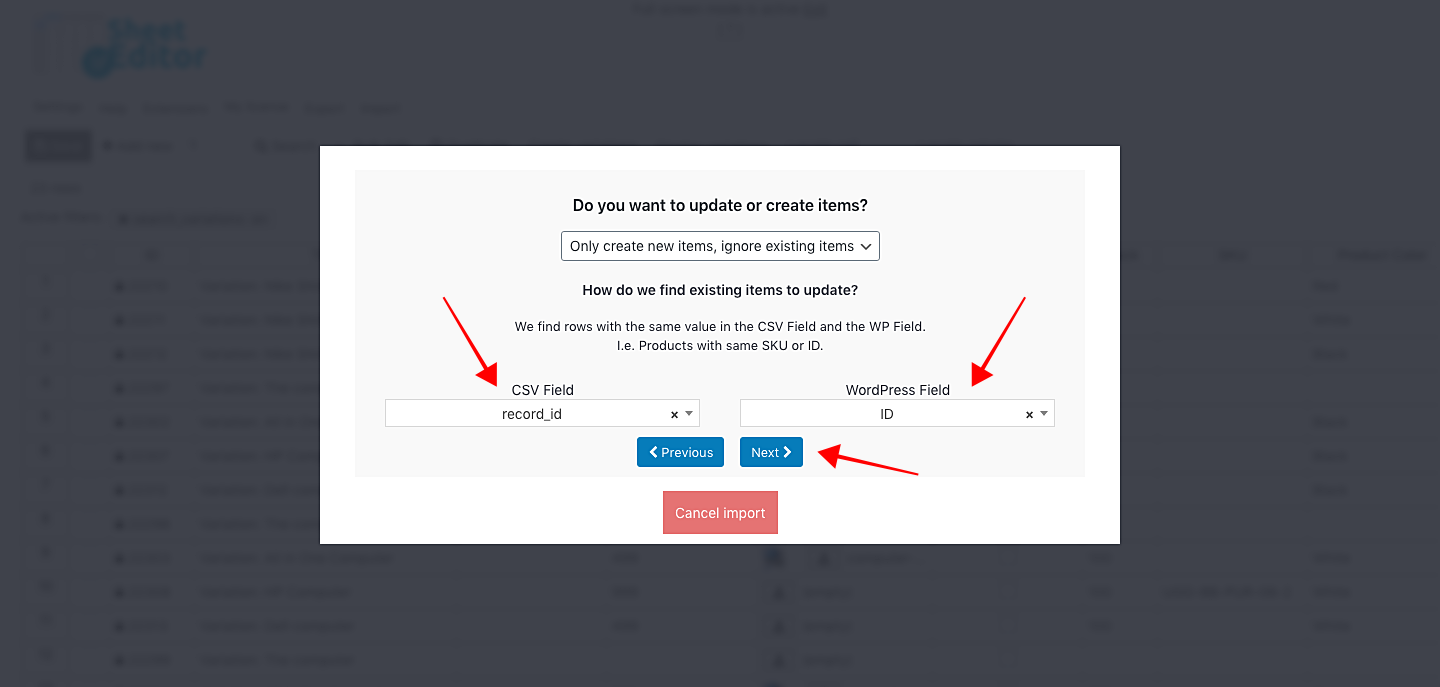
Run the import process to bulk update your variations via CSV file.

WooCommerce Bulk Edit Product Variations with WP Sheet Editor
With WP Sheet Editor – Products, you can filter, edit, export, and import variable products directly from your WordPress dashboard. The spreadsheet view lets you update product and variation prices, assign images, and manage stock levels without opening individual product pages one by one.
You can download the plugin here:
Download WooCommerce Products Spreadsheet Plugin - or - Check the features